How to Remove Activate Windows 11 Watermark Permanently?

Windows 11 is the newest operating system that everyone wishes to give a try. You might know that every operating system has a product key. It means that if you want to use all features of an operating system then you need to purchase a product or license key from its company. If we donʻt activate any operating system then we canʻt use the software on our own because we can use limited things unless we activate that. Therefore, I am going to show you How to Remove Activate Windows 11 Watermark Permanently?
You might have downloaded the free version of Windows 11, then it wonʻt be activated by default. Activate Windows watermark might have appeared at the right-bottom side of your desktop. This small watermark might be very annoying and will feel uncomfortable all the users. However, if you donʻt want to purchase its product key then donʻt worry we are having plenty of ways to Remove Activate Windows 11 Watermark Permanently.
Method 1: Activate Windows 11 Watermark
Step 1. First of all, you need to hold or press Win Key + R to open the dialogue box after that type in the search box Regedit then hit the Enter button.
Step 2. When the registry editor is launch then copy and paste this code in address bar Computer\HKEY_LOCAL_MACHINE\SOFTWARE\Microsoft\Windows NT\CurrentVersion\SoftwareProtectionPlatform\Activation
Step 3. Next, double-click on the Manual then changes the value data from 0 to 1 after that click on the Ok.
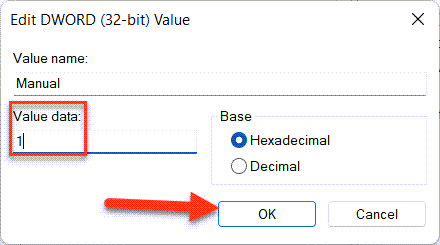 Click on the Ok
 Step 4. At last, tap on the Ok then close the registry after that restart your PC.
Method 2: Remove Activate Windows 11 Watermark From Notepad
Step 1. At first, press Windows + R to open the run box then go to the search bar after that type Notepad.exe then click on the Ok.
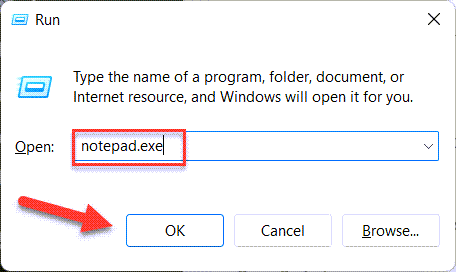 Click on the Ok
 Step 2. Copy this code the code is given are following:
@echo off taskkill /F /IM explorer.exe explorer.exe exit
Step 3. After that paste the code you have copied from above.
Step 4. Next, go to File from the menu then click on the Save.
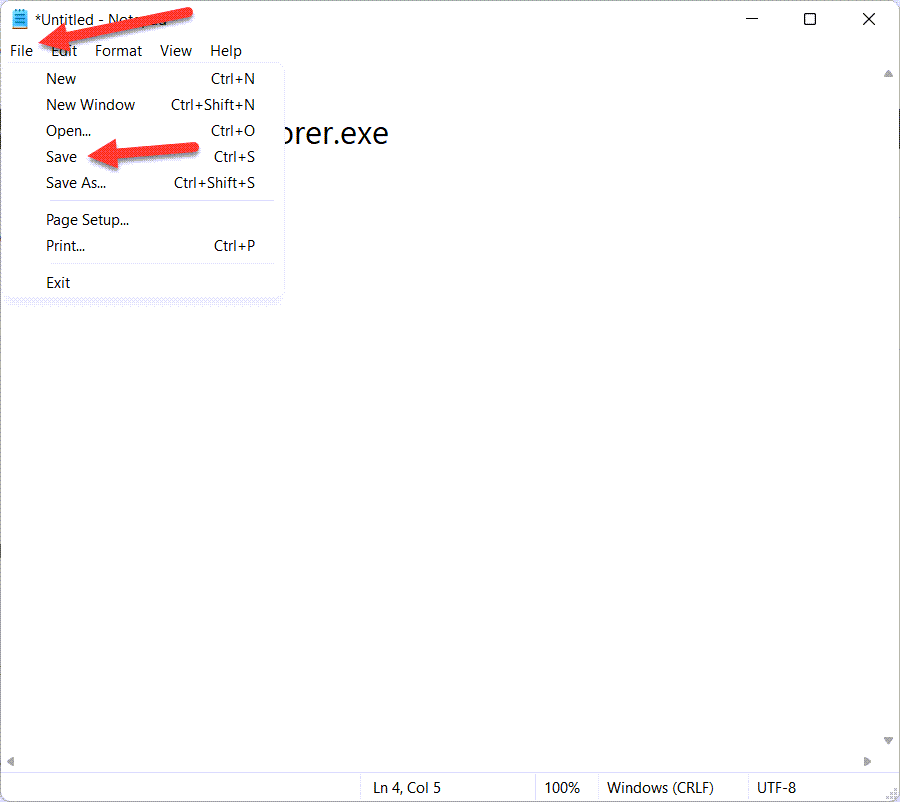 Click on the Save
 Step 5. Now, you need to save the file by the name of Remove.bat then click on the Save.
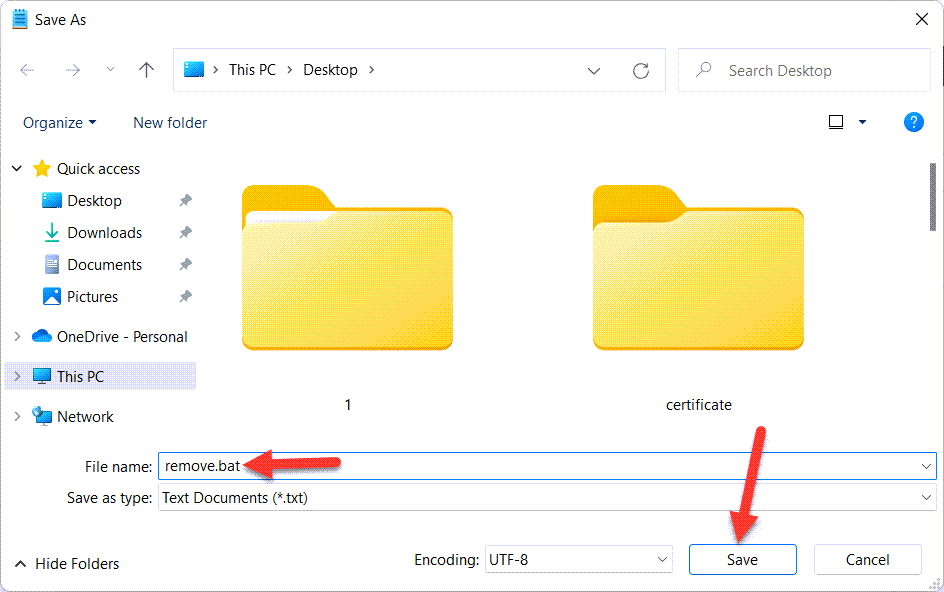 Click on the Save
 Step 6. In this step go to folder destination then right-click on the folder after that click on the Run As Administrator.
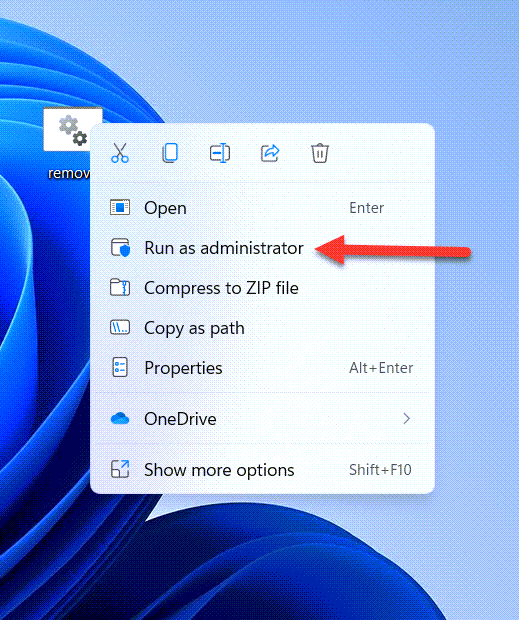 Click on the Run As Administrator
 Step 7. The activating will start then after a while it will activate.
Step 8. At last, restart your PC after that you are PC will activate.
Method 3: Activate your Windows 11 Watermark Parmenantly Using Settings
Step 1. Firstly, open the Settings from the Start menu.
Step 2. Head towards the Activation.
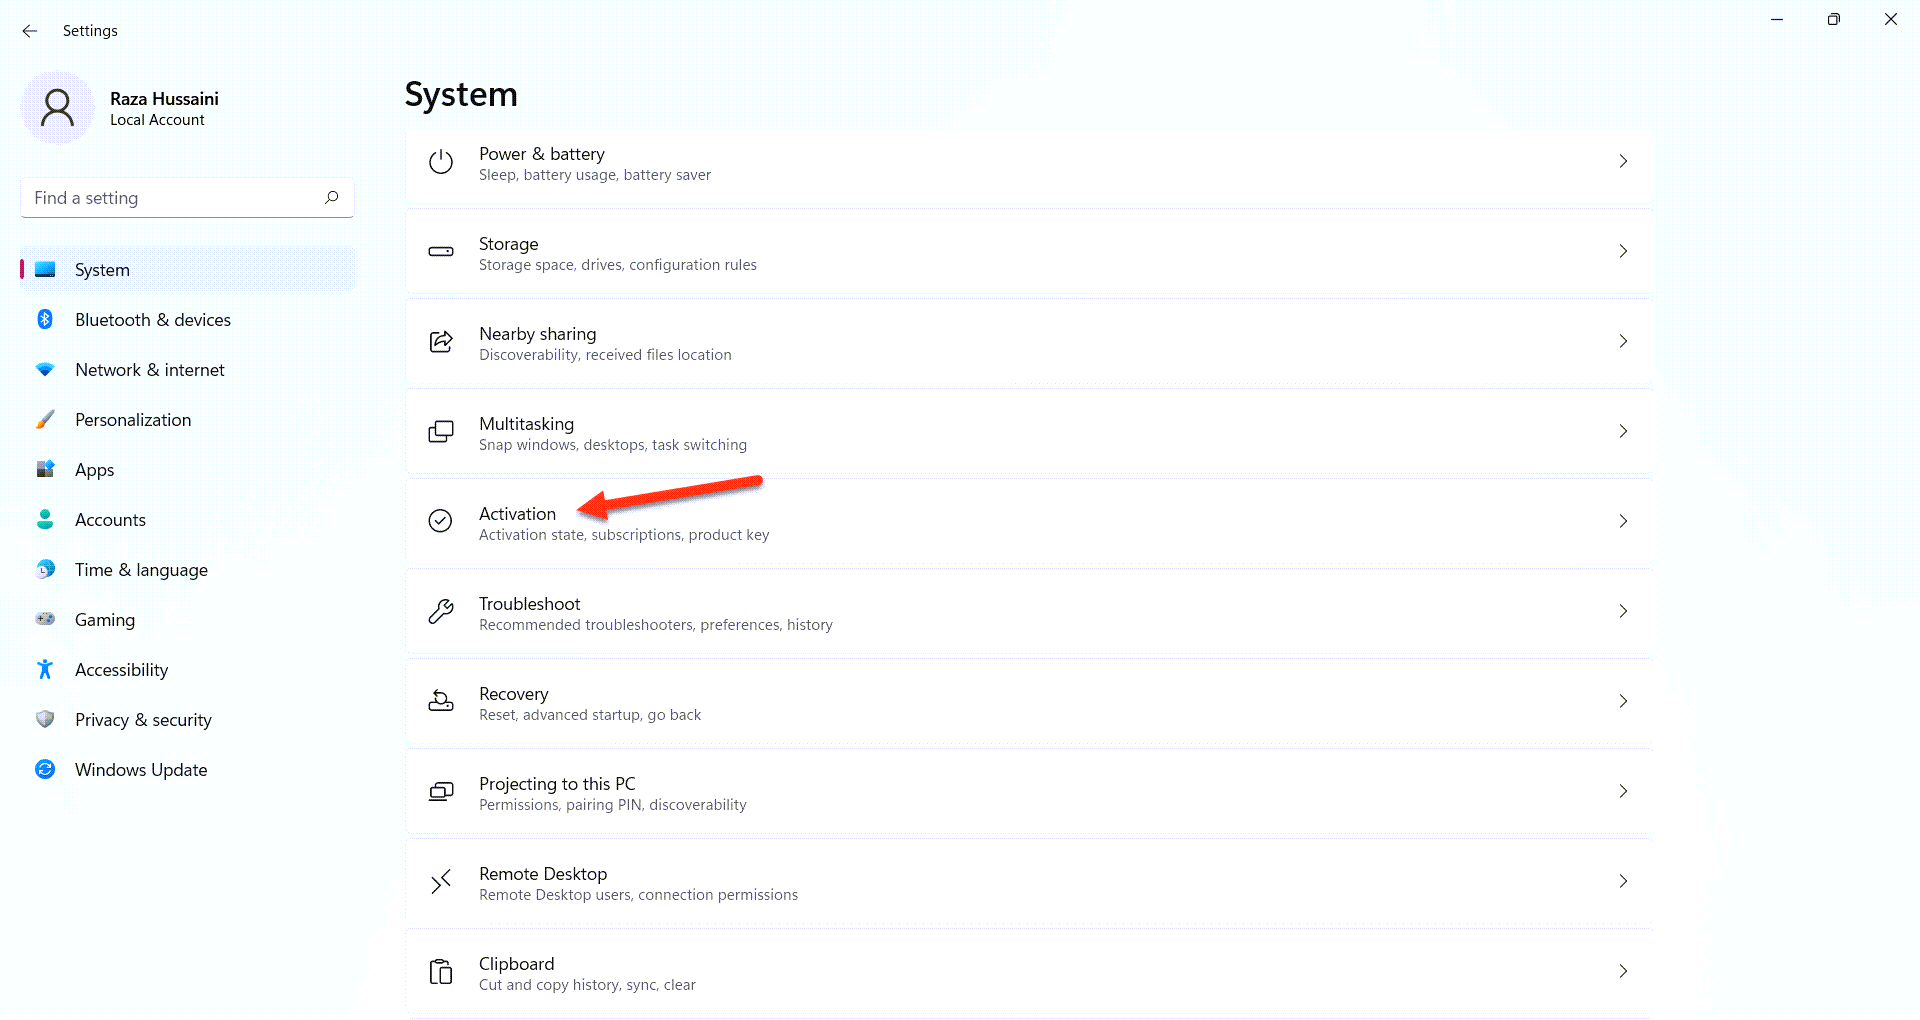 Activation
 Step 3. However, click on the Update Your Edition of windows to open the drop-down menu.
Step 4. Here, tap on the Change in the section of a change product key.
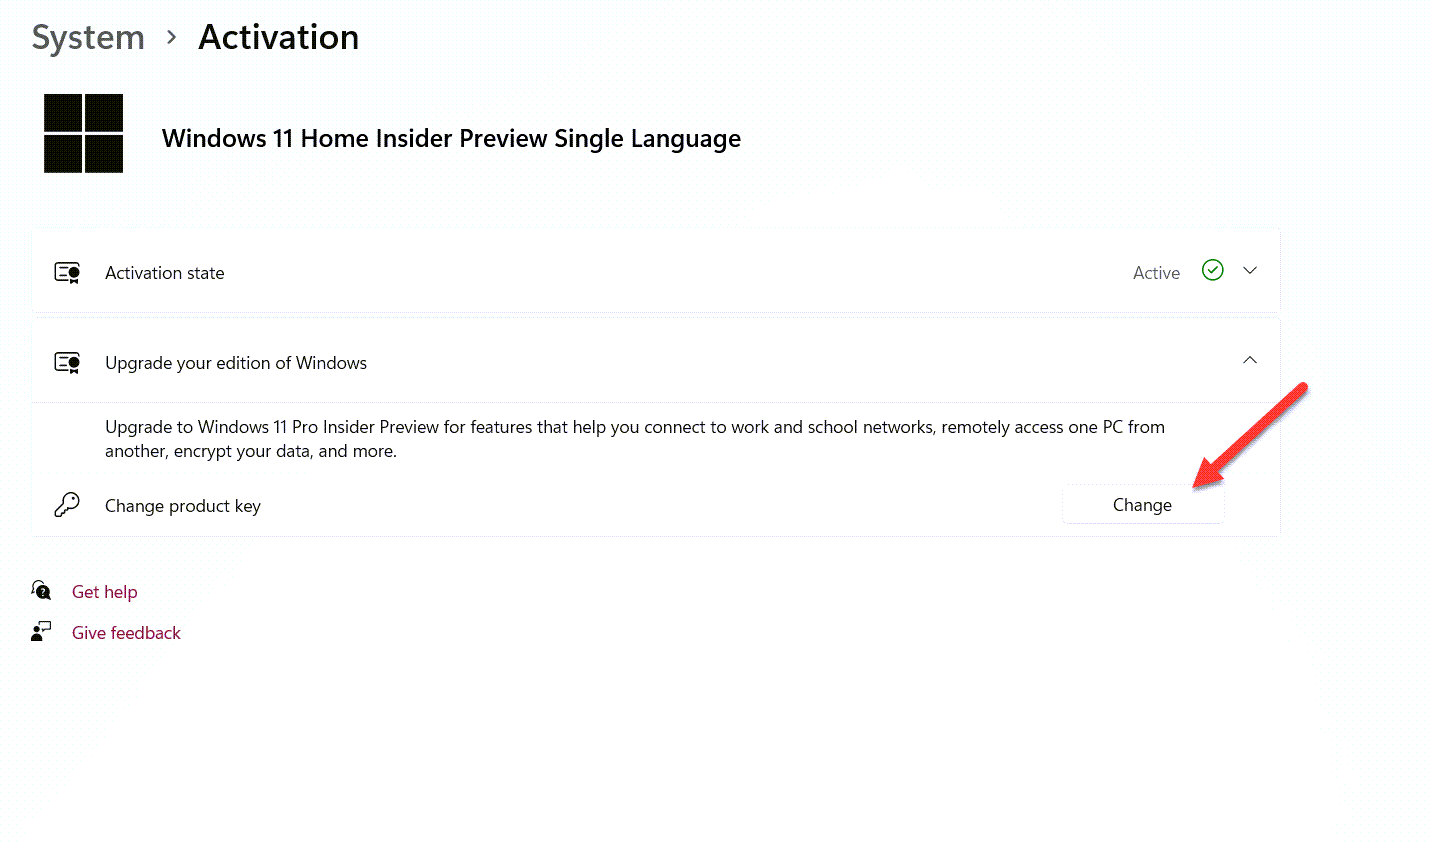 Tap on the Change
 Step 5. Lastly, type the new product key to activate your Windows.
Bottom Line
It was all about to How to Remove Activate Windows 11 Watermark Permanently? I hope this article is very helpful for you to remove activate the watermark. From this, you will get something good. This is the right place where you can easily solve your problem. After following these steps I hope you will not face any kind of problem. If you faced any kind of problem and if you have any type of suggestions then do comment.
Related Posts:
Tagged
Share This Article
Windows 11 is the newest operating system that everyone wishes to give a try. You might know that every operating system has a product key. It means that if you want to use all features of an operating system then you need to purchase a product or license key from its company. If we donʻt activate any operating system then we canʻt use the software on our own because we can use limited things unless we activate that. Therefore, I am going to show you How to Remove Activate Windows 11 Watermark Permanently?
You might have downloaded the free version of Windows 11, then it wonʻt be activated by default. Activate Windows watermark might have appeared at the right-bottom side of your desktop. This small watermark might be very annoying and will feel uncomfortable all the users. However, if you donʻt want to purchase its product key then donʻt worry we are having plenty of ways to Remove Activate Windows 11 Watermark Permanently.
Method 1: Activate Windows 11 Watermark
Step 1. First of all, you need to hold or press Win Key + R to open the dialogue box after that type in the search box Regedit then hit the Enter button.
Step 2. When the registry editor is launch then copy and paste this code in address bar Computer\HKEY_LOCAL_MACHINE\SOFTWARE\Microsoft\Windows NT\CurrentVersion\SoftwareProtectionPlatform\Activation
Step 3. Next, double-click on the Manual then changes the value data from 0 to 1 after that click on the Ok.
 Click on the Ok
 Step 4. At last, tap on the Ok then close the registry after that restart your PC.
Method 2: Remove Activate Windows 11 Watermark From Notepad
Step 1. At first, press Windows + R to open the run box then go to the search bar after that type Notepad.exe then click on the Ok.
 Click on the Ok
 Step 2. Copy this code the code is given are following:
@echo off taskkill /F /IM explorer.exe explorer.exe exit
Step 3. After that paste the code you have copied from above.
Step 4. Next, go to File from the menu then click on the Save.
 Click on the Save
 Step 5. Now, you need to save the file by the name of Remove.bat then click on the Save.
 Click on the Save
 Step 6. In this step go to folder destination then right-click on the folder after that click on the Run As Administrator.
 Click on the Run As Administrator
 Step 7. The activating will start then after a while it will activate.
Step 8. At last, restart your PC after that you are PC will activate.
Method 3: Activate your Windows 11 Watermark Parmenantly Using Settings
Step 1. Firstly, open the Settings from the Start menu.
Step 2. Head towards the Activation.
 Activation
 Step 3. However, click on the Update Your Edition of windows to open the drop-down menu.
Step 4. Here, tap on the Change in the section of a change product key.
 Tap on the Change
 Step 5. Lastly, type the new product key to activate your Windows.
Bottom Line
It was all about to How to Remove Activate Windows 11 Watermark Permanently? I hope this article is very helpful for you to remove activate the watermark. From this, you will get something good. This is the right place where you can easily solve your problem. After following these steps I hope you will not face any kind of problem. If you faced any kind of problem and if you have any type of suggestions then do comment.
Related Posts:


