12 Windows 11 Tips and Tricks To Make Your PC Awesome!

Have you recently installed the most recent Microsoft Windows version? Excited about its new features? If so, you might wonder how to use Windows 11’s new features and customization options. Fortunately, we’ve got you covered with 15 fantastic Windows 11 tips and tricks that will make your PC a lot simpler for you to use and give it a more modern look.
We are going to share many tips to help you organise your work and give your PC an updated look. From changing your desktop backdrop to virtual desktops, you will be amazed to see these little-known techniques.
So get ready to explore these 12 awesome Windows 11 tips and tricks to enhance your Windows experience!
What You Need To Do Before Trying Out Windows 11 Tips and Tricks?
Number 1. Perform Windows 11 Compatibility Check
Obviously, if you are looking for Windows 11 tips and tricks, you have probably upgraded to Windows 11. However, some of you are still using Windows 10 and are looking forward to giving Windows 11 a try. For that purpose, first, you need to perform Windows 11 compatibility check according to your PC or laptop. It includes checking your system’s hardware and model to see if it meets the Windows 11 requirements. Windows 11 update is currently available to fewer devices compared to Windows 10.
Number 2. Check For Windows 11 Update – Latest Version
You must have heard about Microsoft’s free Windows 11 update option for eligible Windows 10 devices. If your device fulfils the Windows 11 requirements, you can upgrade to Windows 11 anytime. Moreover, for users already using Windows 11, look for updates that Microsoft rolls out annually. This way, you can access all the latest Windows 11 features.
12 Little Known Windows 11 Tips And Tricks That Will Surprise You!
From multitasking capability settings to hidden settings of game mode, you’ll learn how to customize and optimize your Windows 11 experience in ways you never thought possible.
Without wasting any time, let’s uncover the hidden gems of Windows 11!
Easy Multitasking With Snap Layouts and Snap Groups
One of the most impressive features of Windows 11 is its enhanced multitasking capabilities, thanks to the introduction of Snap Layouts and Snap Groups. With Snap Layouts, you can quickly and easily snap your windows to predefined layouts that help you organize your screen space more efficiently. And with Snap Groups, you can save and restore sets of snapped windows, allowing you to switch between tasks and workflows with ease. 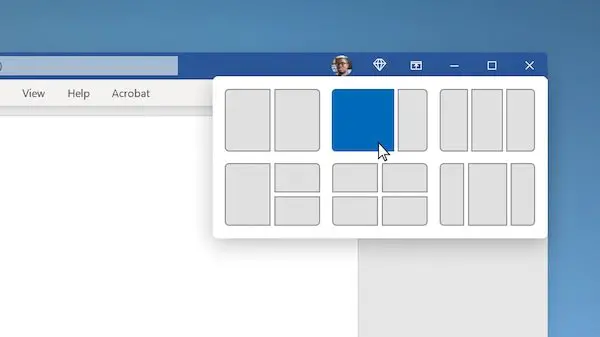
To use Snap Layouts, simply drag a window to the edge or corner of your screen until you see the layout options appear. Then, choose the layout that works best for your needs, and your window will automatically snap into place. To use Snap Groups, simply snap your windows into a group, give the group a name, and save it for future use. You can then restore the group by clicking on its name in the taskbar.
These new features not only make multitasking easier and more efficient but can also help you stay focused and productive throughout your workday. So, give them a try and see how they can improve your Windows 11 experience!
Give Your Taskbar and Start Menu A Modern Look
Another excellent feature in Windows 11 that people rarely use in the taskbar customization. You can try several different customization options for your taskbar to suit your style of working.
All you have to do is make a right-click on the taskbar and choose “Taskbar settings” You can modify the taskbar’s alignment, icon size, and whether or not to display taskbar buttons for all open windows here. Yes, you can also hide the task bar. For example, you can change the location of your taskbar from a boring bottom location to the top. 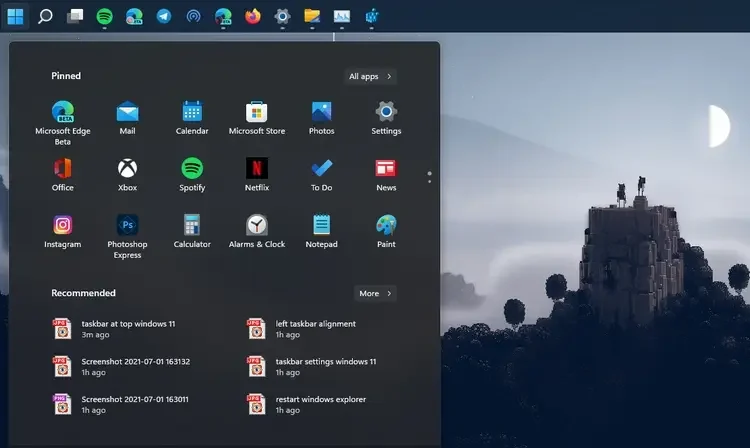
You can also customise your taskbar and start menu by using the Windows 11 personalization settings. You can find these by right-clicking on your desktop and choosing “Personalize.” From here, you can select a different theme, modify your background picture, along with a lot more.
These changes might seem small, but they can significantly alter the way Windows 11 looks and feels.
Create Different Workspaces For Different Tasks: Virtual Desktops
The best thing about Windows 11 features is that they are focused oriented. You don’t have to juggle between multiple windows and applications on your screen all the time. Windows 11 provides several options to stay organised and focused while working. And, Virtual Desktops is one of them!
Virtual Desktops in Windows 11 allows you to create different workspaces for different tasks. This way, you can easily switch between them easily and keep your work organized. 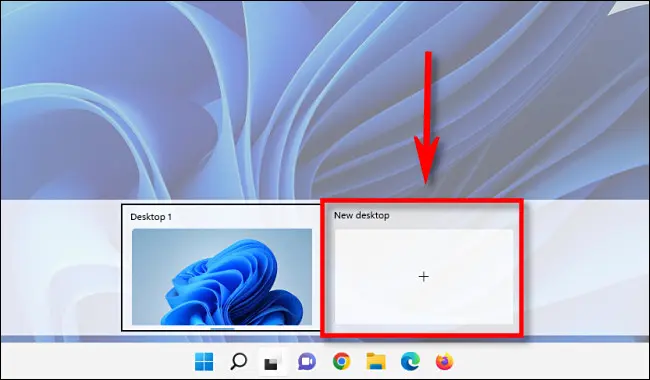
Here’s how you can create Virtual Desktops in Windows 11.
- Click on the “Task view” button in the taskbar or press Windows key + Tab to create a virtual desktop.
- You can also make a new workspace by choosing “New desktop” option from there.
- You can easily switch between your created desktops by clicking on them in the task view or by using the keyboard shortcut Windows key + Ctrl + Left/Right arrow.
The Virtual Desktops feature in Windows 11 is a fantastic tool for boosting productivity and maintaining things in order. Now, it’s simple to organise your various tasks and switch between them. Without any distractions or breaks in focus, you can work efficiently. In this manner, you can work more effectively and without stress by working smarter rather than harder.
Instant Searching With PowerToys Run
Have you ever faced the issue of not finding an old file or where did you save it? Finding an old saved file or program always takes some time. Specially, if you don’t know or forgot the location. You need to suffer a long searching procedure to find that specific file. This why, several Windows 11 users prefer PowerToys Run as it can save their precious time.
PowerToys Run is an additional utility tool provided by Microsoft. It is a fast launcher with some extra features for users without sacrificing performance. You can quickly search for and launch files, programs, and even websites using this Windows 11 tool. PowerToys Run is very simple to install. 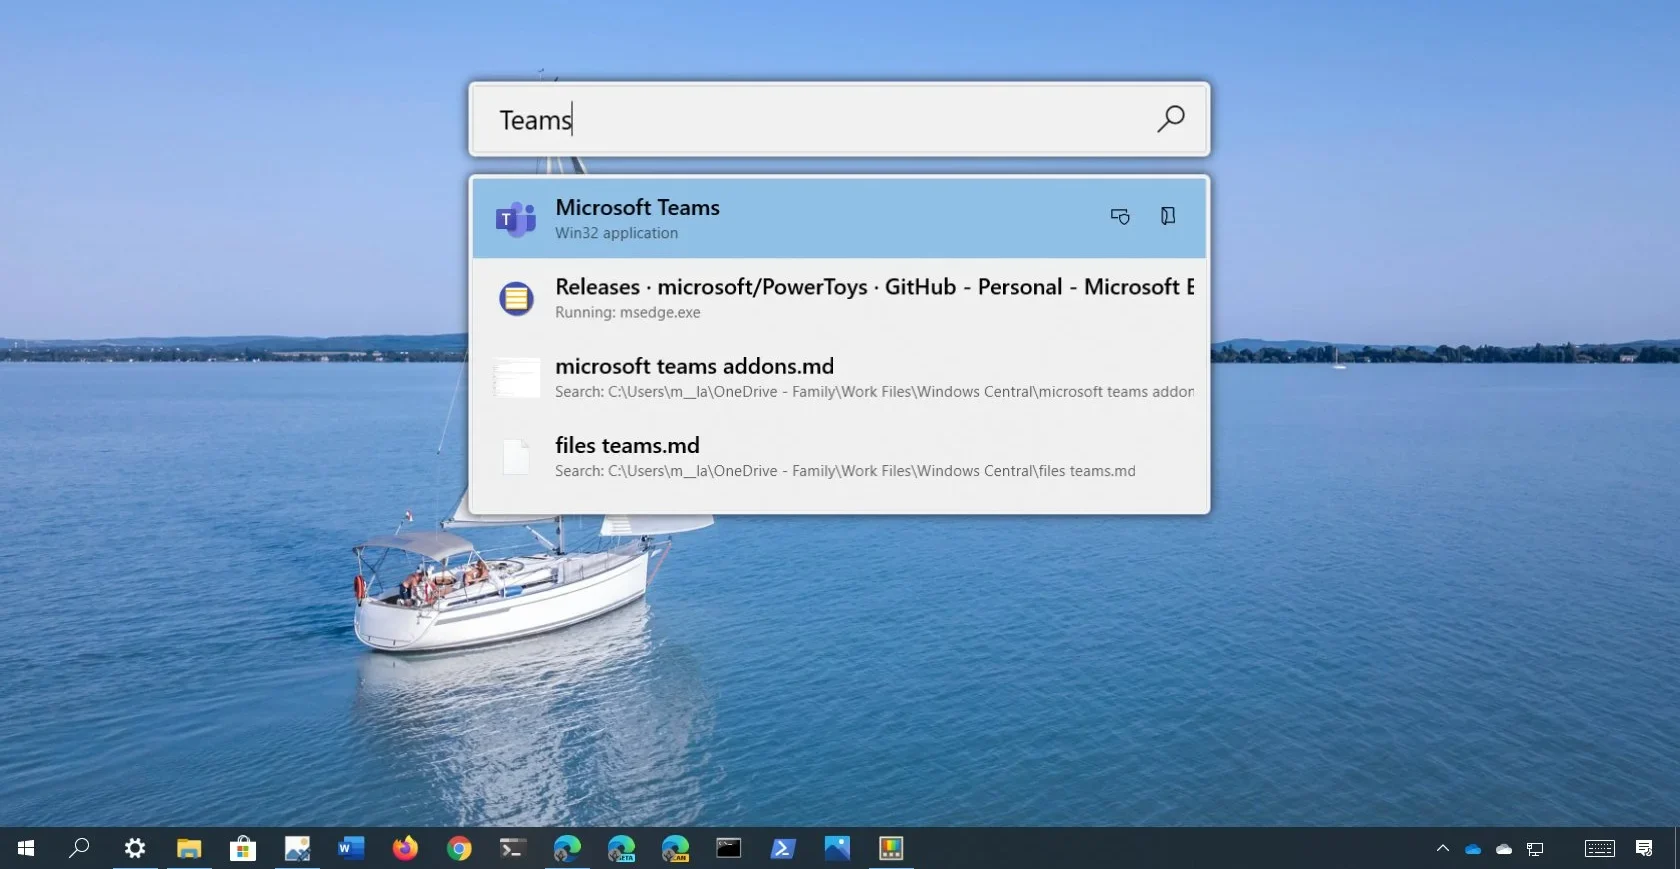
Here’s how to do it!
- Go the Microsoft Official Website and download PowerToys Run.
- Once the downloading finished, install the program and launch it.
- You will see a search box appear at your screen.
- Once you have PowerToys Run successfully install and running, you can also access it by pressing Alt + Space.
- Simply start typing what you’re looking for, and PowerToys Run will instantly search it for you.
Note: You can also customize PowerToys Run as you like. You can add options like changing the search engine or adding your own custom keywords.
Personalize Your Lock Screen With Your Own Photos
Personalizing your lock and home screen is a great way to add a personal touch to your computer and make it feel more like yours. There’s an option in Windows 11 to choose lock screen image from your own photos. You can even use the built-in Bing images to change up your lock screen on a regular basis. It will keep things fresh and give it a more personal look. 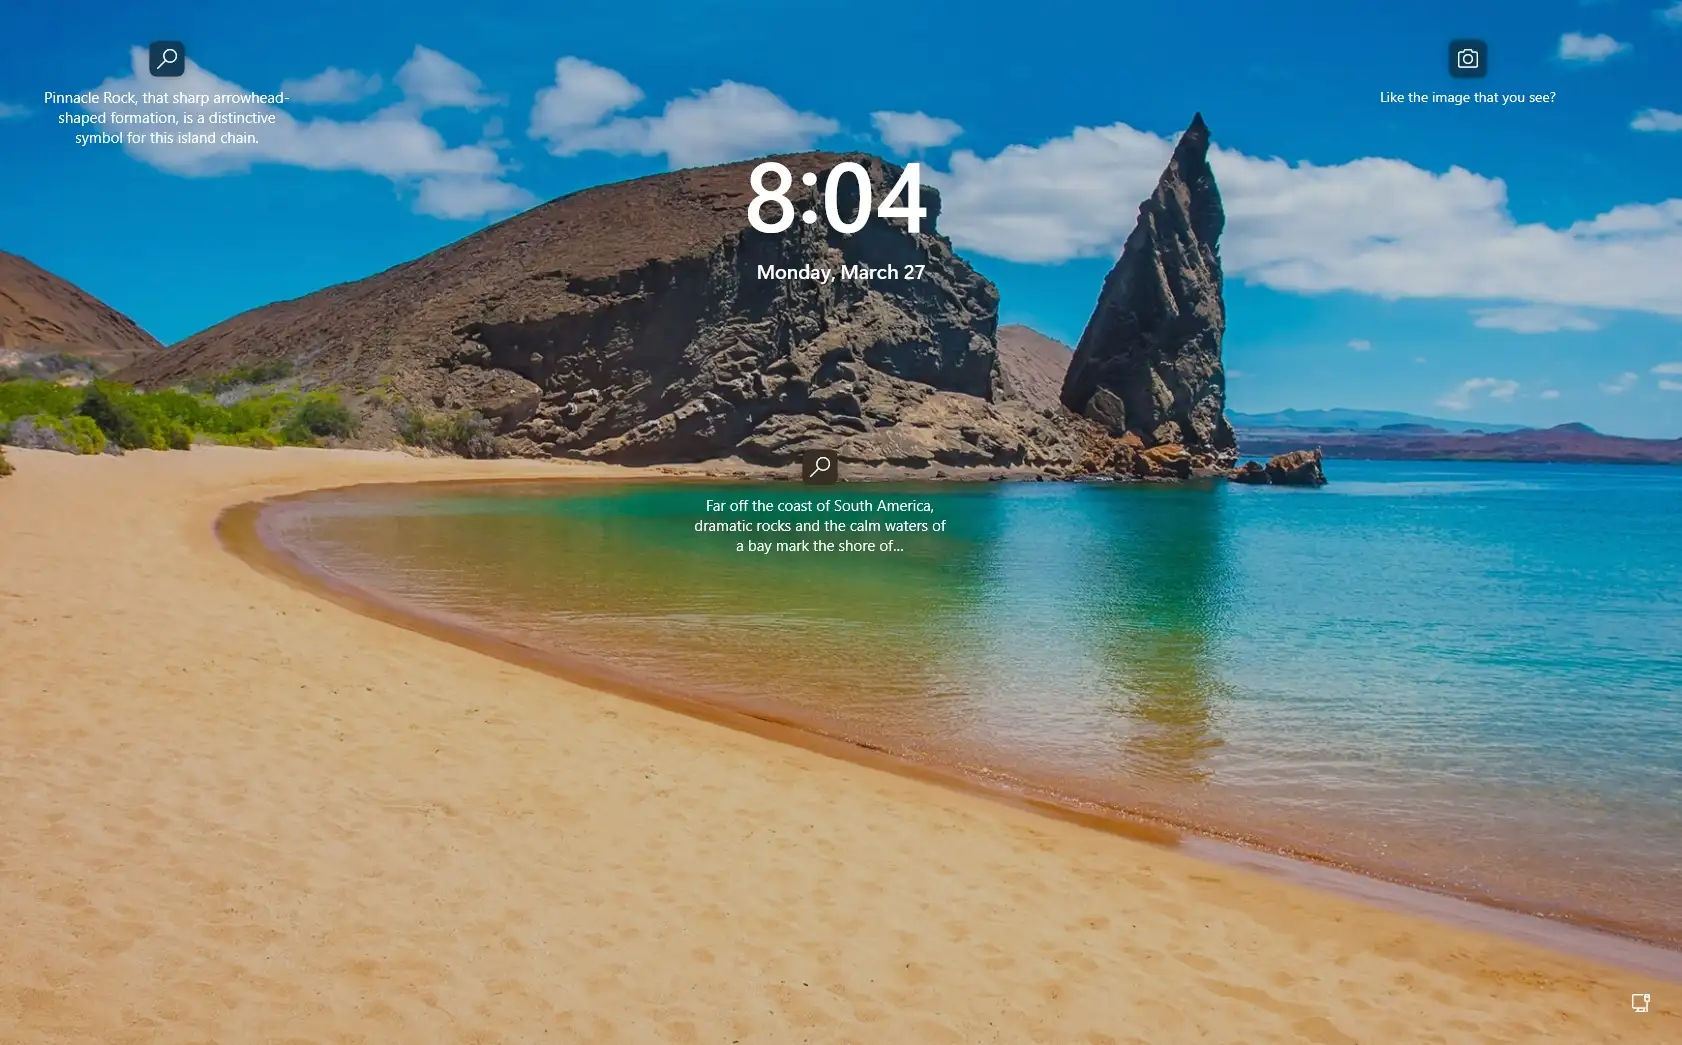
You can change your lock screen by simply following these steps.
- Navigate to Settings and go to Personalization.
- Click on Lock screen, and choose “Background” under “Choose your picture” option.
- There you will an option to select a photo from your own collection or choose from the selection of built-in images.
Dynamic Wallpapers For A Fresh Look All Day
Windows 11 provides a wide library of dynamic or live wallpapers to give your PC a new and fresh look every day. These pre-made dynamic wallpapers include appealing graphics of landscapes and amazing colorful images. You can also choose your own custom dynamic wallpaper using a third-party app. 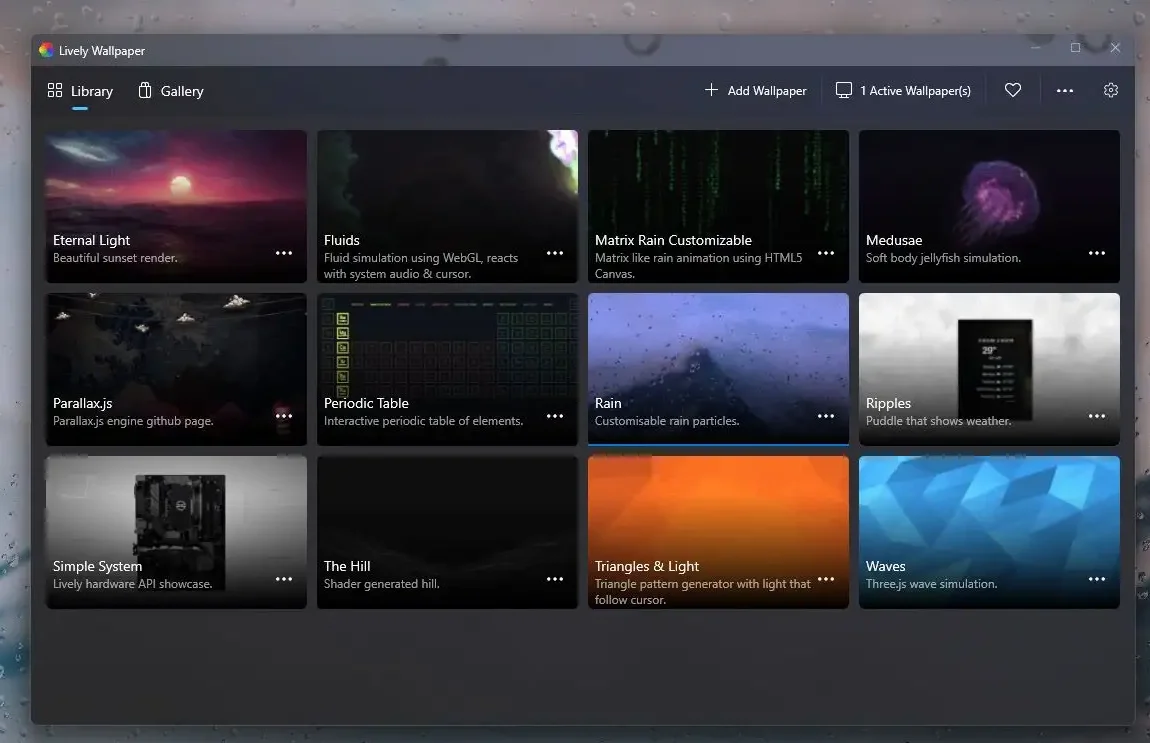
Here’s how you can adjust dynamic wallpapers on your Windows 11 PC.
- For pre-made dynamic live wallpapers. Right-click on your desktop and select “Personalize“.
- Now, select “Background” and choose “Dynamic” from the drop-down menu.
- Apply the changes after browsing and choosing the wallpapers of your liking.
- Now, your wallpapers will keep on changing after some interval and they will feel more dynamic giving you a more fresh feel.
Note: You can also create your own dynamic wallpapers using other apps and websites like Wallpaper Engine and more.
Setting live dynamic wallpapers can give your daily tasks some energy and keep you motivated and focused all day. Additionally, with so many options available, it’s simple to find a dynamic wallpaper that suits your preferences and personal style.
File Explorer For Maximum Efficiency
File Explorer is an amazing tools in Windows 11. Unfortunately, very few users knows or utilise its full potential. There are several features within file explorer that can help you manage and organise your files in a breeze. 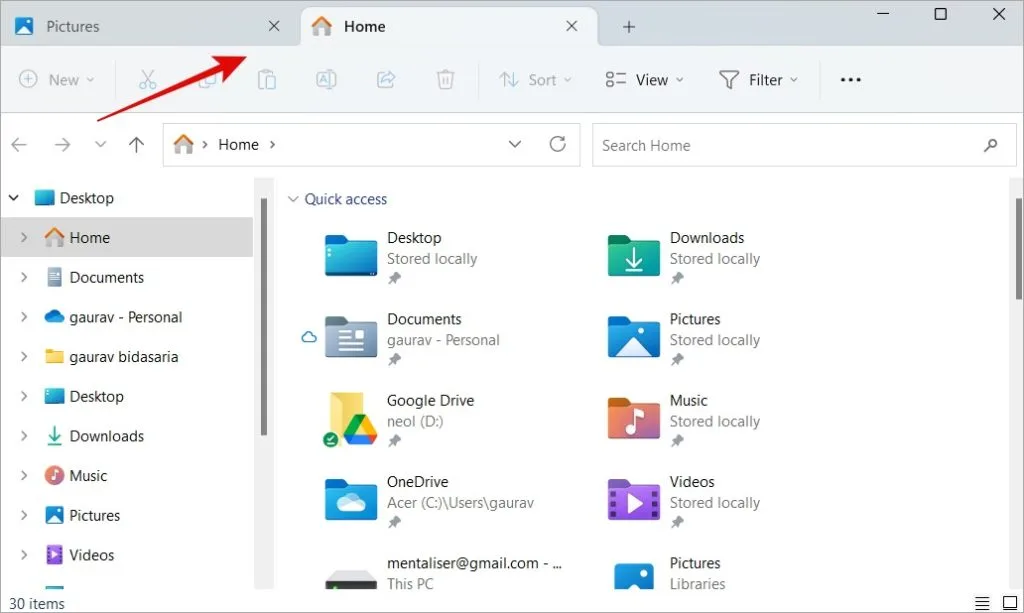
Here’re some way to use Windows 11 File Explorer effectively.
- For instance, you can easily access frequently used folders by pin them to the top of the File Explorer window using the Quick Access function.
- By entering keywords or phrases, you can also utilise the Search bar to locate particular files or folders quickly.
- The Ribbon menu also allows you to change how your files and folders are displayed and access frequently used features like Copy, Cut, and Paste.
- Another useful option is the Preview pane, which enables you to examine a preview of your files without even opening them.
Simply click the folder icon on the taskbar to open File Explorer, or look up “File Explorer” in the Start menu. You can easily navigate through your files and folders from thereon.
Change The Way You Receive Your Notifications
Have you ever been working on something important when a notification popped up on your screen? This issue has a solution in Windows 11 thanks to its customizable notification feature. Now that you can choose how your notifications are shown, you can get them without interfering with your work. 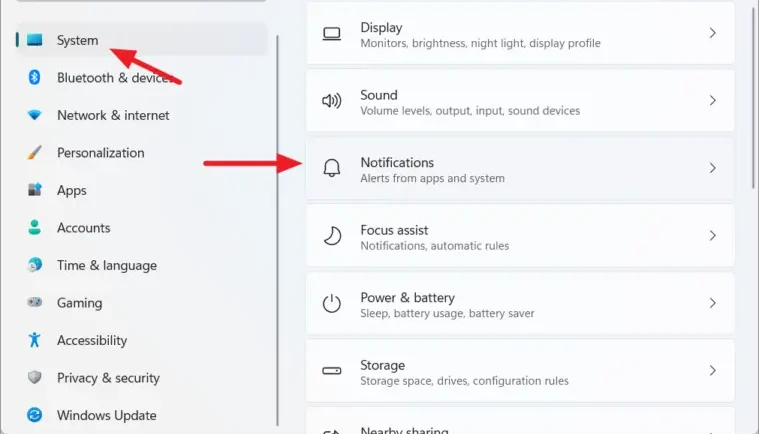
Here’s how you can customize your notification settings.
- Open Settings and then navigate to System. From there open Notifications option.
- Now, you can set how notifications are displayed on your screen. You can also set the length of time they appear on your screen and whether they will create sound when received.
- You can also allow and disallow the apps to send you notifications from settings.
This amazingly helpful feature of Windows 11 ensures that you don’t ever miss out the most important notifications. You can also choose how they are displayed so that it won’t interrupt your work. This can lead to increased productivity and less distraction.
Dark Mode For A Smooth Viewing Experience
Among all other Windows 11 tips and tricks, this technique is extremely useful for users who spend a lot of time in front of screen. At times, you may found yourself straining your eyes while using computer in a long session, especially during nighttime. You can get rid of that issue by enabling Dark Mode in Windows 11. It can provide a more comfortable viewing experience. 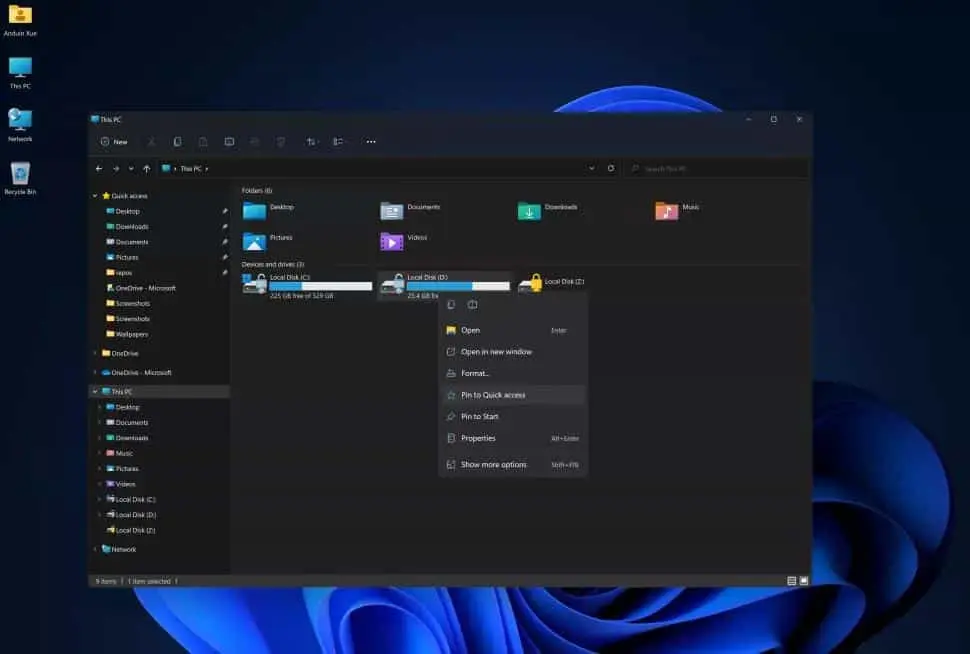
It’s super easy to enable Dark Mode in Windows 11.
You can enable Dark Mode through the Settings app or use the Quick Settings toggle in the Action Center. From Settings, Select Colors under Personalization. Choose Custom from the options available under “Choose your mode” From there, Choose Light or Dark.
Once it is enabled and applied the changed, you’ll immediately notice a change in the overall look and feel of your device, with black or dark gray backgrounds replacing the usual bright white.
In addition to providing a comfortable viewing experience, Dark Mode has other significant advantages like lowering eye strain and extending battery life on devices with OLED screens. Additionally, it gives your device a sleek, modern look that is ideal for those who favour a minimalist style.
Add Widgets To Stay Up To Date
Some people try to avoid widgets as they take some space on their screen. However, widgets in Windows 11 can be a great way to stay updated and get news about weather and recent events. With the help of widgets, you can have the easy access to all the information you need. 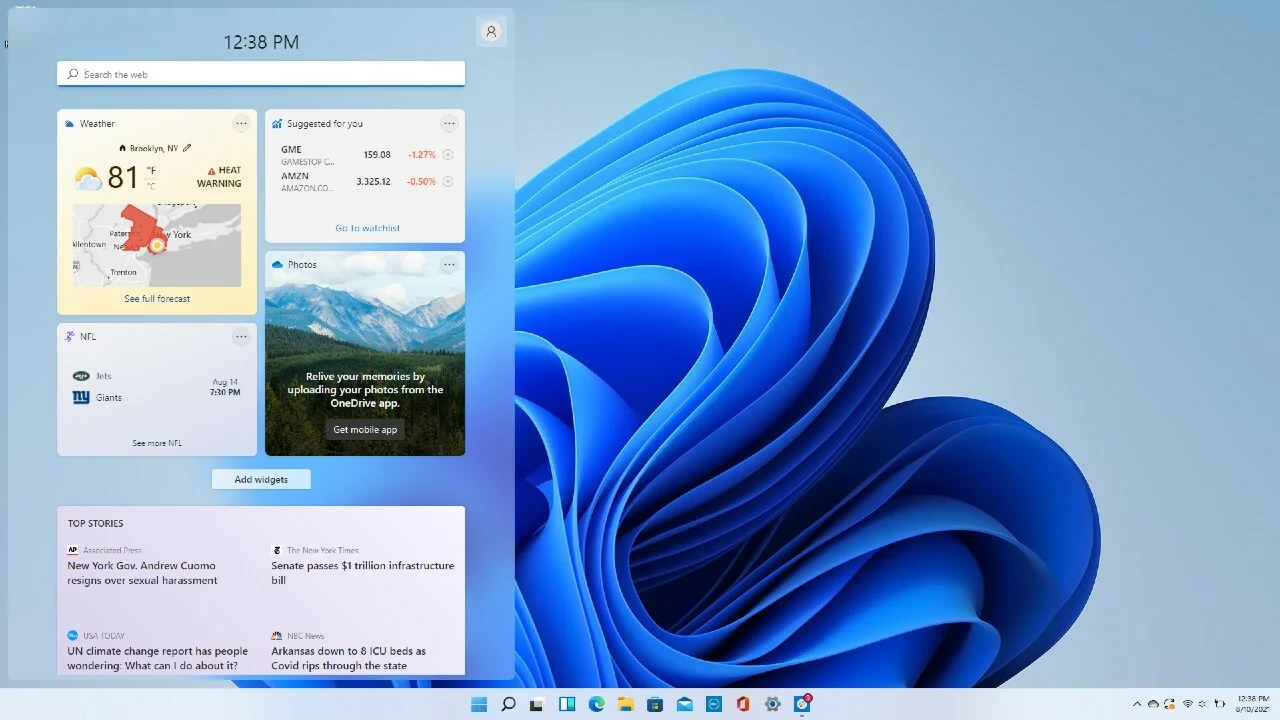
It’s easy to add and set up widgets on your Windows 11 PC. A panel will show up on the left side of your screen when you click the Widgets icon in the taskbar. The weather, news, calendar, and other widgets are available here for your selection.
Widgets don’t simply help you to save time by reducing the need to constantly move between apps; they also let you customise your desktop and keep the data that matters to you the most. Additionally, you can customise the widget sizes and places on your desktop to suit your personal preferences.
Efficient Use Of Task Manager
It’s no wonder that an average Windows 11 user doesn’t know about the potential of task manager. Your system operations and programs can be efficiently managed with the help of a task manager. Task Manager has seen many modifications since Windows 11’s debut, enhancing both its efficiency and its ease of use. 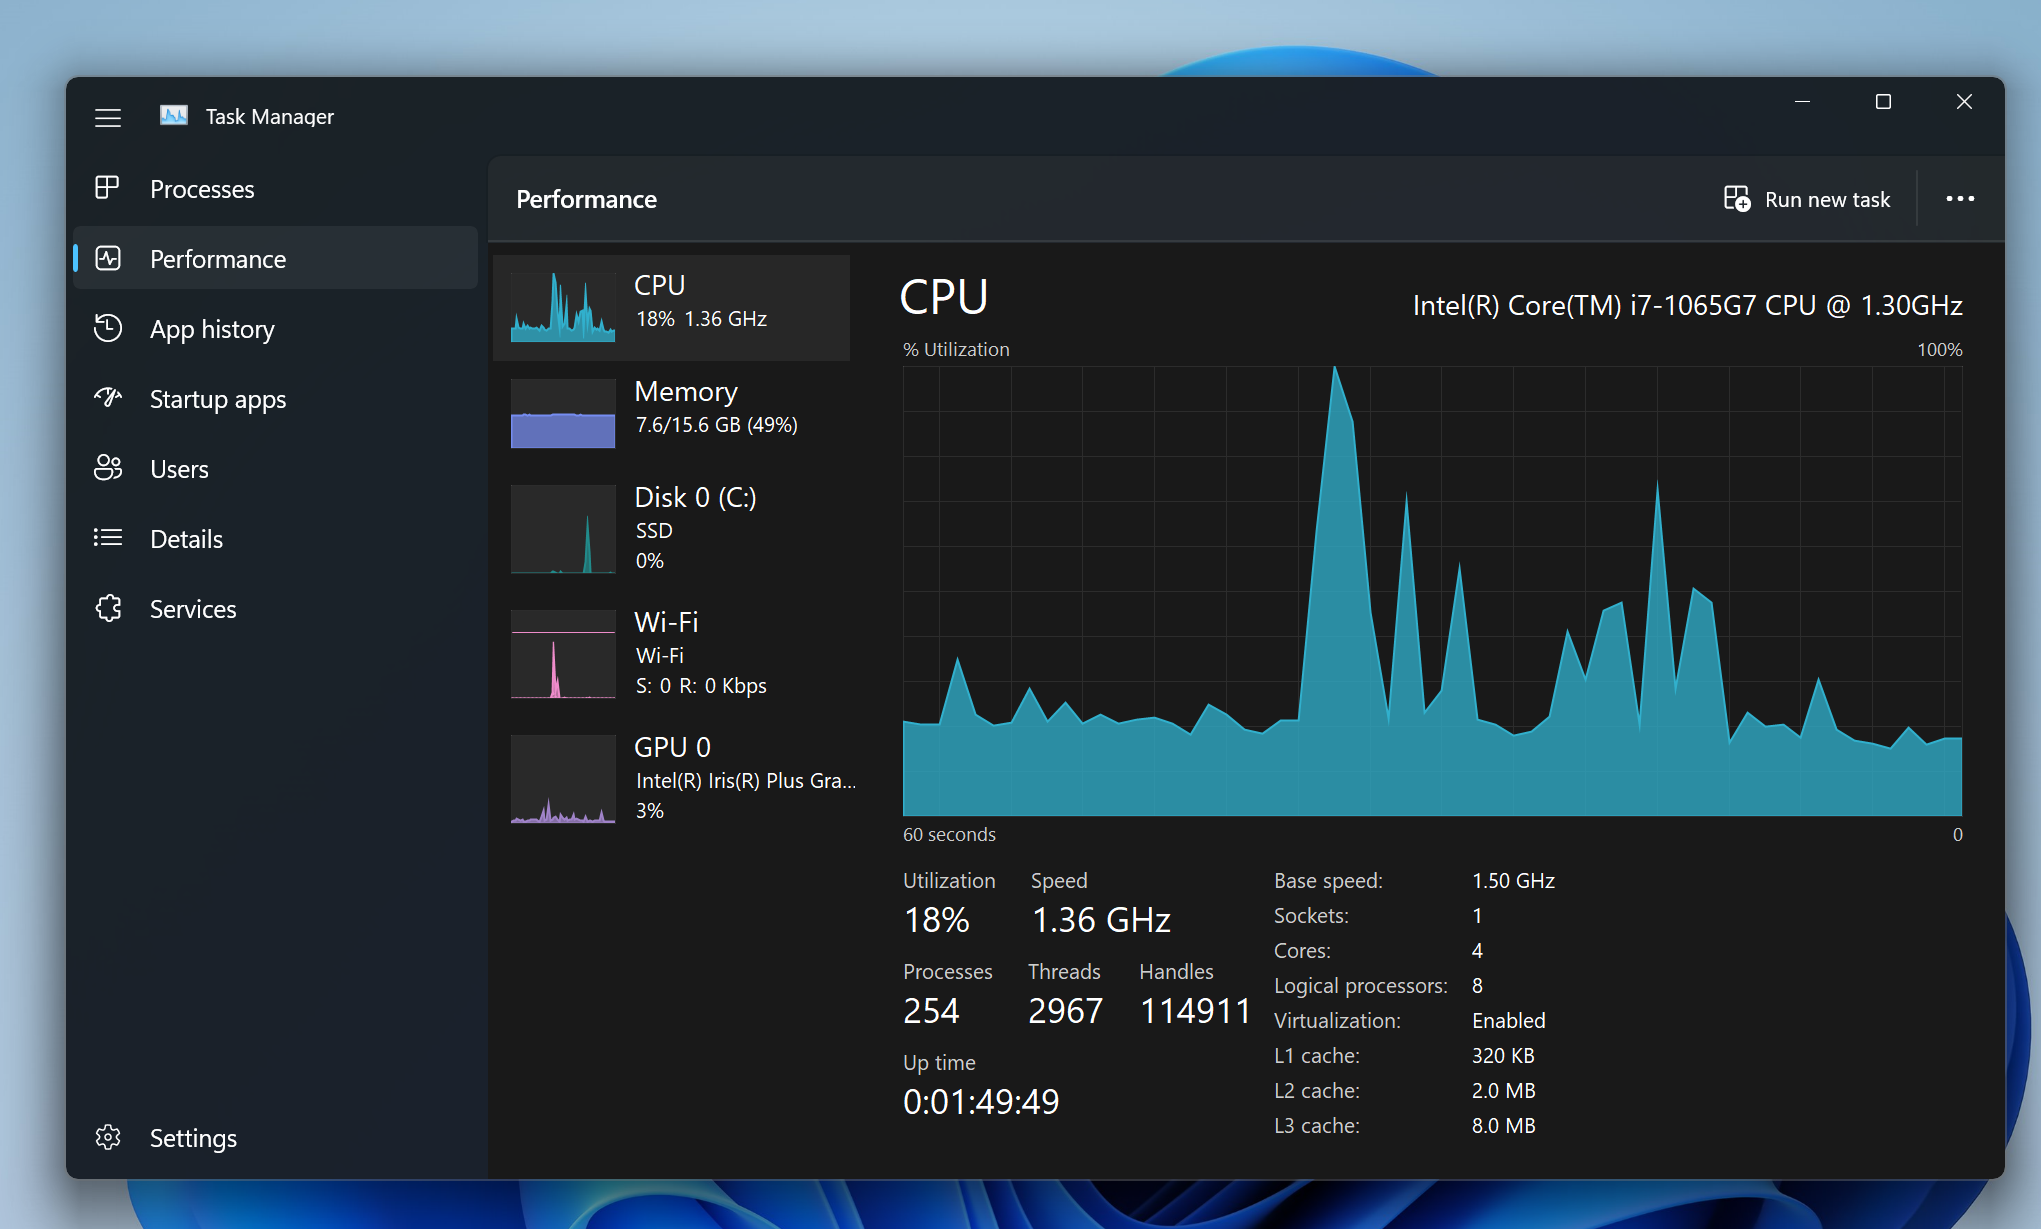
For opening task manager, click on the taskbar and select “Task Manager” From there, you can view all running processes, including CPU and memory usage, and end any unresponsive or unnecessary programs. You manage the processes of your PC from here. There are several features of task manager. For instance, The option to arrange processes by power utilisation is one of the new features in Task Manager for Windows 11, making it simpler to find applications that are using too much battery life. Furthermore, you can now see your disc performance in real-time, enabling you to spot any potential problems right away.
You can prioritise the programs that are most important to you using Task Manager’s ability to set priority levels for processes. Additionally, you can make your own custom groups of processes, which makes managing multiple applications at once easier.
There’s no doubt that you can increase the overall performance and stability of your Windows 11 PC and make sure that everything is working properly by utilising Task Manager effectively.
Make Use Of Game Mode For Better Gaming Performance
This Windows 11 tips is extremely useful for PC gamers. They also know how crucial it is to optimise your PC for best gaming performance. Fortunately, Windows 11 has a feature called Game Mode that can assist you in improving your overall PC gaming performance. By allocating extra system resources to the game you’re playing, the built-in Game Mode feature in Windows 11 optimises your PC for gaming. This will enable you to play more effectively, with improved frame rates and quicker load times. 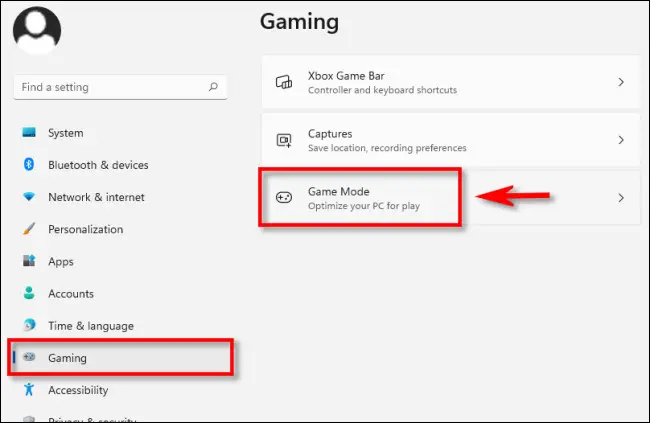
Here are the steps to turn on Game Mode in Windows 1
- Open the Settings app by pressing Windows Key + I
- Click on Gaming from the left-hand side menu
- Click on Game Mode on the right-hand side and toggle it on
- You can also enable the option to “Use Game Mode for all supported games” to automatically enable Game Mode for all games
After you activate Game Mode, you might notice a small change in the way your PC looks to reflect the mode’s activation. Additionally, you won’t have any background activities or interruptions that could interfere with your gaming performance. You may play your favourite games in Game Mode without experiencing any lag or interruptions, creating a seamless and immersive gaming experience.
Bonus: Windows 11 Download: How to Get the Latest Version of Windows
Are you prepared to update to the newest and best version of Windows for your operating system? The most recent version of Microsoft’s operating system, Windows 11, comes with a sleek and contemporary user interface, better performance, and additional features. However, how can you get Windows 11? You can start Windows 11 download on your device from here.
We hope, you find these Windows 11 tips and tricks helpful that can enhance your experience. Watch out for more as we keep on updating them. If you have other tips that aren’t included in the list, leave us a comment in the comment section below.
Related Posts:
Tagged
Share This Article
Have you recently installed the most recent Microsoft Windows version? Excited about its new features? If so, you might wonder how to use Windows 11’s new features and customization options. Fortunately, we’ve got you covered with 15 fantastic Windows 11 tips and tricks that will make your PC a lot simpler for you to use and give it a more modern look.
We are going to share many tips to help you organise your work and give your PC an updated look. From changing your desktop backdrop to virtual desktops, you will be amazed to see these little-known techniques.
So get ready to explore these 12 awesome Windows 11 tips and tricks to enhance your Windows experience!
What You Need To Do Before Trying Out Windows 11 Tips and Tricks?
Number 1. Perform Windows 11 Compatibility Check
Obviously, if you are looking for Windows 11 tips and tricks, you have probably upgraded to Windows 11. However, some of you are still using Windows 10 and are looking forward to giving Windows 11 a try. For that purpose, first, you need to perform Windows 11 compatibility check according to your PC or laptop. It includes checking your system’s hardware and model to see if it meets the Windows 11 requirements. Windows 11 update is currently available to fewer devices compared to Windows 10.
Number 2. Check For Windows 11 Update – Latest Version
You must have heard about Microsoft’s free Windows 11 update option for eligible Windows 10 devices. If your device fulfils the Windows 11 requirements, you can upgrade to Windows 11 anytime. Moreover, for users already using Windows 11, look for updates that Microsoft rolls out annually. This way, you can access all the latest Windows 11 features.
12 Little Known Windows 11 Tips And Tricks That Will Surprise You!
From multitasking capability settings to hidden settings of game mode, you’ll learn how to customize and optimize your Windows 11 experience in ways you never thought possible.
Without wasting any time, let’s uncover the hidden gems of Windows 11!
Easy Multitasking With Snap Layouts and Snap Groups
One of the most impressive features of Windows 11 is its enhanced multitasking capabilities, thanks to the introduction of Snap Layouts and Snap Groups. With Snap Layouts, you can quickly and easily snap your windows to predefined layouts that help you organize your screen space more efficiently. And with Snap Groups, you can save and restore sets of snapped windows, allowing you to switch between tasks and workflows with ease. 
To use Snap Layouts, simply drag a window to the edge or corner of your screen until you see the layout options appear. Then, choose the layout that works best for your needs, and your window will automatically snap into place. To use Snap Groups, simply snap your windows into a group, give the group a name, and save it for future use. You can then restore the group by clicking on its name in the taskbar.
These new features not only make multitasking easier and more efficient but can also help you stay focused and productive throughout your workday. So, give them a try and see how they can improve your Windows 11 experience!
Give Your Taskbar and Start Menu A Modern Look
Another excellent feature in Windows 11 that people rarely use in the taskbar customization. You can try several different customization options for your taskbar to suit your style of working.
All you have to do is make a right-click on the taskbar and choose “Taskbar settings” You can modify the taskbar’s alignment, icon size, and whether or not to display taskbar buttons for all open windows here. Yes, you can also hide the task bar. For example, you can change the location of your taskbar from a boring bottom location to the top. 
You can also customise your taskbar and start menu by using the Windows 11 personalization settings. You can find these by right-clicking on your desktop and choosing “Personalize.” From here, you can select a different theme, modify your background picture, along with a lot more.
These changes might seem small, but they can significantly alter the way Windows 11 looks and feels.
Create Different Workspaces For Different Tasks: Virtual Desktops
The best thing about Windows 11 features is that they are focused oriented. You don’t have to juggle between multiple windows and applications on your screen all the time. Windows 11 provides several options to stay organised and focused while working. And, Virtual Desktops is one of them!
Virtual Desktops in Windows 11 allows you to create different workspaces for different tasks. This way, you can easily switch between them easily and keep your work organized. 
Here’s how you can create Virtual Desktops in Windows 11.
- Click on the “Task view” button in the taskbar or press Windows key + Tab to create a virtual desktop.
- You can also make a new workspace by choosing “New desktop” option from there.
- You can easily switch between your created desktops by clicking on them in the task view or by using the keyboard shortcut Windows key + Ctrl + Left/Right arrow.
The Virtual Desktops feature in Windows 11 is a fantastic tool for boosting productivity and maintaining things in order. Now, it’s simple to organise your various tasks and switch between them. Without any distractions or breaks in focus, you can work efficiently. In this manner, you can work more effectively and without stress by working smarter rather than harder.
Instant Searching With PowerToys Run
Have you ever faced the issue of not finding an old file or where did you save it? Finding an old saved file or program always takes some time. Specially, if you don’t know or forgot the location. You need to suffer a long searching procedure to find that specific file. This why, several Windows 11 users prefer PowerToys Run as it can save their precious time.
PowerToys Run is an additional utility tool provided by Microsoft. It is a fast launcher with some extra features for users without sacrificing performance. You can quickly search for and launch files, programs, and even websites using this Windows 11 tool. PowerToys Run is very simple to install. 
Here’s how to do it!
- Go the Microsoft Official Website and download PowerToys Run.
- Once the downloading finished, install the program and launch it.
- You will see a search box appear at your screen.
- Once you have PowerToys Run successfully install and running, you can also access it by pressing Alt + Space.
- Simply start typing what you’re looking for, and PowerToys Run will instantly search it for you.
Note: You can also customize PowerToys Run as you like. You can add options like changing the search engine or adding your own custom keywords.
Personalize Your Lock Screen With Your Own Photos
Personalizing your lock and home screen is a great way to add a personal touch to your computer and make it feel more like yours. There’s an option in Windows 11 to choose lock screen image from your own photos. You can even use the built-in Bing images to change up your lock screen on a regular basis. It will keep things fresh and give it a more personal look. 
You can change your lock screen by simply following these steps.
- Navigate to Settings and go to Personalization.
- Click on Lock screen, and choose “Background” under “Choose your picture” option.
- There you will an option to select a photo from your own collection or choose from the selection of built-in images.
Dynamic Wallpapers For A Fresh Look All Day
Windows 11 provides a wide library of dynamic or live wallpapers to give your PC a new and fresh look every day. These pre-made dynamic wallpapers include appealing graphics of landscapes and amazing colorful images. You can also choose your own custom dynamic wallpaper using a third-party app. 
Here’s how you can adjust dynamic wallpapers on your Windows 11 PC.
- For pre-made dynamic live wallpapers. Right-click on your desktop and select “Personalize“.
- Now, select “Background” and choose “Dynamic” from the drop-down menu.
- Apply the changes after browsing and choosing the wallpapers of your liking.
- Now, your wallpapers will keep on changing after some interval and they will feel more dynamic giving you a more fresh feel.
Note: You can also create your own dynamic wallpapers using other apps and websites like Wallpaper Engine and more.
Setting live dynamic wallpapers can give your daily tasks some energy and keep you motivated and focused all day. Additionally, with so many options available, it’s simple to find a dynamic wallpaper that suits your preferences and personal style.
File Explorer For Maximum Efficiency
File Explorer is an amazing tools in Windows 11. Unfortunately, very few users knows or utilise its full potential. There are several features within file explorer that can help you manage and organise your files in a breeze. 
Here’re some way to use Windows 11 File Explorer effectively.
- For instance, you can easily access frequently used folders by pin them to the top of the File Explorer window using the Quick Access function.
- By entering keywords or phrases, you can also utilise the Search bar to locate particular files or folders quickly.
- The Ribbon menu also allows you to change how your files and folders are displayed and access frequently used features like Copy, Cut, and Paste.
- Another useful option is the Preview pane, which enables you to examine a preview of your files without even opening them.
Simply click the folder icon on the taskbar to open File Explorer, or look up “File Explorer” in the Start menu. You can easily navigate through your files and folders from thereon.
Change The Way You Receive Your Notifications
Have you ever been working on something important when a notification popped up on your screen? This issue has a solution in Windows 11 thanks to its customizable notification feature. Now that you can choose how your notifications are shown, you can get them without interfering with your work. 
Here’s how you can customize your notification settings.
- Open Settings and then navigate to System. From there open Notifications option.
- Now, you can set how notifications are displayed on your screen. You can also set the length of time they appear on your screen and whether they will create sound when received.
- You can also allow and disallow the apps to send you notifications from settings.
This amazingly helpful feature of Windows 11 ensures that you don’t ever miss out the most important notifications. You can also choose how they are displayed so that it won’t interrupt your work. This can lead to increased productivity and less distraction.
Dark Mode For A Smooth Viewing Experience
Among all other Windows 11 tips and tricks, this technique is extremely useful for users who spend a lot of time in front of screen. At times, you may found yourself straining your eyes while using computer in a long session, especially during nighttime. You can get rid of that issue by enabling Dark Mode in Windows 11. It can provide a more comfortable viewing experience. 
It’s super easy to enable Dark Mode in Windows 11.
You can enable Dark Mode through the Settings app or use the Quick Settings toggle in the Action Center. From Settings, Select Colors under Personalization. Choose Custom from the options available under “Choose your mode” From there, Choose Light or Dark.
Once it is enabled and applied the changed, you’ll immediately notice a change in the overall look and feel of your device, with black or dark gray backgrounds replacing the usual bright white.
In addition to providing a comfortable viewing experience, Dark Mode has other significant advantages like lowering eye strain and extending battery life on devices with OLED screens. Additionally, it gives your device a sleek, modern look that is ideal for those who favour a minimalist style.
Add Widgets To Stay Up To Date
Some people try to avoid widgets as they take some space on their screen. However, widgets in Windows 11 can be a great way to stay updated and get news about weather and recent events. With the help of widgets, you can have the easy access to all the information you need. 
It’s easy to add and set up widgets on your Windows 11 PC. A panel will show up on the left side of your screen when you click the Widgets icon in the taskbar. The weather, news, calendar, and other widgets are available here for your selection.
Widgets don’t simply help you to save time by reducing the need to constantly move between apps; they also let you customise your desktop and keep the data that matters to you the most. Additionally, you can customise the widget sizes and places on your desktop to suit your personal preferences.
Efficient Use Of Task Manager
It’s no wonder that an average Windows 11 user doesn’t know about the potential of task manager. Your system operations and programs can be efficiently managed with the help of a task manager. Task Manager has seen many modifications since Windows 11’s debut, enhancing both its efficiency and its ease of use. 
For opening task manager, click on the taskbar and select “Task Manager” From there, you can view all running processes, including CPU and memory usage, and end any unresponsive or unnecessary programs. You manage the processes of your PC from here. There are several features of task manager. For instance, The option to arrange processes by power utilisation is one of the new features in Task Manager for Windows 11, making it simpler to find applications that are using too much battery life. Furthermore, you can now see your disc performance in real-time, enabling you to spot any potential problems right away.
You can prioritise the programs that are most important to you using Task Manager’s ability to set priority levels for processes. Additionally, you can make your own custom groups of processes, which makes managing multiple applications at once easier.
There’s no doubt that you can increase the overall performance and stability of your Windows 11 PC and make sure that everything is working properly by utilising Task Manager effectively.
Make Use Of Game Mode For Better Gaming Performance
This Windows 11 tips is extremely useful for PC gamers. They also know how crucial it is to optimise your PC for best gaming performance. Fortunately, Windows 11 has a feature called Game Mode that can assist you in improving your overall PC gaming performance. By allocating extra system resources to the game you’re playing, the built-in Game Mode feature in Windows 11 optimises your PC for gaming. This will enable you to play more effectively, with improved frame rates and quicker load times. 
Here are the steps to turn on Game Mode in Windows 1
- Open the Settings app by pressing Windows Key + I
- Click on Gaming from the left-hand side menu
- Click on Game Mode on the right-hand side and toggle it on
- You can also enable the option to “Use Game Mode for all supported games” to automatically enable Game Mode for all games
After you activate Game Mode, you might notice a small change in the way your PC looks to reflect the mode’s activation. Additionally, you won’t have any background activities or interruptions that could interfere with your gaming performance. You may play your favourite games in Game Mode without experiencing any lag or interruptions, creating a seamless and immersive gaming experience.
Bonus: Windows 11 Download: How to Get the Latest Version of Windows
Are you prepared to update to the newest and best version of Windows for your operating system? The most recent version of Microsoft’s operating system, Windows 11, comes with a sleek and contemporary user interface, better performance, and additional features. However, how can you get Windows 11? You can start Windows 11 download on your device from here.
We hope, you find these Windows 11 tips and tricks helpful that can enhance your experience. Watch out for more as we keep on updating them. If you have other tips that aren’t included in the list, leave us a comment in the comment section below.
Related Posts:


