How to Install macOS Big Sur on PC- Hackintosh?

As you are aware that Apple has released the extraordinary operating system for Mac computers and named it macOS Big Sur. Similar to previous years, Apple has introduced macOS Big Sur on Worldwide Developer Conference (WWDC) 2020. Most of the Apple users were really excited for this operating system. However, macOS Big Sur is somewhat changed from macOS Mojave and Catalina. You will get the full version of macOS Big Sur in September 2020. Too many new things and features are added to macOS Big Sur. It has a completely new look and unique look which most of the users liked. I will go for step by step process on How to Install macOS Big Sur on PC- Hackintosh.
There was a piece of good news for us that Apple has directly moved from the macOS 10.0 version into macOS 11.0. It will surely fulfill your need and give you a better experience. According to Technology, macOS Big Sur is one of the powerful operating systems of Hackintosh. Furthermore, the first WWDC occurred in 1987 in Santa Clara (the city in California). By the passage of time, Apple is working hard on their products in order to make it better and better.
Apple highlighted tons of features but the best and biggest update is in Safari. They made the Safari web browser 50% faster than before. Now, Safari is known as a great and flexible web browser than other web browsers on the internet. It evens loads faster in macOS Big Sur.
Step 1. macOS Big Sur Compatible Macs List
Before going to install macOS Big Sur, you have to check out that if your Mac or MacBook is compatible with it or not.
You don’t have to worry about install macOS Big Sur because if you have clearly installed macOS Catalina or Mojave then you will completely able to run the new operating system (macOS Big Sur).
- MacBook 2015 and later
- MacBook Air and Pro Late 2013 and later
- Mac mini 2014 and later
- iMac 2014 and later
- iMac Pro 2017 and later (all models)
- Mac Pro 2013 and later
Step 2. Create macOS Big Sur Bootable USB
In the first thing, you need to download the macOS Big Sur DMG file because if you don’t have it then you won’t be able to create macOS Big Sur Bootable USB. So, click on the link below and get it downloaded.
Once it is downloaded, before creating macOS Big Sur Bootable USB there is something you have to do it. Whenever you want to install any operating system, we highly recommend you to get back up of all the vital documents and data. If you hadn’t back up then anything can go wrong, then each and everything will be erased or deleted.
When you have successfully got the backup of all things. There are many ways for creating macOS Big Sur Bootable USB, some of them are difficult and lengthy. But I will guide you with the easiest and quickest method that is Disk Utility.
- Insert the USB (USB Flash Drive should have at least 16GB storage) and go to Disk utility.
- Choose your USB from the sidebar.
- Make sure to click on the Erase button from the top menu.
- Enter a simple name to your USB.
- Now, select the format Mac OS Extended (Journaled).
- For scheme select GUID Partition Map.
- If all the above steps went right, then click on Done and close the disk utility.
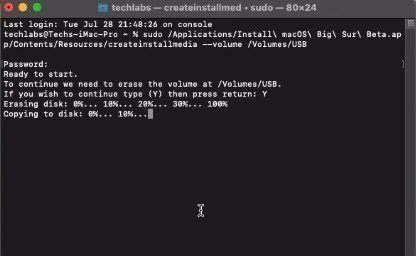
8. Now, it is time to open the Terminal. For that, you have to go to Spotlight and search for Terminal. When it is opened, Follow the commands down below and paste them on the Terminal.
sudo /Applications/Install\ macOS\ Beta.app/Contents/Resources/createinstallmedia --volume /Volumes/USBAfter pasting the commands, you have to enter the password then type the word Y and wait for the process to be finished.
 Command
 Step 3. Mount E.F.I Partition
1. For the macOS Big Sur Bootable USB, you have to do to E.F.I partition. For that, make sure to open the OpenCore Configurator and mount E.F.I partition from there.
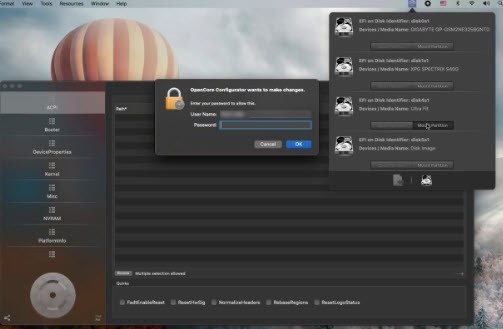 Mount E.F.I Partition
 2. Then, you have to copy E.F.I and paste to the EFI USB partition.
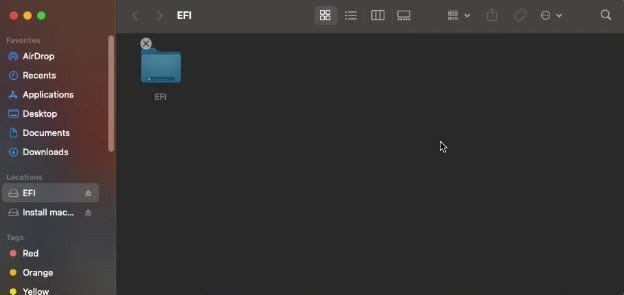 Copy EFI
 3. Once done, copy OpenCore Configurator and paste it to the macOS Big Sur USB now.
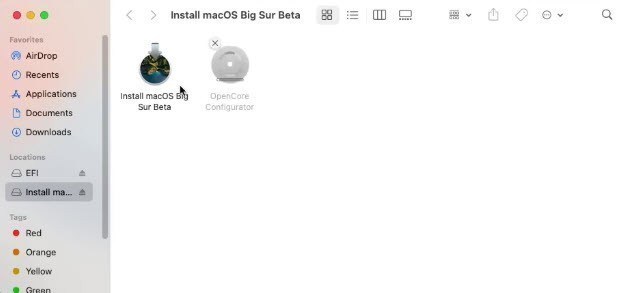 Paste OpenCore Configurator
 Step 4. Customize BIOS Settings of PC
After creating a bootable USB successfully. After that, you need to make your BIOS settings perfect for macOS Big Sur. In order to edit your BIOS, restart your PC and click on the Delete button. You will get into the BIOS on your PC. choose to Save then Edit and load optimized default. And click on the Press, select save and edit click enter to restart your PC.
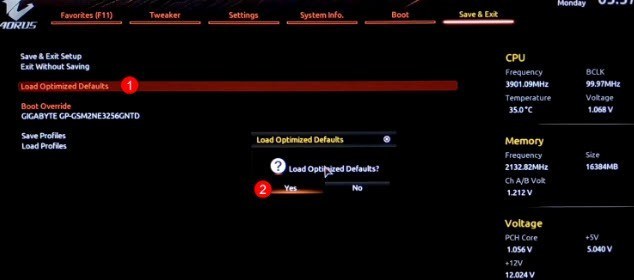 Edit BIOS Settings
 2. Again Restart your PC and press the Delete button to enter the BIOS settings. Click on Tweaker from the top-menu select the Advanced CPU Settings > VT-d and disable the option. After some seconds, click on the Extreme Memory Profile and then choose profile 1.
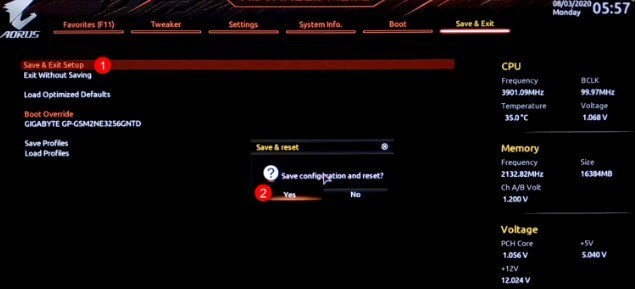 Exit
Exit 3. Click on the Settings and Click on I.O. Ports > USB Configuration and then click on XHCI hand-off.
4. Then, navigate towards the Boot from the top menu and select Windows 8/f features and click on other OS. Once done, go to the Save & Edit and save all the changes you did.
Step 5. Install macOS Big Sur on PC- Hackintosh
When you have brought changes to BIOS settings and also we have created bootable USB. It is time to install macOS Big Sur. Connect your booted USB drive, find out the Boot Menu, and click on it. Select USB flash drive and press Enter to boot.
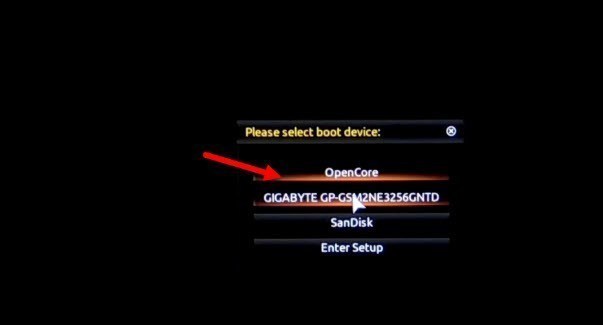 Boot Device
 - When the booting process, Select your Language and click Continue.
- On the next window, Select disk utility and press continue.
Select your flash drive from the sidebar menu and click on Erase
- Type a name for your drive
- Select the format APFS
- For scheme select GUID Partition Map
- Click on the Erase option and enter the Done button
- Close Disk Utility and select Install macOS and continue.
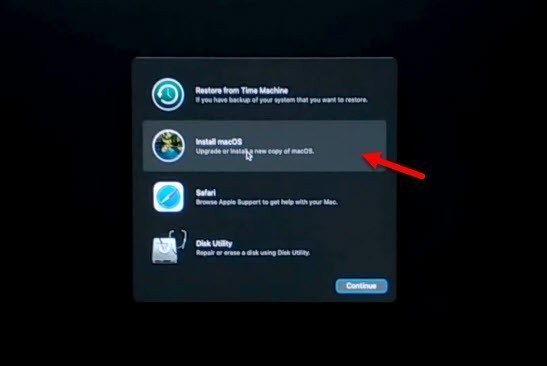 Install macOS
 - For the installation process and click Continue.
- Agree to the license agreement to continue.
- Select Machintosh HD for drive selection and click install.
Step 6. Complete Installation of macOS Big Sur
- From the “Written and Spoken languages” section, select your language and click Continue.
- From the “Accessibility” section, select Not now.
- Select, your Wi-Fi Network” click on other network options, select your Wi-Fi network and click continue.
- From “Data and Privacy” click continue
- On “Migration Assistant” window select Not Now
- On this, you are asked to sing-in. If you have an Apple ID sing in, but if you don’t have click on Not ow and skip that part.
- Agree to terms and conditions and click continue
- Here you will need to make a computer account t nd fill the places like Account name, password, etc., and click continue.
- Click to Customize Settings if you want to customize Express Set-Up. Suppose you don’t want to click on Continue.
- On “Analytics,” click Continue.
- Click Set up later.
- From Siri click Continue
- Allow Siri to share of Audio Recording and click Continue
- Select your macOS Big Sur theme.
- wait for a few seconds till the setup saves
Bottom Line
It was the complete process of How to Install macOS Big Sur on PC- Hackintosh. The easy process was that much. If you faced any kind of issue then don’t hesitate to leave a comment.
Tagged
Share This Article
As you are aware that Apple has released the extraordinary operating system for Mac computers and named it macOS Big Sur. Similar to previous years, Apple has introduced macOS Big Sur on Worldwide Developer Conference (WWDC) 2020. Most of the Apple users were really excited for this operating system. However, macOS Big Sur is somewhat changed from macOS Mojave and Catalina. You will get the full version of macOS Big Sur in September 2020. Too many new things and features are added to macOS Big Sur. It has a completely new look and unique look which most of the users liked. I will go for step by step process on How to Install macOS Big Sur on PC- Hackintosh.
There was a piece of good news for us that Apple has directly moved from the macOS 10.0 version into macOS 11.0. It will surely fulfill your need and give you a better experience. According to Technology, macOS Big Sur is one of the powerful operating systems of Hackintosh. Furthermore, the first WWDC occurred in 1987 in Santa Clara (the city in California). By the passage of time, Apple is working hard on their products in order to make it better and better.
Apple highlighted tons of features but the best and biggest update is in Safari. They made the Safari web browser 50% faster than before. Now, Safari is known as a great and flexible web browser than other web browsers on the internet. It evens loads faster in macOS Big Sur.
Step 1. macOS Big Sur Compatible Macs List
Before going to install macOS Big Sur, you have to check out that if your Mac or MacBook is compatible with it or not.
You don’t have to worry about install macOS Big Sur because if you have clearly installed macOS Catalina or Mojave then you will completely able to run the new operating system (macOS Big Sur).
- MacBook 2015 and later
- MacBook Air and Pro Late 2013 and later
- Mac mini 2014 and later
- iMac 2014 and later
- iMac Pro 2017 and later (all models)
- Mac Pro 2013 and later
Step 2. Create macOS Big Sur Bootable USB
In the first thing, you need to download the macOS Big Sur DMG file because if you don’t have it then you won’t be able to create macOS Big Sur Bootable USB. So, click on the link below and get it downloaded.
Once it is downloaded, before creating macOS Big Sur Bootable USB there is something you have to do it. Whenever you want to install any operating system, we highly recommend you to get back up of all the vital documents and data. If you hadn’t back up then anything can go wrong, then each and everything will be erased or deleted.
When you have successfully got the backup of all things. There are many ways for creating macOS Big Sur Bootable USB, some of them are difficult and lengthy. But I will guide you with the easiest and quickest method that is Disk Utility.
- Insert the USB (USB Flash Drive should have at least 16GB storage) and go to Disk utility.
- Choose your USB from the sidebar.
- Make sure to click on the Erase button from the top menu.
- Enter a simple name to your USB.
- Now, select the format Mac OS Extended (Journaled).
- For scheme select GUID Partition Map.
- If all the above steps went right, then click on Done and close the disk utility.
8. Now, it is time to open the Terminal. For that, you have to go to Spotlight and search for Terminal. When it is opened, Follow the commands down below and paste them on the Terminal.
sudo /Applications/Install\ macOS\ Beta.app/Contents/Resources/createinstallmedia --volume /Volumes/USBAfter pasting the commands, you have to enter the password then type the word Y and wait for the process to be finished.
Command Step 3. Mount E.F.I Partition
1. For the macOS Big Sur Bootable USB, you have to do to E.F.I partition. For that, make sure to open the OpenCore Configurator and mount E.F.I partition from there.
Mount E.F.I Partition 2. Then, you have to copy E.F.I and paste to the EFI USB partition.
Copy EFI 3. Once done, copy OpenCore Configurator and paste it to the macOS Big Sur USB now.
Paste OpenCore Configurator Step 4. Customize BIOS Settings of PC
After creating a bootable USB successfully. After that, you need to make your BIOS settings perfect for macOS Big Sur. In order to edit your BIOS, restart your PC and click on the Delete button. You will get into the BIOS on your PC. choose to Save then Edit and load optimized default. And click on the Press, select save and edit click enter to restart your PC.
Edit BIOS Settings 2. Again Restart your PC and press the Delete button to enter the BIOS settings. Click on Tweaker from the top-menu select the Advanced CPU Settings > VT-d and disable the option. After some seconds, click on the Extreme Memory Profile and then choose profile 1.
Exit 3. Click on the Settings and Click on I.O. Ports > USB Configuration and then click on XHCI hand-off.
4. Then, navigate towards the Boot from the top menu and select Windows 8/f features and click on other OS. Once done, go to the Save & Edit and save all the changes you did.
Step 5. Install macOS Big Sur on PC- Hackintosh
When you have brought changes to BIOS settings and also we have created bootable USB. It is time to install macOS Big Sur. Connect your booted USB drive, find out the Boot Menu, and click on it. Select USB flash drive and press Enter to boot.
Boot Device - When the booting process, Select your Language and click Continue.
- On the next window, Select disk utility and press continue.
Select your flash drive from the sidebar menu and click on Erase
- Type a name for your drive
- Select the format APFS
- For scheme select GUID Partition Map
- Click on the Erase option and enter the Done button
- Close Disk Utility and select Install macOS and continue.
Install macOS - For the installation process and click Continue.
- Agree to the license agreement to continue.
- Select Machintosh HD for drive selection and click install.
Step 6. Complete Installation of macOS Big Sur
- From the “Written and Spoken languages” section, select your language and click Continue.
- From the “Accessibility” section, select Not now.
- Select, your Wi-Fi Network” click on other network options, select your Wi-Fi network and click continue.
- From “Data and Privacy” click continue
- On “Migration Assistant” window select Not Now
- On this, you are asked to sing-in. If you have an Apple ID sing in, but if you don’t have click on Not ow and skip that part.
- Agree to terms and conditions and click continue
- Here you will need to make a computer account t nd fill the places like Account name, password, etc., and click continue.
- Click to Customize Settings if you want to customize Express Set-Up. Suppose you don’t want to click on Continue.
- On “Analytics,” click Continue.
- Click Set up later.
- From Siri click Continue
- Allow Siri to share of Audio Recording and click Continue
- Select your macOS Big Sur theme.
- wait for a few seconds till the setup saves
Bottom Line
It was the complete process of How to Install macOS Big Sur on PC- Hackintosh. The easy process was that much. If you faced any kind of issue then don’t hesitate to leave a comment.