How to Upgrade macOS Catalina in Virtual Machine To The Latest Version

In this article, I am going to guide you on How to Upgrade macOS Catalina in Virtual Machine To The Latest Version. As you know, macOS Catalina Operating System is a special gift from the apple company in the year 2019. It has tons of amazing and beautiful features that are somehow better than the older operating system. For Mac users, it is fine to try and use the macOS Catalina. But in windows, it is somehow complicated. So, since we have virtual machines like VirtualBox and VMware it is easy to try and use macOS. Therefore make sure to install macOS Catalina on VMware and VirtualBox. Now, we are going to upgrade the virtual machine to the latest version. If you really want so that is outstanding. Because we will have new features of macOS Catalina after upgrading to the latest version.
If you upgrade your virtual machine to the latest version then you will see more cool features. So, the procedure is pretty easy and simple. Below, we have provided a step by step tutorial to make sure that you upgrade to avoid losing your data and ensure that the upgrade is successful. Therefore, we are going to discuss the best 2 tutorials, upgrade Mojave to Catalina and upgrade Catalina to the new version.
 Upgrade macOS Catalina in Virtual Machine To The Latest Version
Upgrade Catalina and Mojave on VMware
If you are running macOS Mojave on Vmware, make sure that you have the latest version of VMware 15.5. Only this release has enough resources to support macOS Catalina. If you are using an old version of VMware then make sure to install the latest version 15.5. Therefore follow the steps below in order to install VMware’s latest version.
- Go to the VMware website and download VMware 15.5.0.
- Then, you have to click on the Download button that is on the right top corner of the page.
- When the downloading is finished, then go ahead and click on the exe.
- When your computer starts again, you need to double click on the exe file in order to finish the installation.
- Once the installation is complete, a popup window will appear. Click on Finish to close the installation wizard.
- Now, enjoy using the latest version of VMware.
Edit the File for macOS Catalina
Now you need yo open the “Virtual Machine configuration file of the virtual machine. If you cannot find the location of that file then let me guess. The file will be in Document > Virtual machine. When you found it then you have to right-click on that and open that in NotePad.
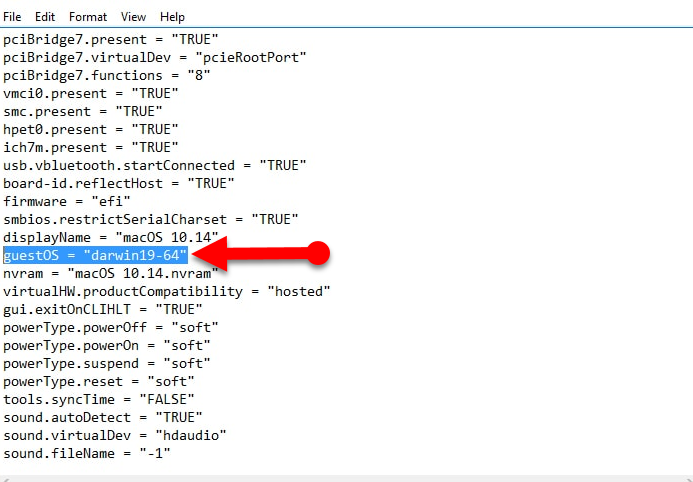
Scroll down and find the code which is written like this, guestOS = “darwin18-64” and replace it to guestOS = “darwin19-64”. Scroll down to the bottom of texts and add this code: smc.version = “0”. When it is done, you have to click on the file tab and click on save or direct press ctrl + s in order to save. Then I am pretty sure that your Vmware will support macOS Catalina.
 Edit the file
Download and Install macOS Catalina
configure your virtual machine. With your VMware configured, you can go to the last step and install macOS Catalina.
- Turn on VMware Player latest version, select your virtual machine then click on Power on the virtual machine.
- Download a new version of macOS Catalina from the Mac Apps Store.
- After the download has completed, the installer will start running.
- Go ahead and follow that wizard instruction to install macOS Catalina on your VMware.
Upgrade Catalina and Mojave on VirtualBox
So, download the macOS Catalina from the App Store or you can also download from apple website when each and everything is backed up then go ahead with the following process. For downloading it from the app store then just go through the below instruction.
- First of all, launch the App store using your current macOS Mojave.
- On the search bar, type macOS Catalina and press enter.
- Once it shows up, click on the install button.
- Once the installation is complete, you will need to edit VirtualBox with a boot disk.
Configure the VirtualBox with Boot Disk
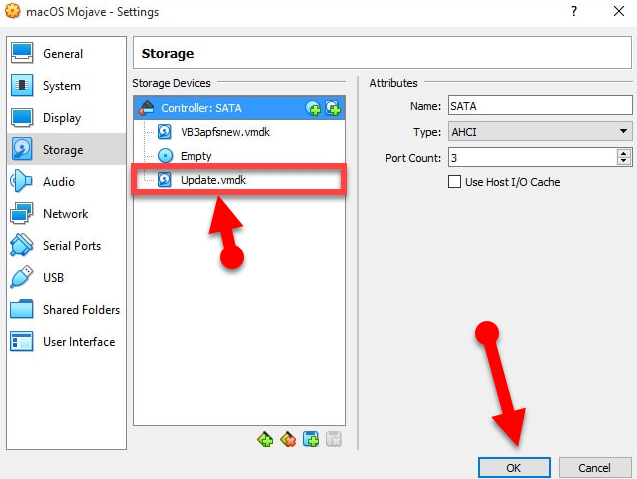
When you are sure that the installation is successfully finished, then you have turned off your virtual machine, again open the VirtualBox and edit the virtual machine. Now, click on the storage tab. there you need to click on the Add button. And open a new Update Image.
 Update the Image
Installation of macOS Catalina
- Firstly, turn on your Virtual Machine.
- Once running again, open the UEFI Shell Screen.
- And finally, type in the following command Type, update.nsh to boot to the Catalina installation.
Final Words
That’s all about How to Upgrade macOS Catalina in Virtual Machine To The Latest Version. So, I hope that these tips and tricks on upgrading macOS Mojave to Catalina was beneficial for you. And I hope that macOS Catalina will be enjoyable for you because of its cool feature. Therefore, if you faced any kind of problem or any question regarding this then feel normal to ask from the comment box below.
Tagged
Share This Article
In this article, I am going to guide you on How to Upgrade macOS Catalina in Virtual Machine To The Latest Version. As you know, macOS Catalina Operating System is a special gift from the apple company in the year 2019. It has tons of amazing and beautiful features that are somehow better than the older operating system. For Mac users, it is fine to try and use the macOS Catalina. But in windows, it is somehow complicated. So, since we have virtual machines like VirtualBox and VMware it is easy to try and use macOS. Therefore make sure to install macOS Catalina on VMware and VirtualBox. Now, we are going to upgrade the virtual machine to the latest version. If you really want so that is outstanding. Because we will have new features of macOS Catalina after upgrading to the latest version.
If you upgrade your virtual machine to the latest version then you will see more cool features. So, the procedure is pretty easy and simple. Below, we have provided a step by step tutorial to make sure that you upgrade to avoid losing your data and ensure that the upgrade is successful. Therefore, we are going to discuss the best 2 tutorials, upgrade Mojave to Catalina and upgrade Catalina to the new version.
 Upgrade macOS Catalina in Virtual Machine To The Latest Version
Upgrade Catalina and Mojave on VMware
If you are running macOS Mojave on Vmware, make sure that you have the latest version of VMware 15.5. Only this release has enough resources to support macOS Catalina. If you are using an old version of VMware then make sure to install the latest version 15.5. Therefore follow the steps below in order to install VMware’s latest version.
- Go to the VMware website and download VMware 15.5.0.
- Then, you have to click on the Download button that is on the right top corner of the page.
- When the downloading is finished, then go ahead and click on the exe.
- When your computer starts again, you need to double click on the exe file in order to finish the installation.
- Once the installation is complete, a popup window will appear. Click on Finish to close the installation wizard.
- Now, enjoy using the latest version of VMware.
Edit the File for macOS Catalina
Now you need yo open the “Virtual Machine configuration file of the virtual machine. If you cannot find the location of that file then let me guess. The file will be in Document > Virtual machine. When you found it then you have to right-click on that and open that in NotePad.
Scroll down and find the code which is written like this, guestOS = “darwin18-64” and replace it to guestOS = “darwin19-64”. Scroll down to the bottom of texts and add this code: smc.version = “0”. When it is done, you have to click on the file tab and click on save or direct press ctrl + s in order to save. Then I am pretty sure that your Vmware will support macOS Catalina.
 Edit the file
Download and Install macOS Catalina
configure your virtual machine. With your VMware configured, you can go to the last step and install macOS Catalina.
- Turn on VMware Player latest version, select your virtual machine then click on Power on the virtual machine.
- Download a new version of macOS Catalina from the Mac Apps Store.
- After the download has completed, the installer will start running.
- Go ahead and follow that wizard instruction to install macOS Catalina on your VMware.
Upgrade Catalina and Mojave on VirtualBox
So, download the macOS Catalina from the App Store or you can also download from apple website when each and everything is backed up then go ahead with the following process. For downloading it from the app store then just go through the below instruction.
- First of all, launch the App store using your current macOS Mojave.
- On the search bar, type macOS Catalina and press enter.
- Once it shows up, click on the install button.
- Once the installation is complete, you will need to edit VirtualBox with a boot disk.
Configure the VirtualBox with Boot Disk
When you are sure that the installation is successfully finished, then you have turned off your virtual machine, again open the VirtualBox and edit the virtual machine. Now, click on the storage tab. there you need to click on the Add button. And open a new Update Image.
 Update the Image
Installation of macOS Catalina
- Firstly, turn on your Virtual Machine.
- Once running again, open the UEFI Shell Screen.
- And finally, type in the following command Type, update.nsh to boot to the Catalina installation.
Final Words
That’s all about How to Upgrade macOS Catalina in Virtual Machine To The Latest Version. So, I hope that these tips and tricks on upgrading macOS Mojave to Catalina was beneficial for you. And I hope that macOS Catalina will be enjoyable for you because of its cool feature. Therefore, if you faced any kind of problem or any question regarding this then feel normal to ask from the comment box below.


