How to Pair and Connect Apple AirPods to a Windows 10 PC


If you have an Airpods then you want to connect it with your Windows 10 PC. When you try to pair the Apple AirPods then you don’t know the way. When you search on YouTube then the video you are watching maybe it is not real. But don’t worry I am here to solve your problem. This article doesn’t require any third-party software. If you want to pair and connect Apple AirPods to a Windows 10 PC then you need to read this article. So, without wasting any time let’s get has started. From this article, you will learn How to Pair and Connect Apple AirPods to a Windows 10 PC.
Further, if you are not an audiophile or obsessed with super high-quality audio. Some Airpods are tiny wireless earbuds and they’re not going to give you the best sound quality especially in this price range. They have good AAC audio but it’s not going to be the absolute best when it comes to pure high-quality audio.
In fact, they are very similar to the Apple Earpods that if you have an iPhone or if you got the latest iPhone 7 listen to the sound quality on those and the AirPods are ninety-nine percent the same quality audio that the AirPods give you maybe a little bit higher. So, audio quality takes a backseat to the main features which one of main features is the W1 chip that’s inside each of the AirPods that makes them smarter than most other Bluetooth devices. The W1 chip allows for instant pairing with iOS 10 devices.
Related Post: 3 Ways to Share Photos, Videos Between iPhone and Android
How to Pair and Connect Apple AirPods to a Windows 10 PC
Step 1. At first, put both AirPods into their case make sure that the case of AirPods has a full charge.
Step 2. Now, open the lid of the AirPods case doesn’t get any AirPods from the case.
Step 3. Next, long press on the circle button at the backside of Airpods case. Press it till the light inside the case will change from black to white. and the white light should blink.
Step 4. When the white light blinks the go to the Settings from the Start menu or shortcut to open the settings simply press Windows Key + I.
Step 5. Click on the Devices.
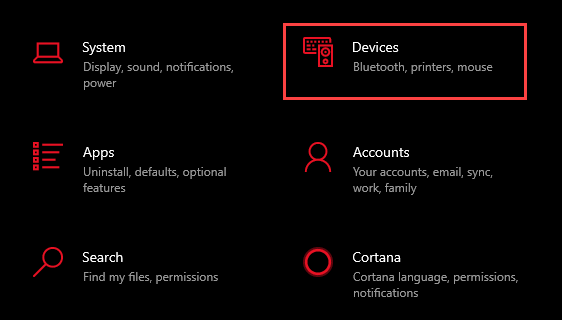 Click on the Devices
 Step 6. Turn on the toggle of Bluetooth then tap on the Add Bluetooth or Other Device.
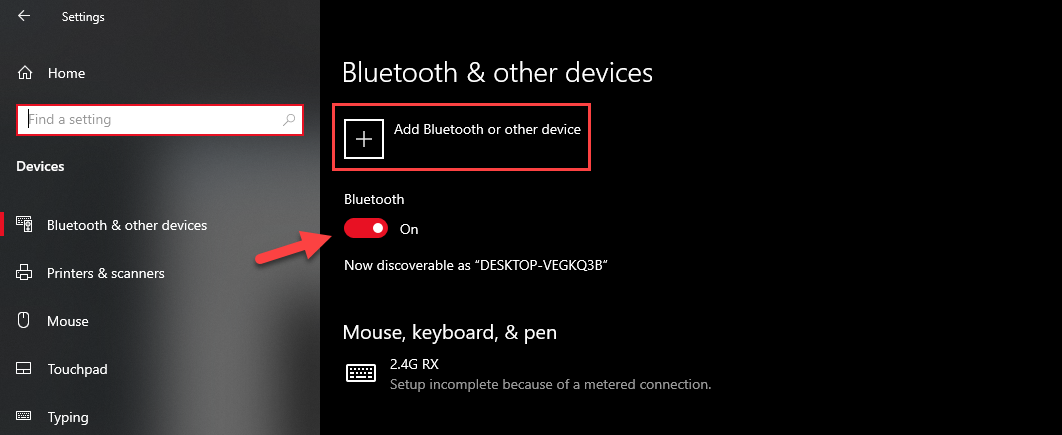 Tap on the Add Bluetooth or Other Device
 Step 7. However, click on the Bluetooth at the top option.
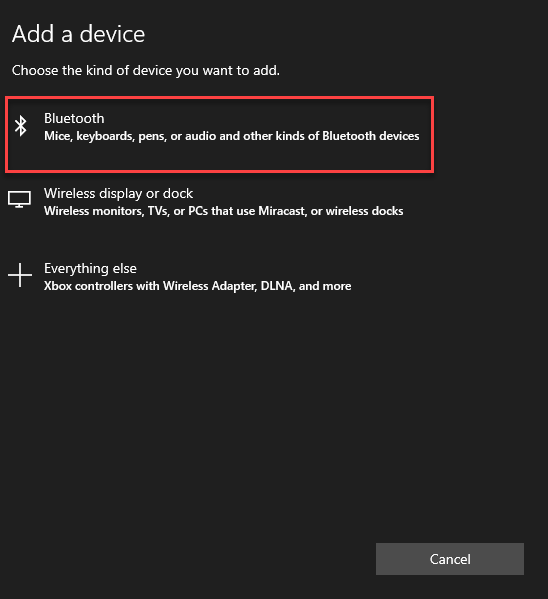 Click on the Bluetooth
 Step 8. Once you click on the Bluetooth then you will get the name of your AirPods. Simply click on your Airpods name.
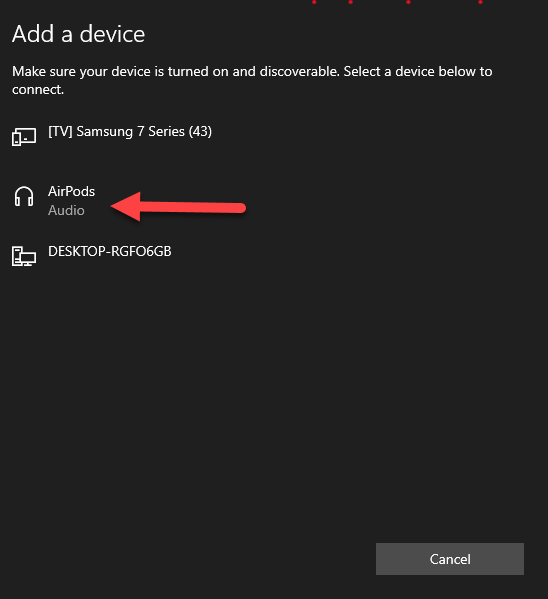 Click on your AirPods Name
 When you click on your Aripods name then it will automatically connect to your Windows 10 PC. If the steps will not work then do the steps from the first.
Related Post: How to Convert Photo to PDF on iPhone (3 Simple Ways)
Bottom Line
It was all about How to Pair and Connect Apple AirPods to a Windows 10 PC. I hope this article is very helpful for you to pair and connect apple AirPods to a windows 10 PC. This is the right place to solve your problems. From this article, you will get something good. However, if you faced any kind of problem don’t hesitate to leave comments down below.
Related Post: How to Sync and Move Folders, Software, and Settings Between Windows 10 PCs
Tagged
Share This Article
If you have an Airpods then you want to connect it with your Windows 10 PC. When you try to pair the Apple AirPods then you don’t know the way. When you search on YouTube then the video you are watching maybe it is not real. But don’t worry I am here to solve your problem. This article doesn’t require any third-party software. If you want to pair and connect Apple AirPods to a Windows 10 PC then you need to read this article. So, without wasting any time let’s get has started. From this article, you will learn How to Pair and Connect Apple AirPods to a Windows 10 PC.
Further, if you are not an audiophile or obsessed with super high-quality audio. Some Airpods are tiny wireless earbuds and they’re not going to give you the best sound quality especially in this price range. They have good AAC audio but it’s not going to be the absolute best when it comes to pure high-quality audio.
In fact, they are very similar to the Apple Earpods that if you have an iPhone or if you got the latest iPhone 7 listen to the sound quality on those and the AirPods are ninety-nine percent the same quality audio that the AirPods give you maybe a little bit higher. So, audio quality takes a backseat to the main features which one of main features is the W1 chip that’s inside each of the AirPods that makes them smarter than most other Bluetooth devices. The W1 chip allows for instant pairing with iOS 10 devices.
Related Post: 3 Ways to Share Photos, Videos Between iPhone and Android
How to Pair and Connect Apple AirPods to a Windows 10 PC
Step 1. At first, put both AirPods into their case make sure that the case of AirPods has a full charge.
Step 2. Now, open the lid of the AirPods case doesn’t get any AirPods from the case.
Step 3. Next, long press on the circle button at the backside of Airpods case. Press it till the light inside the case will change from black to white. and the white light should blink.
Step 4. When the white light blinks the go to the Settings from the Start menu or shortcut to open the settings simply press Windows Key + I.
Step 5. Click on the Devices.
 Click on the Devices
 Step 6. Turn on the toggle of Bluetooth then tap on the Add Bluetooth or Other Device.
 Tap on the Add Bluetooth or Other Device
 Step 7. However, click on the Bluetooth at the top option.
 Click on the Bluetooth
 Step 8. Once you click on the Bluetooth then you will get the name of your AirPods. Simply click on your Airpods name.
 Click on your AirPods Name
 When you click on your Aripods name then it will automatically connect to your Windows 10 PC. If the steps will not work then do the steps from the first.
Related Post: How to Convert Photo to PDF on iPhone (3 Simple Ways)
Bottom Line
It was all about How to Pair and Connect Apple AirPods to a Windows 10 PC. I hope this article is very helpful for you to pair and connect apple AirPods to a windows 10 PC. This is the right place to solve your problems. From this article, you will get something good. However, if you faced any kind of problem don’t hesitate to leave comments down below.
Related Post: How to Sync and Move Folders, Software, and Settings Between Windows 10 PCs


