How to Install macOS Monterey on VirtualBox on Windows 10/11?
macOS Monterey is the most workable and beautiful operating system for Mac computers. It is the recent operating system of Hackintosh which is announced several days ago on 7th June 2021. It is 10 times better than macOS Big Sur. Because the design, features, updates, functions, is more unique than the older versions of macOS. At Worldwide Developer Conference (WWDC), Apple has announced all the features and preview of macOS Monterey in a convenient way. However, macOS Monterey has got too many amazing features that will satisfy while using it. We are going to show you how to install macOS Monterey on VirtualBox on Windows PC.
Apple has released many operating systems at once like every year. Such as iOS 15, iPadOS 15, watchOS 15, and the one and only macOS 12 (Monterey). All of these are getting more unique whenever they release a new version for that. You have to keep in mind that these new operating systems contain amazing features and functions. You can test the beta version of all of them on your devices.
However, installing macOS Monterey on an actual PC is really difficult and not an easy task. Because macOS doesn’t allow their operating system to be installed in other PC. Therefore, you can use the virtual machine to install macOS Monterey without facing any difficulties. We are having many virtualization software but VMware and VirtualBox are the best and easy among them. So, lets start installing macOS Monterey on VirtualBox.
Download Required Files
1: Install VirtualBox on Windows PC
Step 1: First open google chrome and open the VirtualBox website click on the Windows 10 Hosts and click on the All supported Platforms.
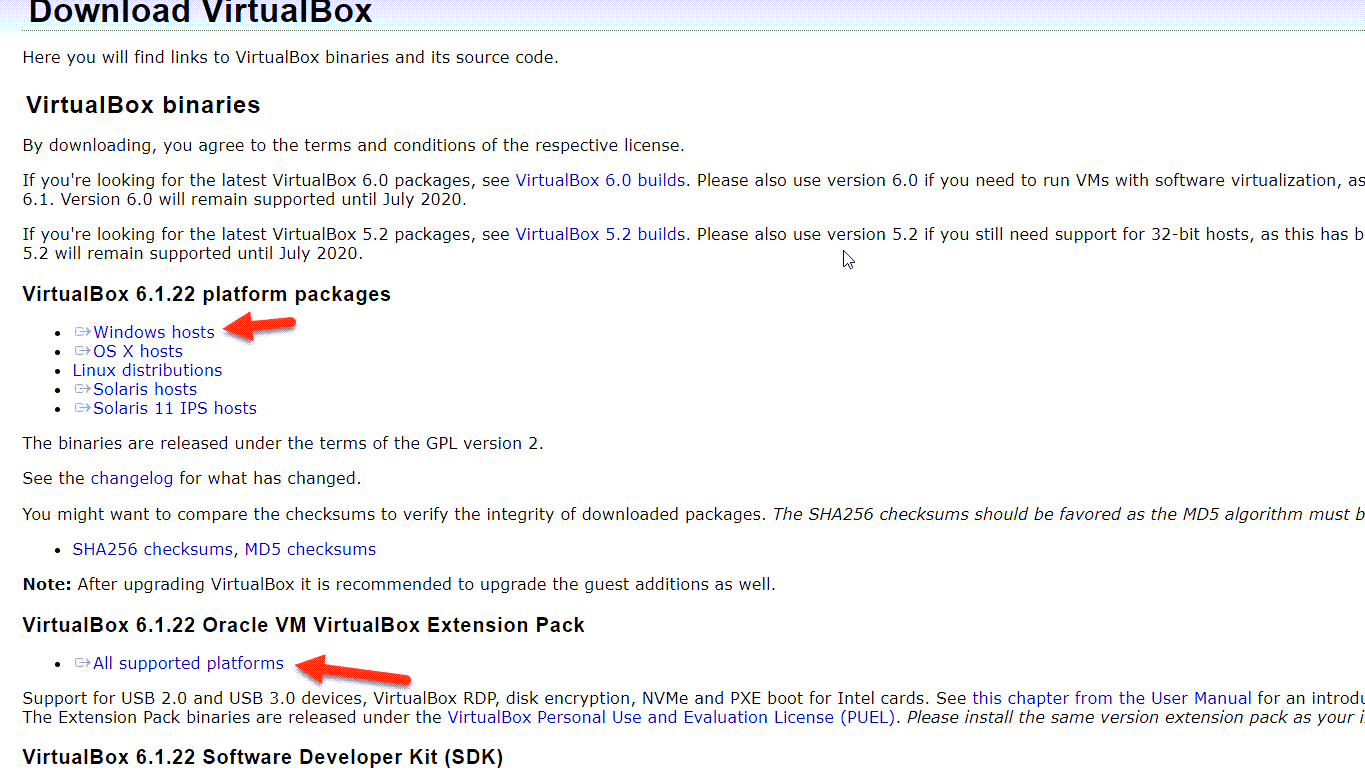 Click On The Windows 10 Hosts And Click On The All Supported Platforms.
 Step 2: When the Virtualbox is installed then open it then click on the Preferences.
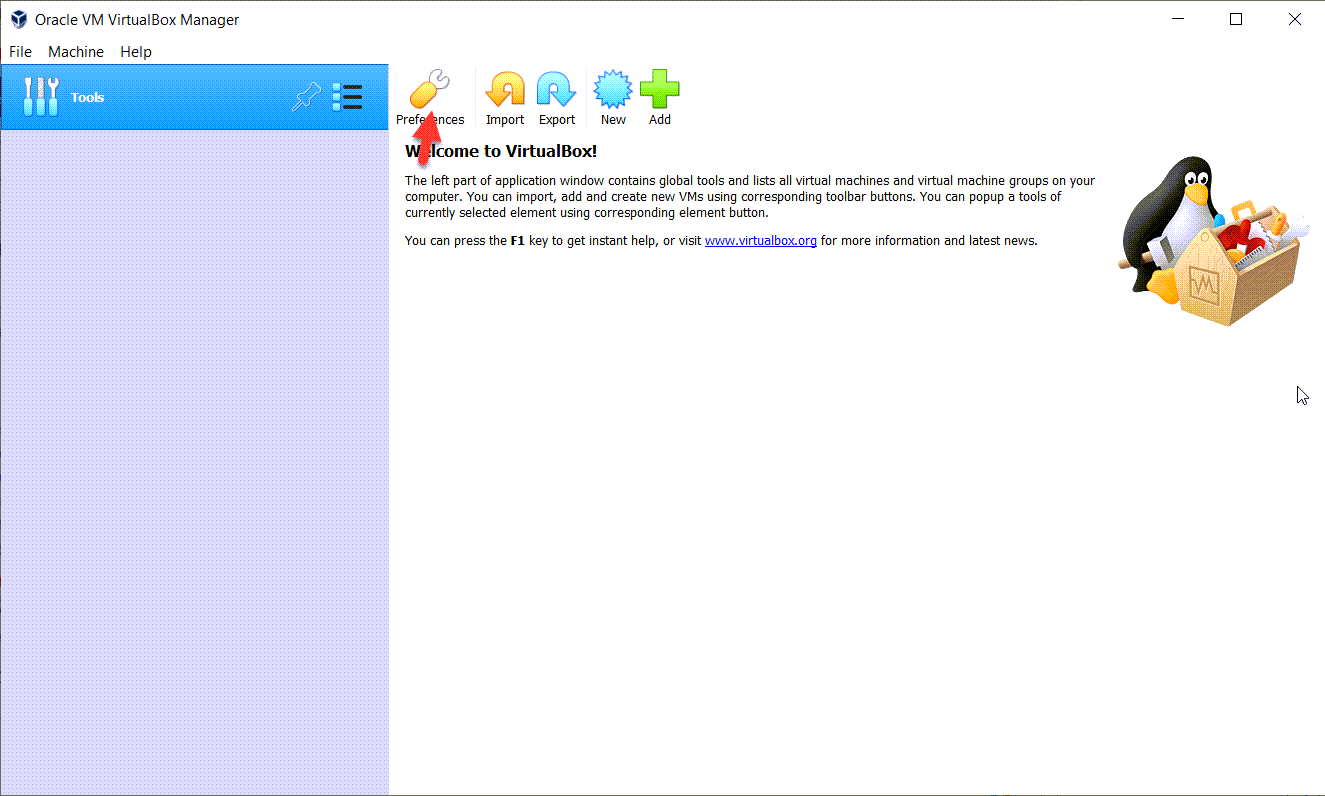 When VirtualBox Is Installed Then Click On The Preferences
 Step 3: Go to Extensions and click on the + icon.
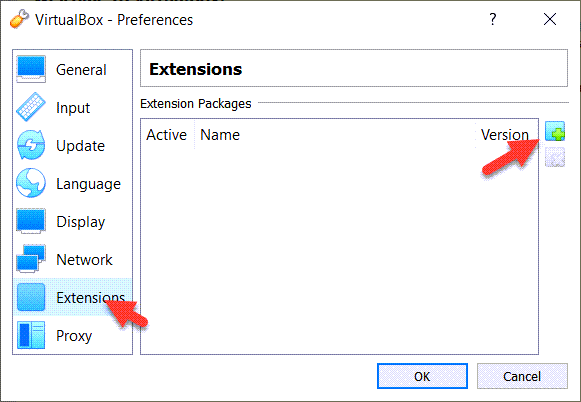 Go to Extensions And Click on The + Icon
 Step 4: Select The Extensions Then Click On The Open
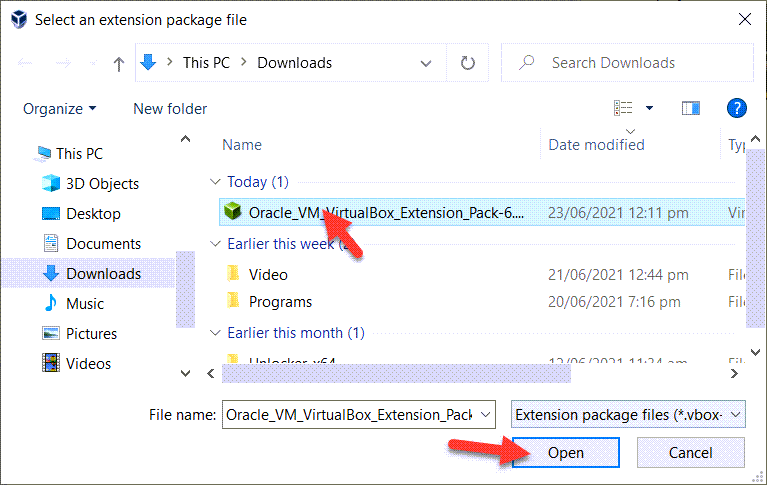 Select The Extensions Then Click On The Open
 Step 5: Now, click on the Install.
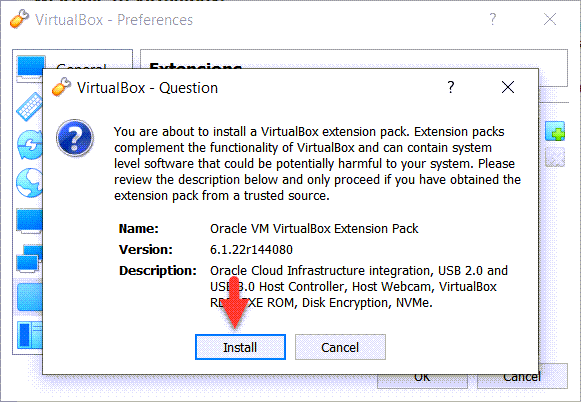 Click On the Install
 Step 6: Scroll down and then click on the I Agree.
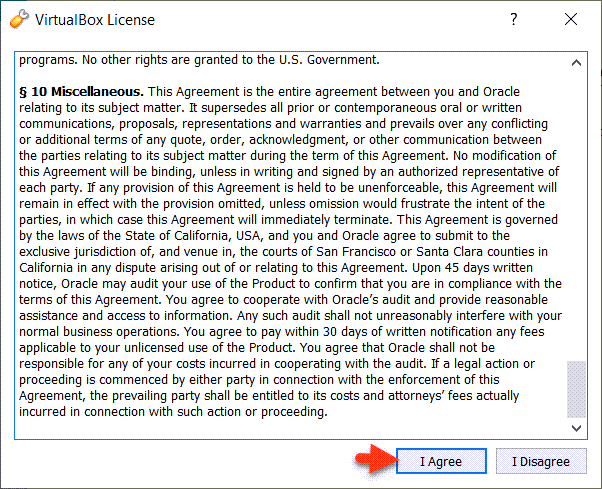 Scroll Down And Click On The I Agree.
 Stp 7: Atlast click on the OK.
2: Create a New Virtual Machine for macOS Monterey
Step 1: Open the VirtualBox and then click on the New.
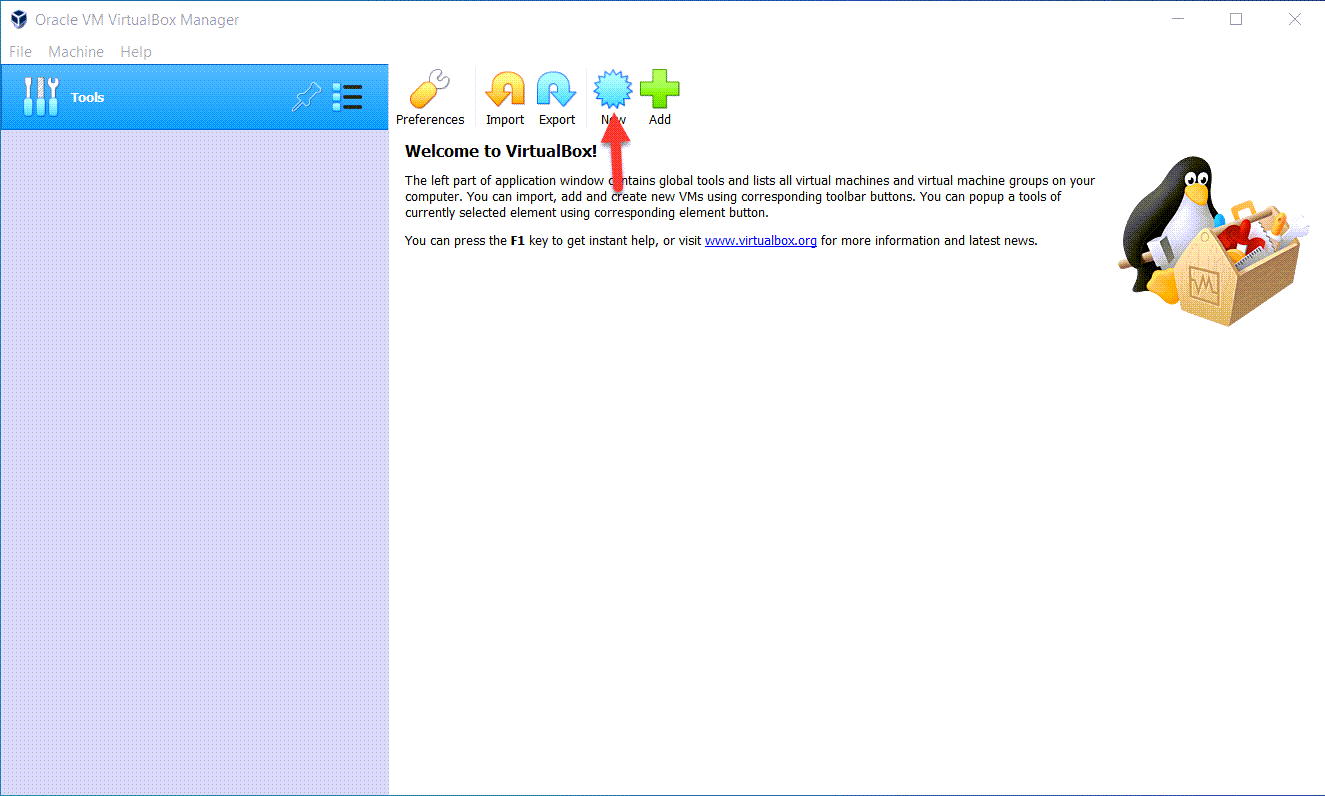 Open The VirtualBox And Click On The New
 Step 2: Now, type your Virtual Machine name and select type Mac OS X, Version Mac OS X (64-Bit), and click on the Next.
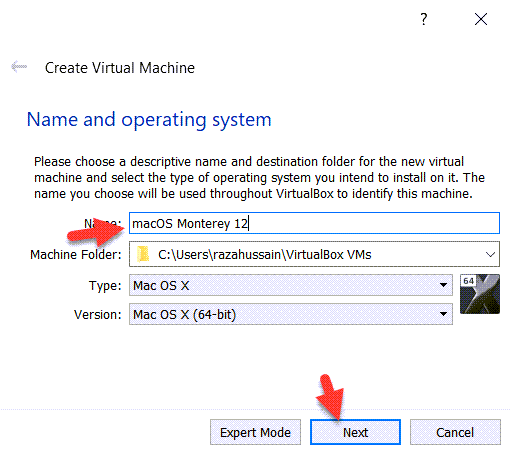 Type The Virtual Machine name
 Step 3: Increase the Memory Size and click on the Next
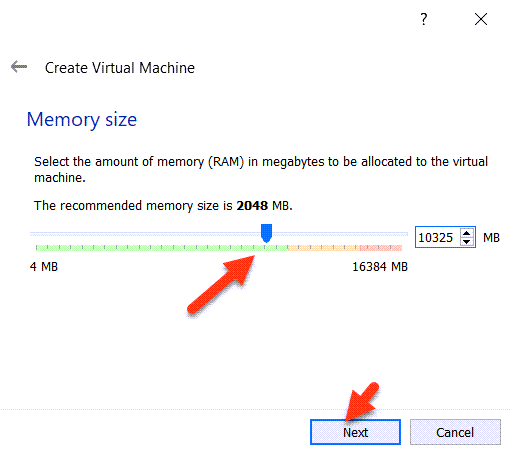 Increase The Memory Size And Click On The Next
 Step 4: Select the create a virtual hard disk and click on the Next.
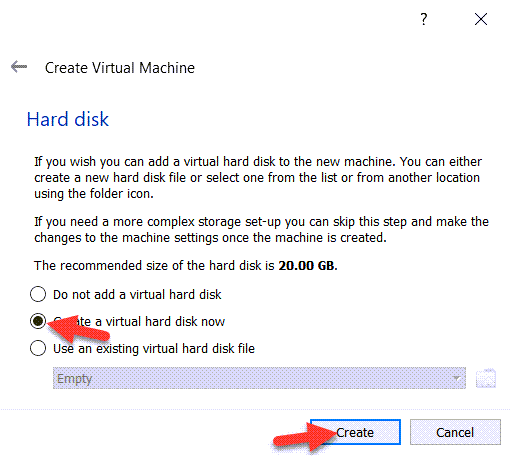 Select The create a virtual hard disk now and click create.
 Step 5: Select The VDI (VirtualBox Disk Image) and click on the Next.
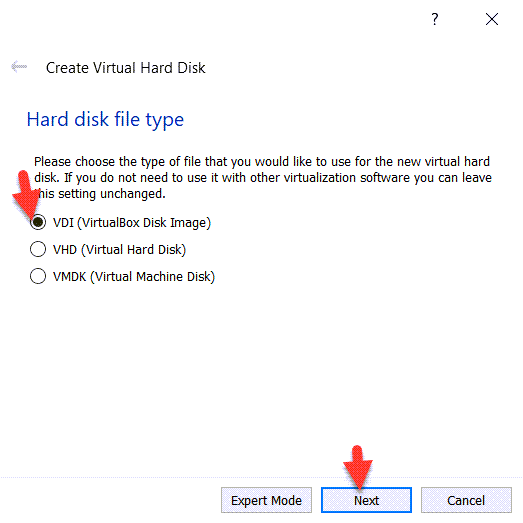 Select The VDI (VirtualBox Disk Image) Click On The Next
 Step 6: Select the Dynamically Allocated and click on the Next.
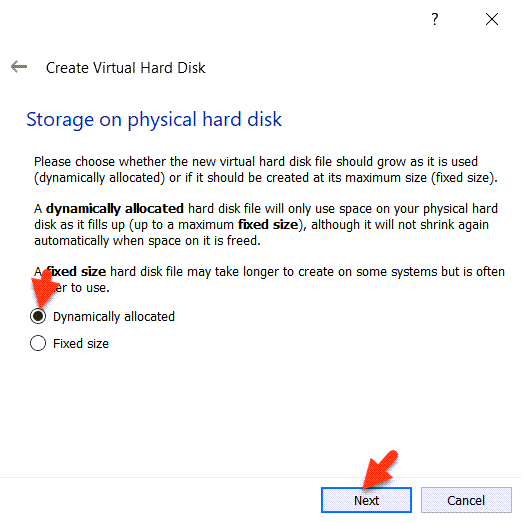 Select the Dynamically Allocated and click on the Next.
 Step 7: Choose the File Location and Increase the size of the Hard Disk to 120 GB and click on the Create.
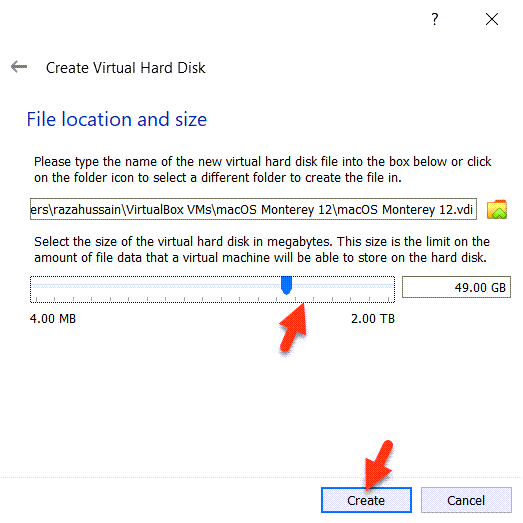 maximize the size of the Hard Disk to 120 GB
 3: Customize the Virtual Machine Settings for a Better Performance
Step 1: Now, click on the Setting.
 Click On The Setting
 Step 2: Go to System and then uncheck the Floppy.
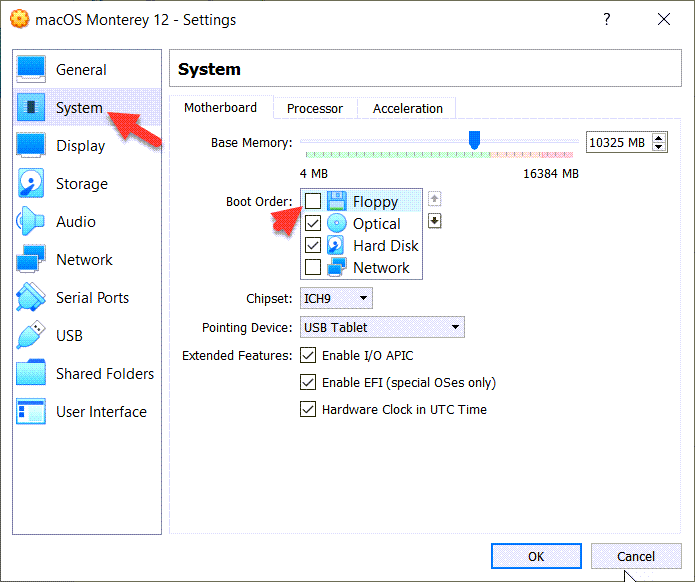 Go to System And Uncheck The Floppy
 Step 3: Go to Processor and increase the number of processors up to 4.
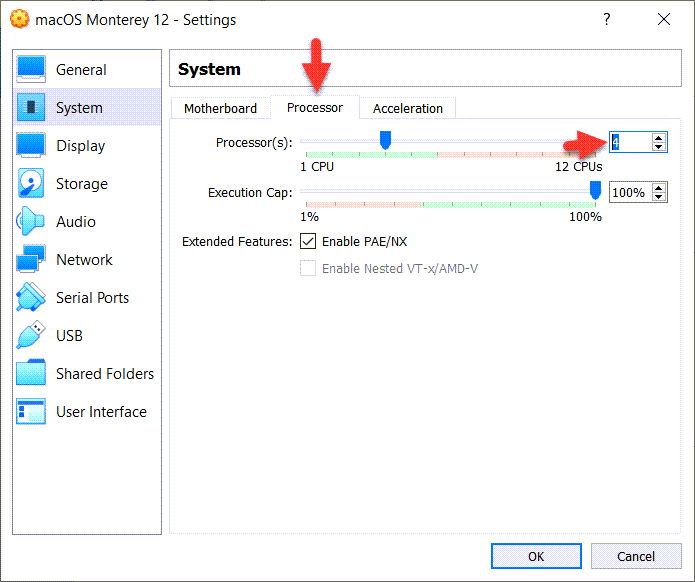 Go to the Processor tab and increase the number of processors up to 4.
 Step 4: Go to the Display, and increase the number of Displays up to 128MB.
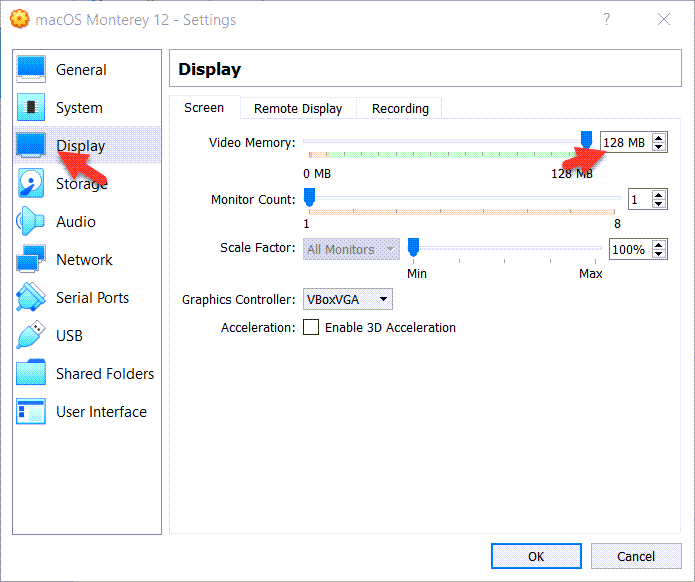 Go to Display And Increase The Number Of Display Up To 128MB
 Step 5: Go to Storage and click on the Empty click on the blue disk icon Click on the choose/Create a virtual optical disk.
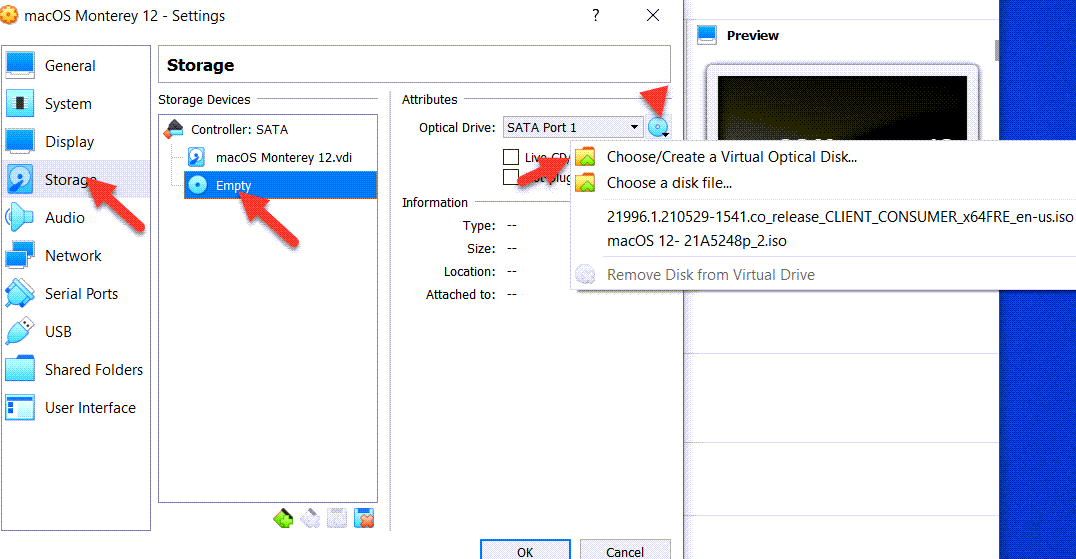 Click On The Empty And Click On The blue disk icon and choose/Create a virtual optical disk.
 Step 6: Now, click on the Add.
 Click On The Add
 Step 7: Now, Select the macOS Monterey ISO Image file and click on the Open.
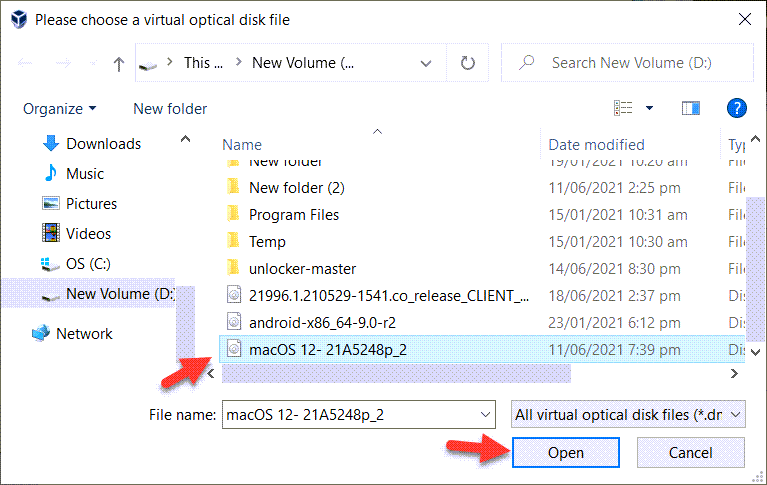 Select the macOS Monterey ISO Image file and click on The Open.
 Step 8: Click on the Choose.
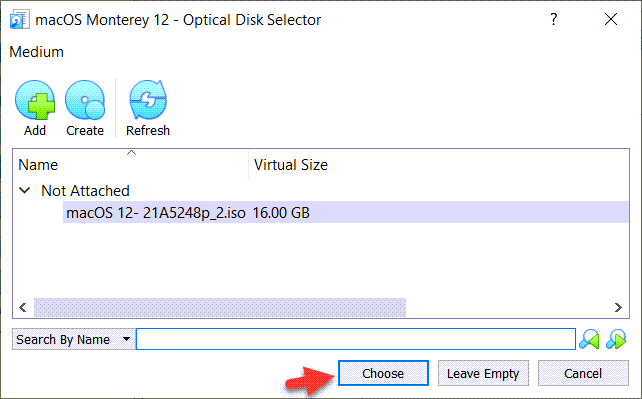 Click On The Choose
 Step 9: Go to USB and USB 3.0 (xHCI) Controller and click on the OK.
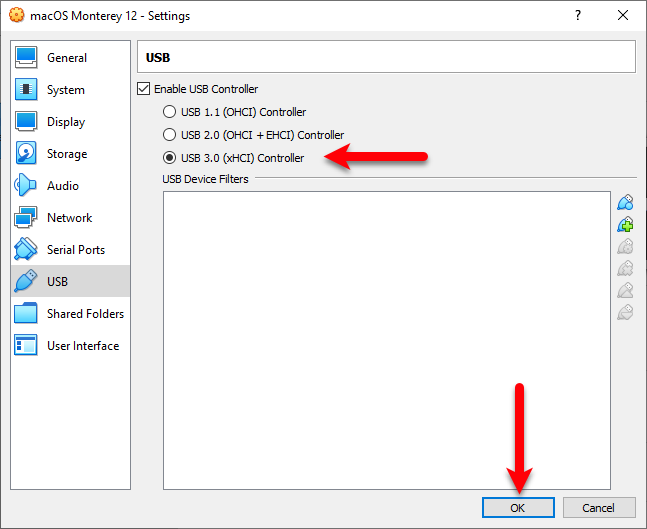 Go to USB and USB 3.0 (xHCI) Controller and click on the OK.
 4: Add Commands to CMD
Step 1: Now, you can open the Code and then paste in the Notepad.
| cd “C:\Program Files\Oracle\VirtualBox\” zVBoxManage.exe modifyvm “VM Name” –-cpuidset 00000001 000106e5 00100800 0098e3fd bfebfbff BoxManage setextradata “VM Name” VBoxInternal/Devices/efi/0/Config/DmiSystemProduct “MacBookPro15,1” Copy > VBoxManage setextradata “VM Name” “VBoxInternal/Devices/efi/0/Config/DmiBoardProduct” “Mac-551B86E5744E2388” VBoxManage setextradata “VM Name” “VBoxInternal/Devices/smc/0/Config/DeviceKey” “ourhardworkbythesewordsguardedpleasedontsteal(c)AppleComputerInc” VBoxManage setextradata “VM Name” “VBoxInternal/Devices/smc/0/Config/GetKeyFromRealSMC” 1 |
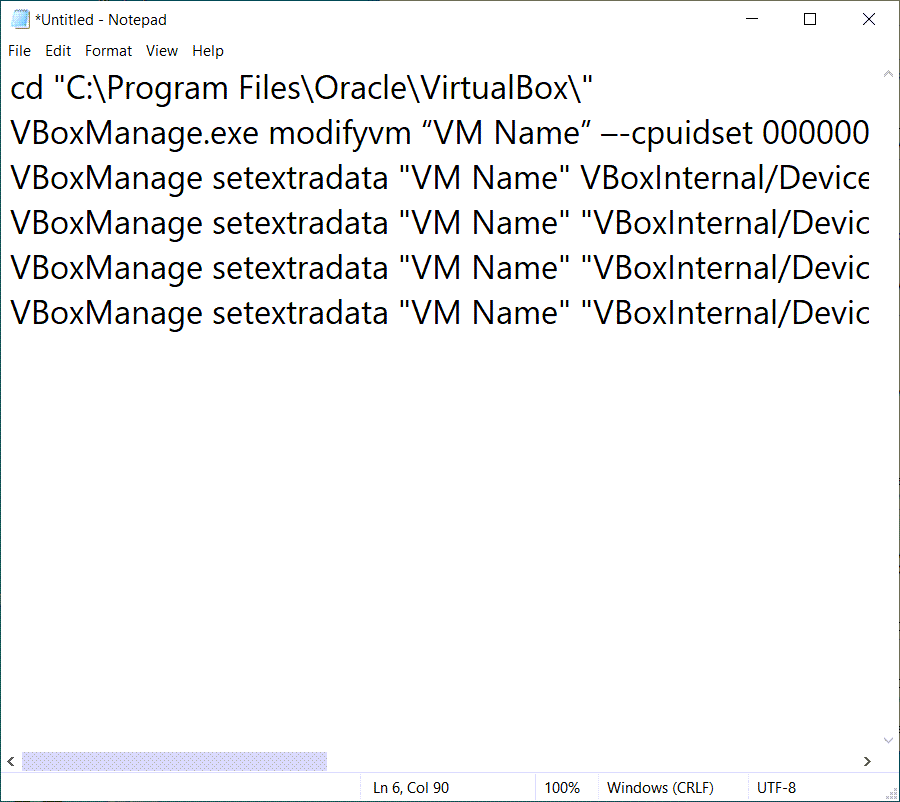 Paste The Code On The Notepad
 Step 2: Click on the Edit and click on the Replace
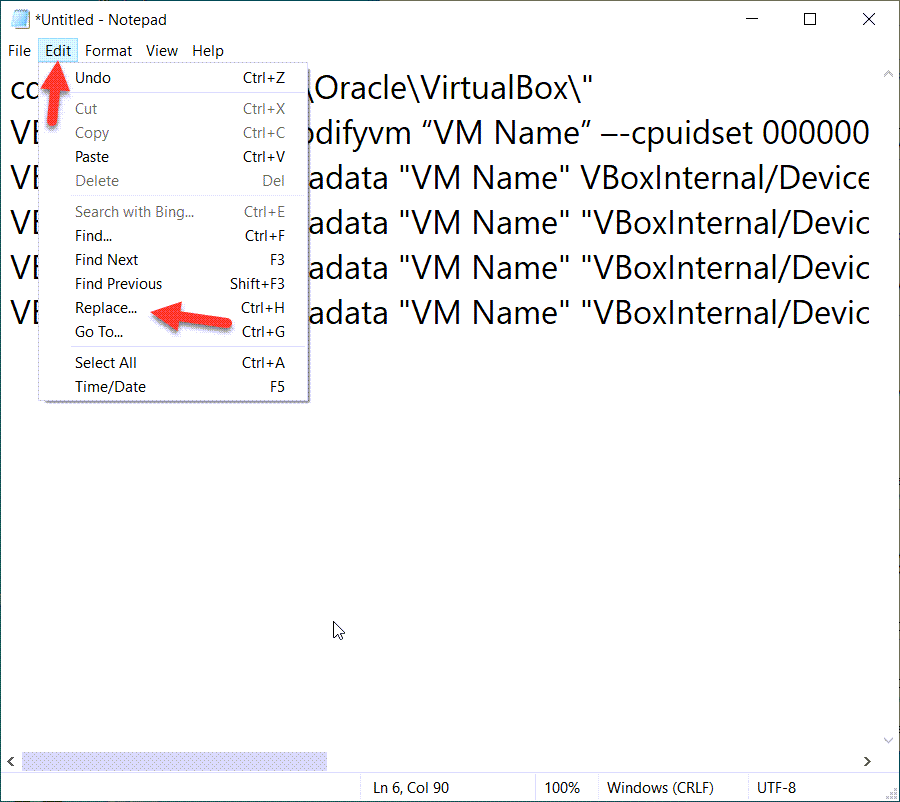 Click On The Edit And Click On The Replace
 Step 3: copy the Virtual Machine and replace it with the VM Name.
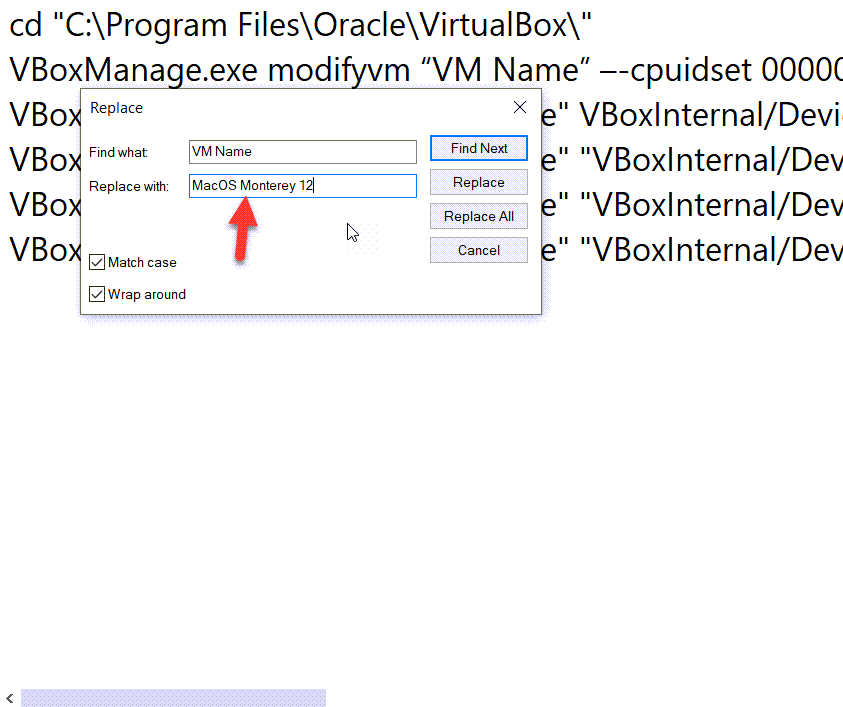 replace the VM Name
 Step 4: Open start Menu and type CMD and right-click on the CMD and click on the Run As Administrator.
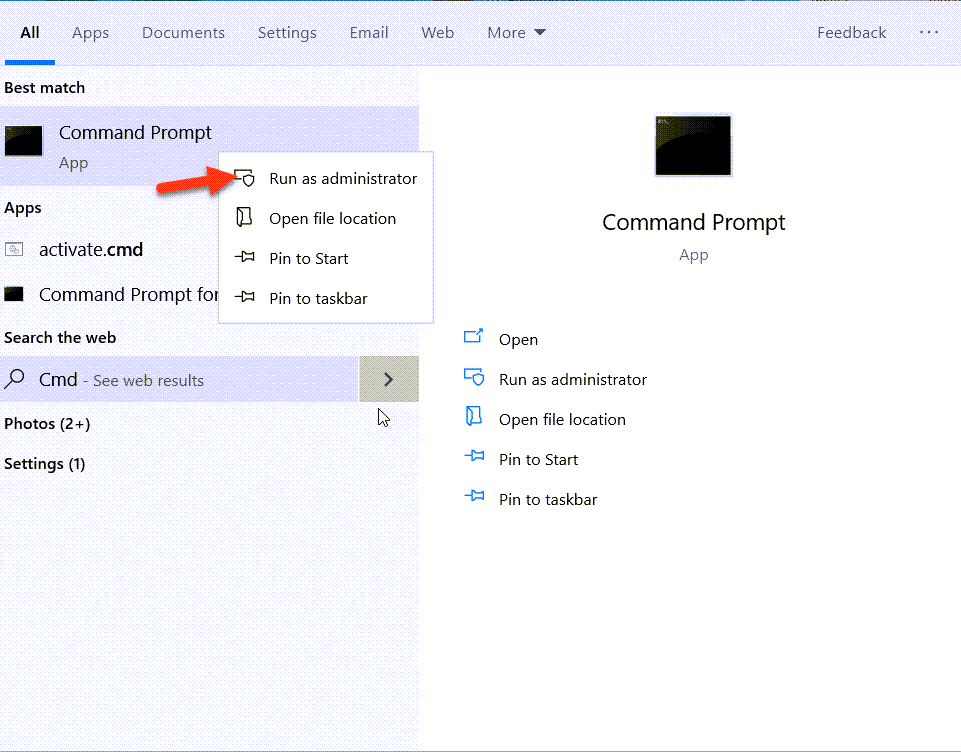 Right-Click On The CMD And Click On The Run As Administrator.
 Step 5: ON each line step By Step and press enter.
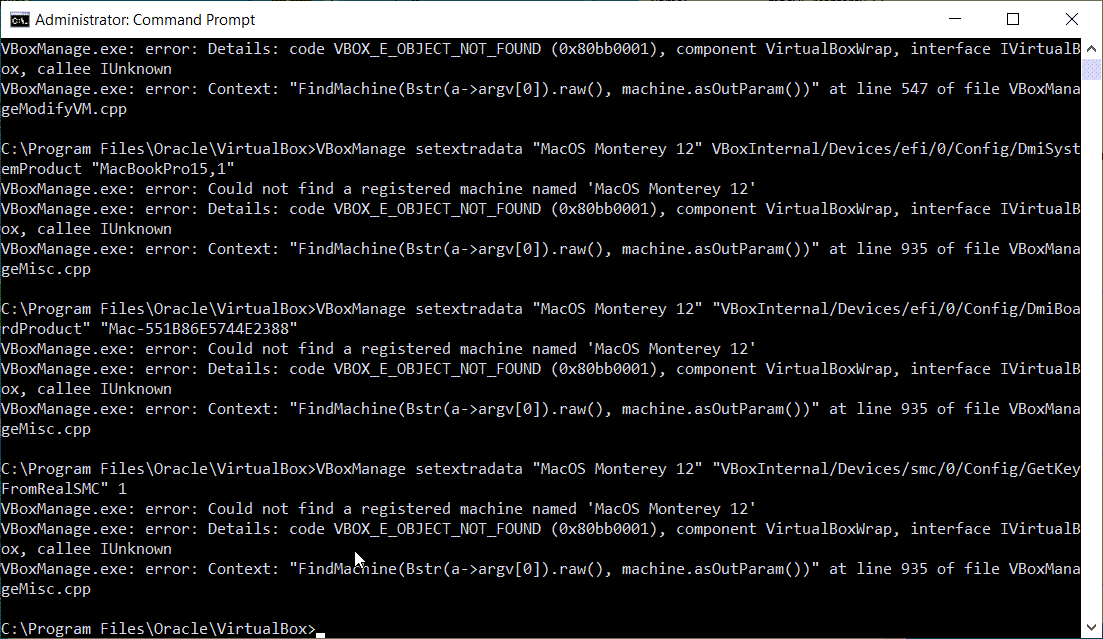 On Each Step By Step You Press Enter
 5: Perform a Clean Installation of macOS Monterey on VirtualBox on Windows PC
Step 1: When it is done then click on the Start.
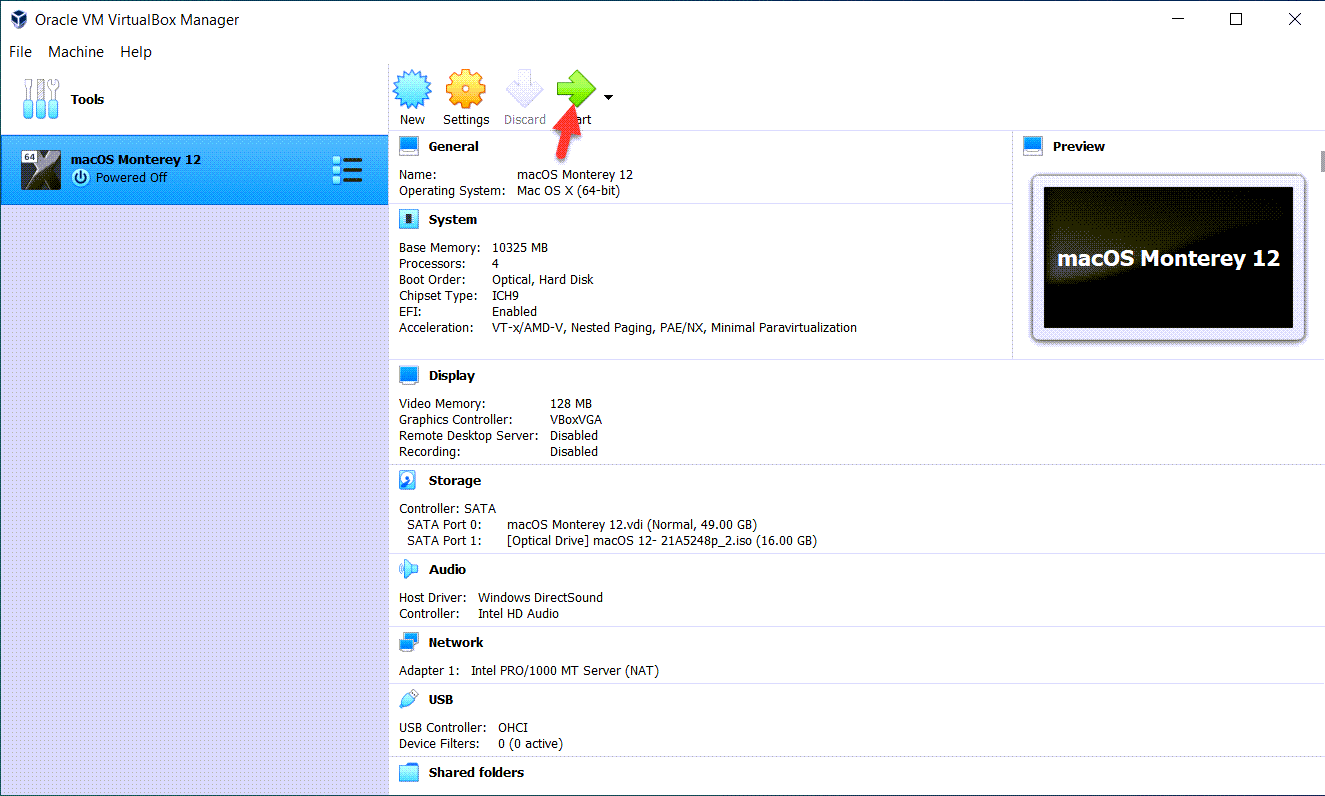 Click On The Start
 Step 2: Select you language and then click on the Continue Icon.
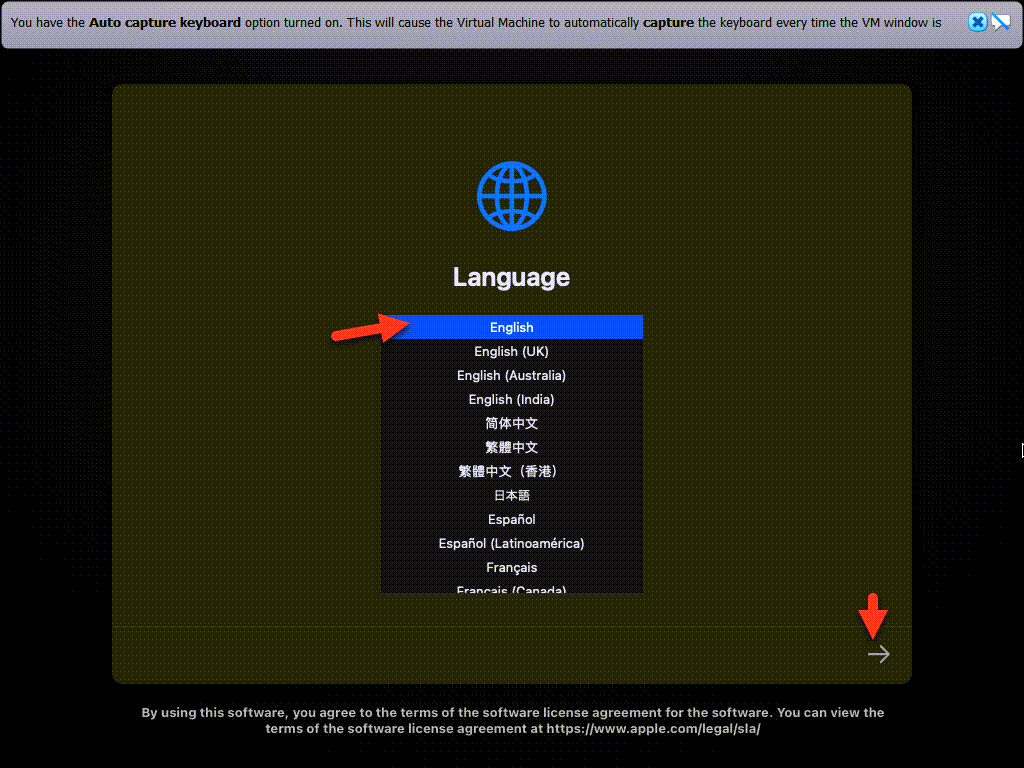 Select Your Language And Then Click On The Continue Icon.
 Step 3: Select Disk Utility And Click On The Continue.
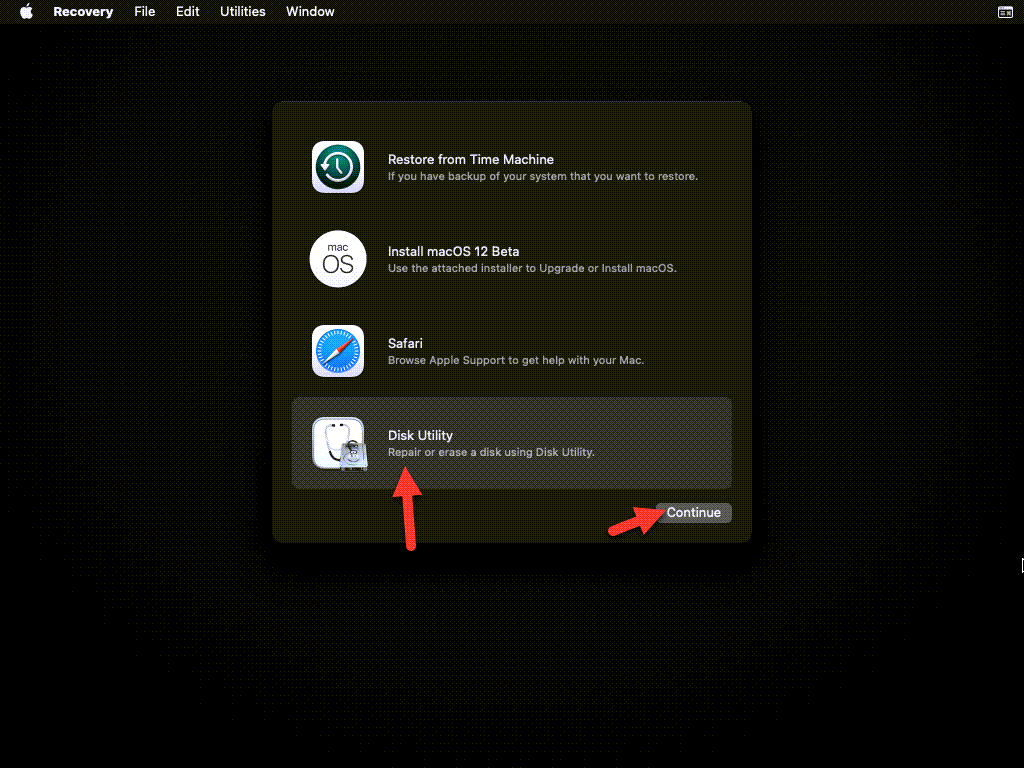 Select Disk Utility And Click On The Continue
 Step 4: Go to VBox HAEDDISK Media and click on the Erase.
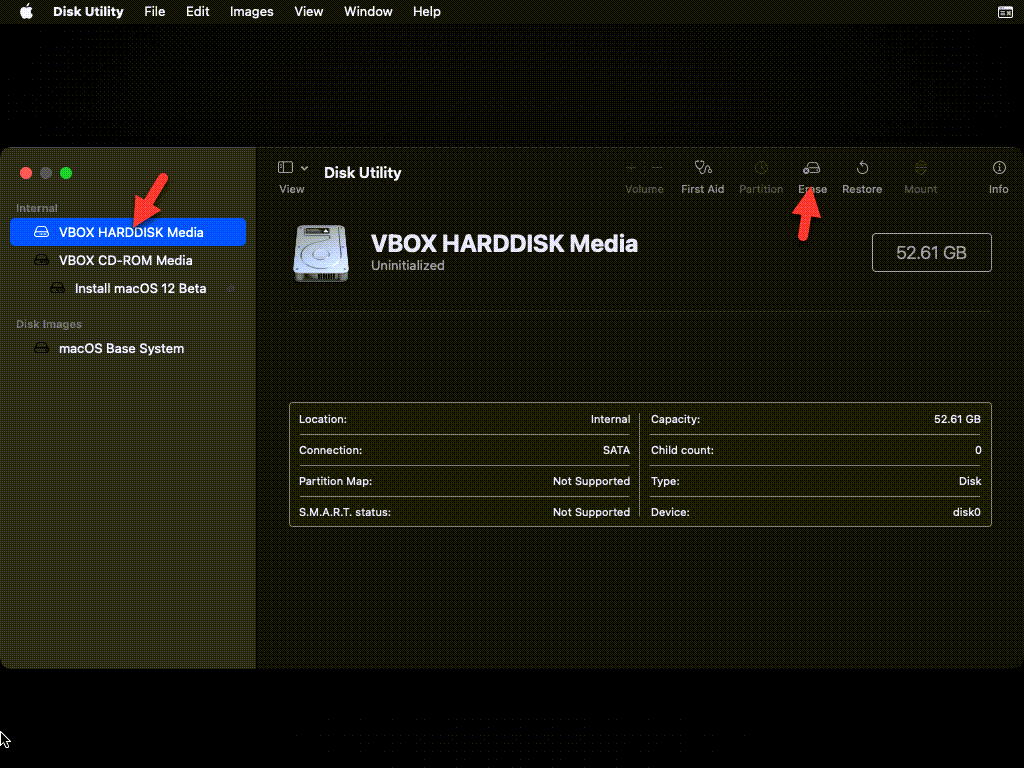 Go to VBox HAEDDISK Media and click on the Erase.
 Step 5: Now, close the Disk Utility.
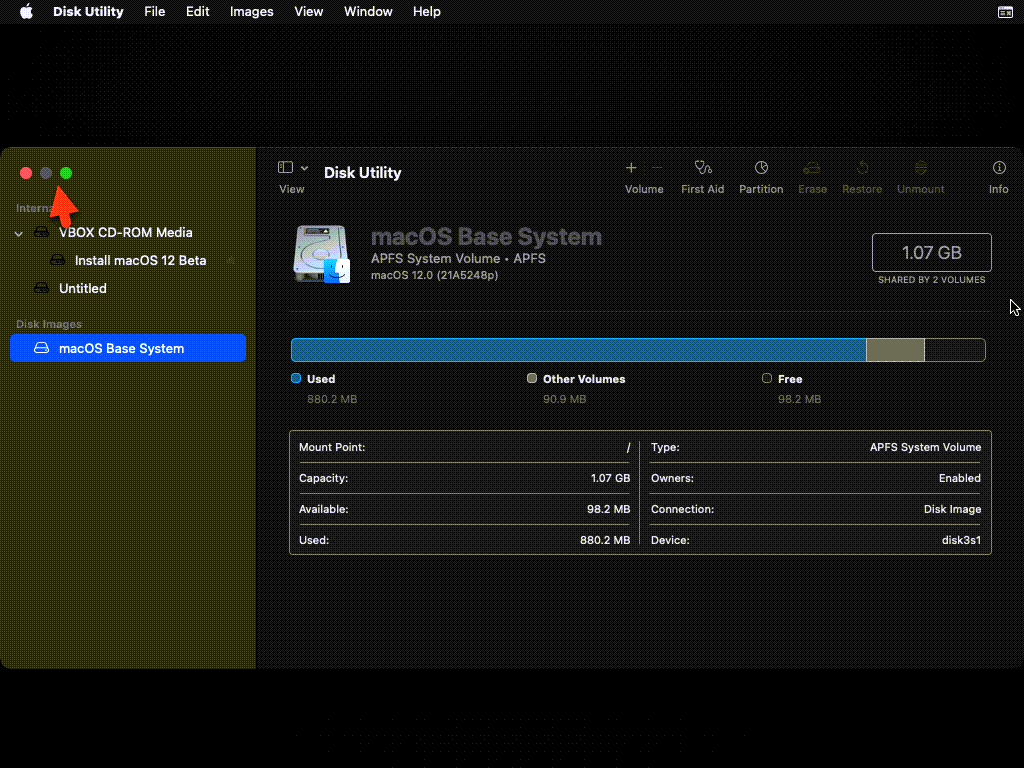 close the Disk Utility.
 Step 6: Now choose InstallmacOS 12 Beta and click continue.
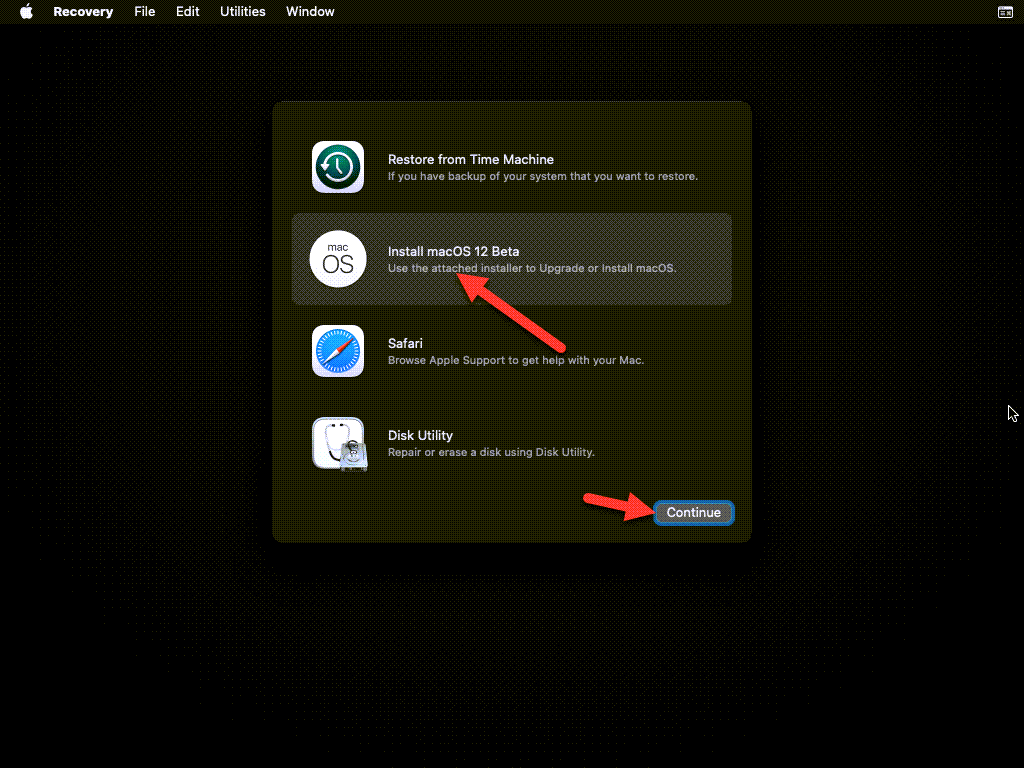 Now choose Install macOS 12 Beta and click continue.
 Step 7: Click On The Continue
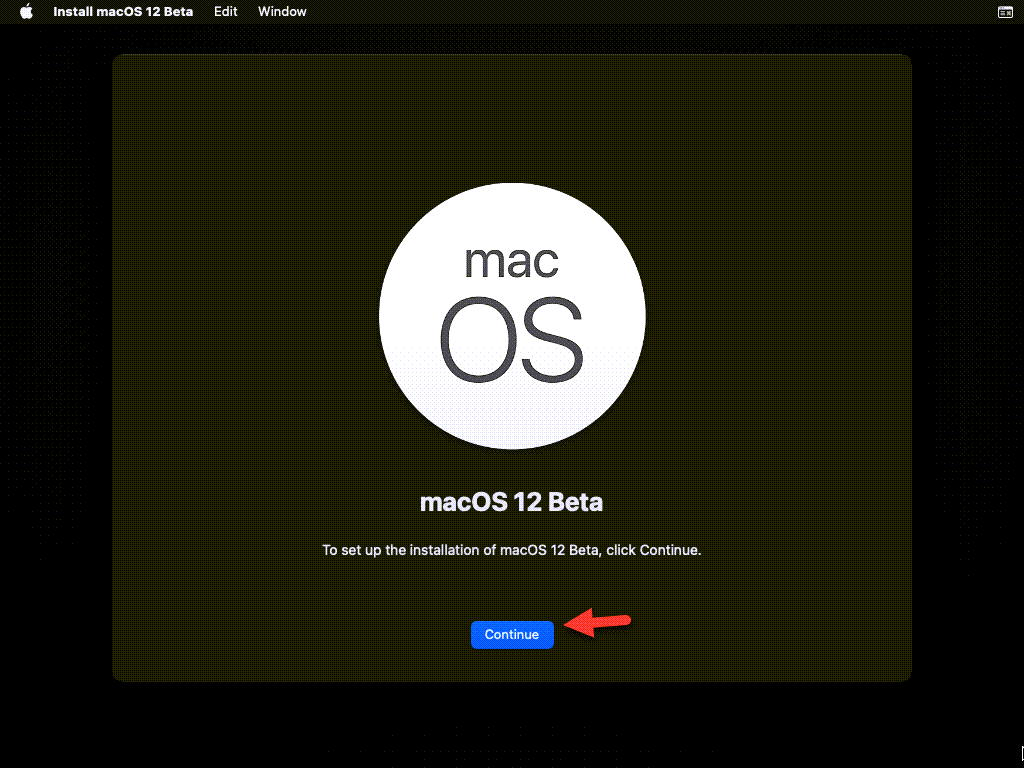 Click On The Continue
 Step 8: Click on the Agree.
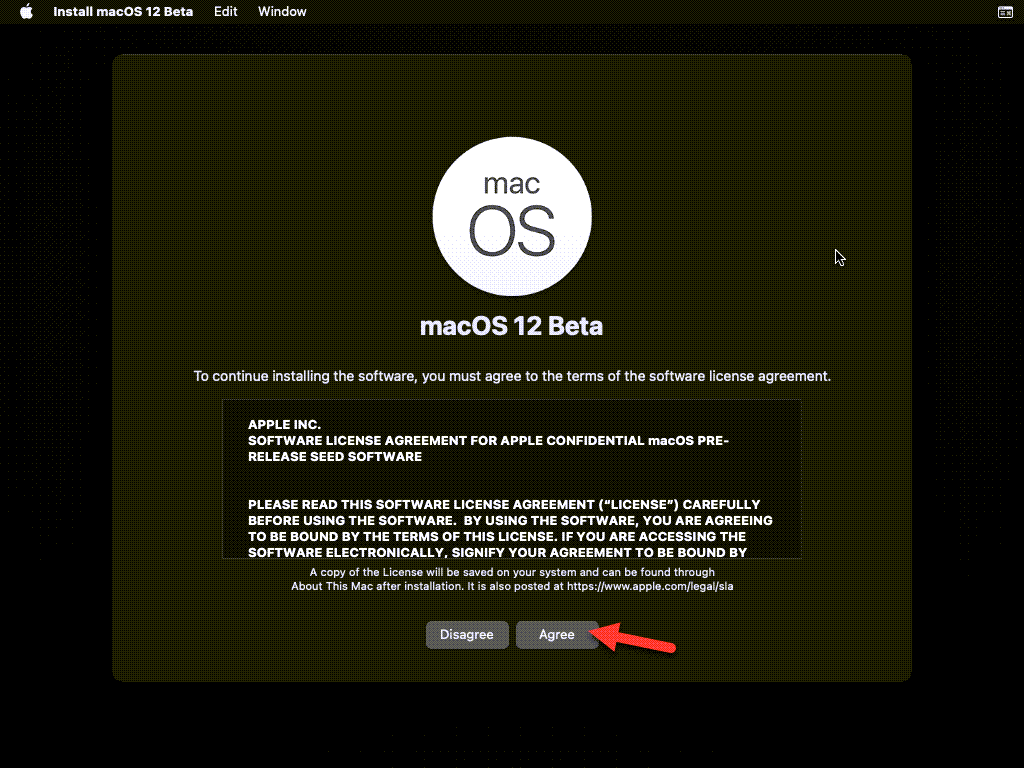 Click On The Agree
 Step 9: Select the disk and click on the continue.
 Select The Disk And Click On The Continue
 Step 10: Now, wait for download the MacOS Monterey.
 Wait For Download The MacOS Monterey
 Basic Settings of macOS Monterey on VirtualBox
- Select your country and then click on the Continue.
- Select your written and spoken language and Continue.
- Click on the Not Now.
- Select my computer does not connect Internet then click on the Continue.
- Again click on the Continue.
- Click on the Continue.
- Click on the Not Now. Install macOS Monterey on VirtualBox
- Agree to the terms and condition of macOS Monterey
- Create your computer and account and click on the continue.
- Again click on the Continue.
- Click on the Sign Up Later.
- On Siri click on the continues and enables it.
- Select your language click on the continue.
- Click on the Not now and click on the continue.
- Choose your look for macOS Monterey on VirtualBox and click on the Continue
- Wait for ready the Mac OS Monterey
- Finally my Mac OS Monterey successfully installed on VirtualBox.
Last Words
It was all about how to install macOS Monterey on VirtualBox on Windows PC. So, VirtualBox also works like VMware Workstation which allows you to install several operating systems. macOS Monterey works the best and you can access all the features without any problem. However, if you are facing any error or problem while following the steps then please comment down below, we will try to provide the solution for that.
Tagged
Share This Article
macOS Monterey is the most workable and beautiful operating system for Mac computers. It is the recent operating system of Hackintosh which is announced several days ago on 7th June 2021. It is 10 times better than macOS Big Sur. Because the design, features, updates, functions, is more unique than the older versions of macOS. At Worldwide Developer Conference (WWDC), Apple has announced all the features and preview of macOS Monterey in a convenient way. However, macOS Monterey has got too many amazing features that will satisfy while using it. We are going to show you how to install macOS Monterey on VirtualBox on Windows PC.
Apple has released many operating systems at once like every year. Such as iOS 15, iPadOS 15, watchOS 15, and the one and only macOS 12 (Monterey). All of these are getting more unique whenever they release a new version for that. You have to keep in mind that these new operating systems contain amazing features and functions. You can test the beta version of all of them on your devices.
However, installing macOS Monterey on an actual PC is really difficult and not an easy task. Because macOS doesn’t allow their operating system to be installed in other PC. Therefore, you can use the virtual machine to install macOS Monterey without facing any difficulties. We are having many virtualization software but VMware and VirtualBox are the best and easy among them. So, lets start installing macOS Monterey on VirtualBox.
Download Required Files
1: Install VirtualBox on Windows PC
Step 1: First open google chrome and open the VirtualBox website click on the Windows 10 Hosts and click on the All supported Platforms.
Click On The Windows 10 Hosts And Click On The All Supported Platforms. Step 2: When the Virtualbox is installed then open it then click on the Preferences.
When VirtualBox Is Installed Then Click On The Preferences Step 3: Go to Extensions and click on the + icon.
Go to Extensions And Click on The + Icon Step 4: Select The Extensions Then Click On The Open
Select The Extensions Then Click On The Open Step 5: Now, click on the Install.
Click On the Install Step 6: Scroll down and then click on the I Agree.
Scroll Down And Click On The I Agree. Stp 7: Atlast click on the OK.
2: Create a New Virtual Machine for macOS Monterey
Step 1: Open the VirtualBox and then click on the New.
Open The VirtualBox And Click On The New Step 2: Now, type your Virtual Machine name and select type Mac OS X, Version Mac OS X (64-Bit), and click on the Next.
Type The Virtual Machine name Step 3: Increase the Memory Size and click on the Next
Increase The Memory Size And Click On The Next Step 4: Select the create a virtual hard disk and click on the Next.
Select The create a virtual hard disk now and click create. Step 5: Select The VDI (VirtualBox Disk Image) and click on the Next.
Select The VDI (VirtualBox Disk Image) Click On The Next Step 6: Select the Dynamically Allocated and click on the Next.
Select the Dynamically Allocated and click on the Next. Step 7: Choose the File Location and Increase the size of the Hard Disk to 120 GB and click on the Create.
maximize the size of the Hard Disk to 120 GB 3: Customize the Virtual Machine Settings for a Better Performance
Step 1: Now, click on the Setting.
Click On The Setting Step 2: Go to System and then uncheck the Floppy.
Go to System And Uncheck The Floppy Step 3: Go to Processor and increase the number of processors up to 4.
Go to the Processor tab and increase the number of processors up to 4. Step 4: Go to the Display, and increase the number of Displays up to 128MB.
Go to Display And Increase The Number Of Display Up To 128MB Step 5: Go to Storage and click on the Empty click on the blue disk icon Click on the choose/Create a virtual optical disk.
Click On The Empty And Click On The blue disk icon and choose/Create a virtual optical disk. Step 6: Now, click on the Add.
Click On The Add Step 7: Now, Select the macOS Monterey ISO Image file and click on the Open.
Select the macOS Monterey ISO Image file and click on The Open. Step 8: Click on the Choose.
Click On The Choose Step 9: Go to USB and USB 3.0 (xHCI) Controller and click on the OK.
Go to USB and USB 3.0 (xHCI) Controller and click on the OK. 4: Add Commands to CMD
Step 1: Now, you can open the Code and then paste in the Notepad.
| cd “C:\Program Files\Oracle\VirtualBox\” zVBoxManage.exe modifyvm “VM Name” –-cpuidset 00000001 000106e5 00100800 0098e3fd bfebfbff BoxManage setextradata “VM Name” VBoxInternal/Devices/efi/0/Config/DmiSystemProduct “MacBookPro15,1” Copy > VBoxManage setextradata “VM Name” “VBoxInternal/Devices/efi/0/Config/DmiBoardProduct” “Mac-551B86E5744E2388” VBoxManage setextradata “VM Name” “VBoxInternal/Devices/smc/0/Config/DeviceKey” “ourhardworkbythesewordsguardedpleasedontsteal(c)AppleComputerInc” VBoxManage setextradata “VM Name” “VBoxInternal/Devices/smc/0/Config/GetKeyFromRealSMC” 1 |
Paste The Code On The Notepad Step 2: Click on the Edit and click on the Replace
Click On The Edit And Click On The Replace Step 3: copy the Virtual Machine and replace it with the VM Name.
replace the VM Name Step 4: Open start Menu and type CMD and right-click on the CMD and click on the Run As Administrator.
Right-Click On The CMD And Click On The Run As Administrator. Step 5: ON each line step By Step and press enter.
On Each Step By Step You Press Enter 5: Perform a Clean Installation of macOS Monterey on VirtualBox on Windows PC
Step 1: When it is done then click on the Start.
Click On The Start Step 2: Select you language and then click on the Continue Icon.
Select Your Language And Then Click On The Continue Icon. Step 3: Select Disk Utility And Click On The Continue.
Select Disk Utility And Click On The Continue Step 4: Go to VBox HAEDDISK Media and click on the Erase.
Go to VBox HAEDDISK Media and click on the Erase. Step 5: Now, close the Disk Utility.
close the Disk Utility. Step 6: Now choose InstallmacOS 12 Beta and click continue.
Now choose Install macOS 12 Beta and click continue. Step 7: Click On The Continue
Click On The Continue Step 8: Click on the Agree.
Click On The Agree Step 9: Select the disk and click on the continue.
Select The Disk And Click On The Continue Step 10: Now, wait for download the MacOS Monterey.
Wait For Download The MacOS Monterey Basic Settings of macOS Monterey on VirtualBox
- Select your country and then click on the Continue.
- Select your written and spoken language and Continue.
- Click on the Not Now.
- Select my computer does not connect Internet then click on the Continue.
- Again click on the Continue.
- Click on the Continue.
- Click on the Not Now. Install macOS Monterey on VirtualBox
- Agree to the terms and condition of macOS Monterey
- Create your computer and account and click on the continue.
- Again click on the Continue.
- Click on the Sign Up Later.
- On Siri click on the continues and enables it.
- Select your language click on the continue.
- Click on the Not now and click on the continue.
- Choose your look for macOS Monterey on VirtualBox and click on the Continue
- Wait for ready the Mac OS Monterey
- Finally my Mac OS Monterey successfully installed on VirtualBox.
Last Words
It was all about how to install macOS Monterey on VirtualBox on Windows PC. So, VirtualBox also works like VMware Workstation which allows you to install several operating systems. macOS Monterey works the best and you can access all the features without any problem. However, if you are facing any error or problem while following the steps then please comment down below, we will try to provide the solution for that.