How to Install Android in VirtualBox?

In this article, you will learn How to install Android in VirtualBox. As a geek, we would love to try new things in the world of Technology. VirtualBox is the best place where you can test multiple operating systems for free. Install Android on a PC is an interesting way to use apps of Android within your computer. Running Android unique apps on PC that you don’t have with yourself on PC. Therefore, installing Android on VirtualBox is the only simplest solution to do.
Basically, Android is a handy operating system based on Linux and some other open-source programs are specially created for smartphones and tablets. You can also have full features of Android on PC. Therefore, you might have enough information about Android, so lets’ start the procedure on how to install Android in VirtualBox.
Required Files to Download:
For a better installation process, you will need to have downloaded some required stuff which you will probably need while installation. Go ahead and download all the files down below.
Create Virtual Machine for Android
Step 1. Open your computer and open VirtualBox and click on the New.
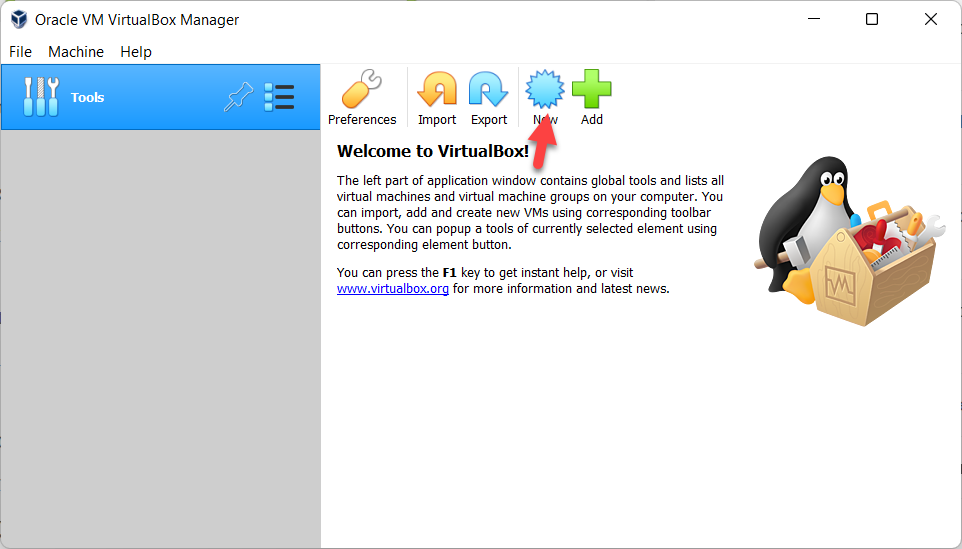 Click On The New
 Step 2. In the name section type Andriod and in type select the Linux and in Version select the Other Linux and then click on the Next.
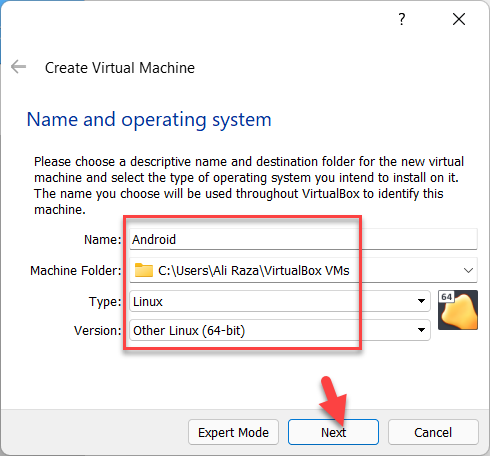 Click On The Next
 Step 3. Select the Memory size of anything greater than 512 MB and Click on Next.
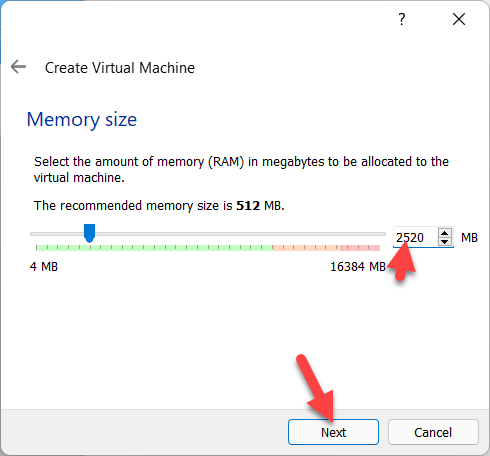 Click On The Next
 Step 4. Select the Create a virtual hard disk now and click on the Create.
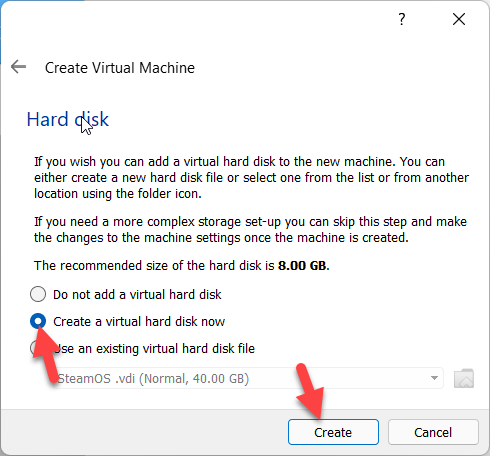 Click On The Create
 Step 5. Select the VDI (Virtualbox Disk Image) and click on the Next.
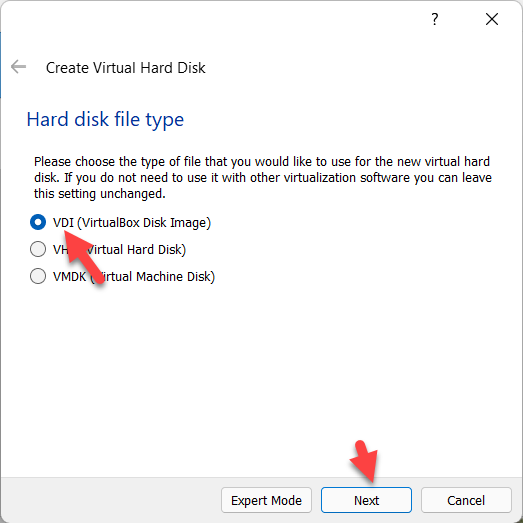 Click On The Next
 Step 6. Select the Dynamically Allocated and click on the Next.
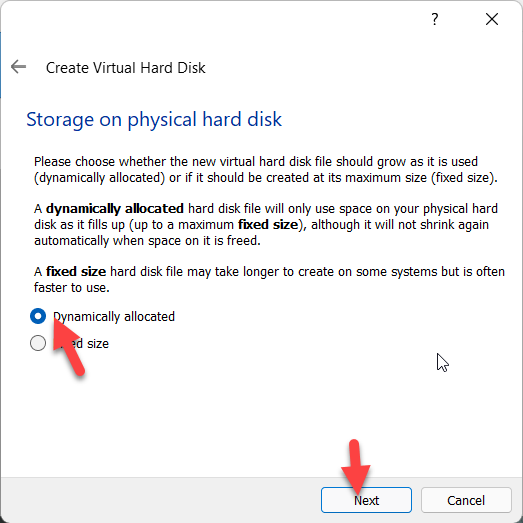 Click On The Next
 Step 7. Choose the path you can keep as default and click on Create.
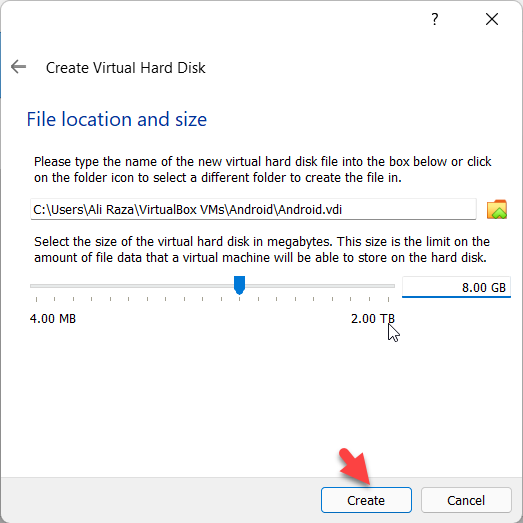 Click On The Create
 Step 8. When is created then click on the Setting?
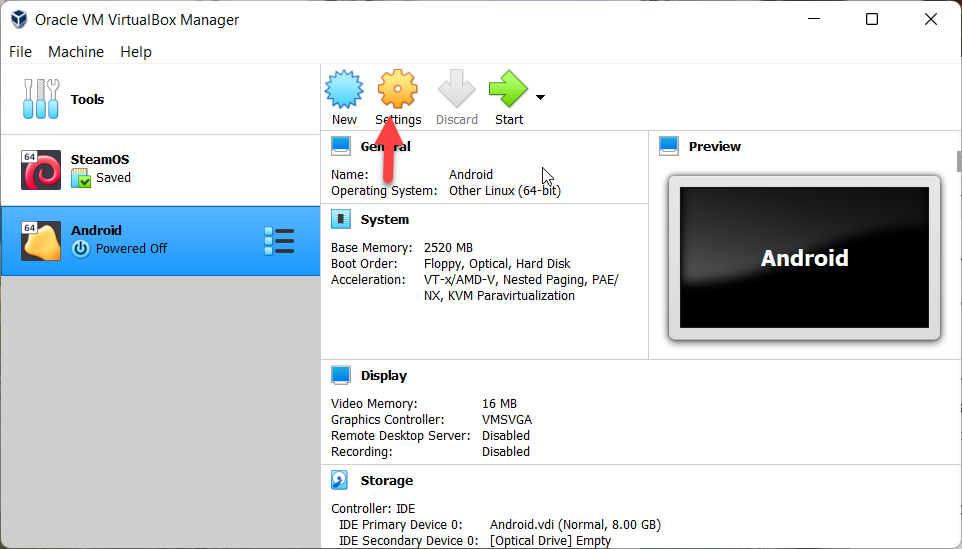 Click On The Setting
 Step 9. Now, go to the Storage tab and click on the Empty and click on the blue disk icon on the top right corner and then click on the Choose a disk file.
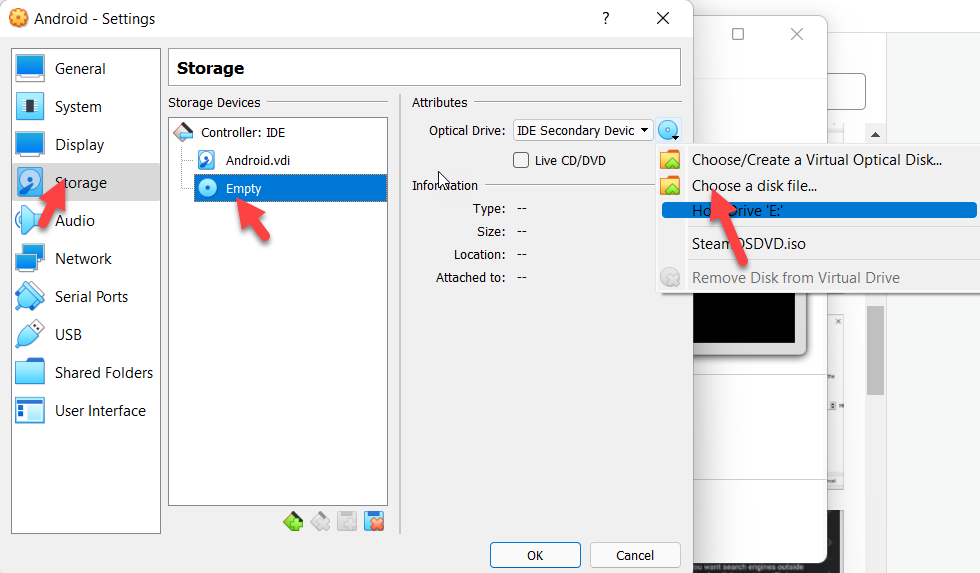 Click on the Choose a disk file
 Step 10. Select the ISO file that you downloaded and click on the Open.
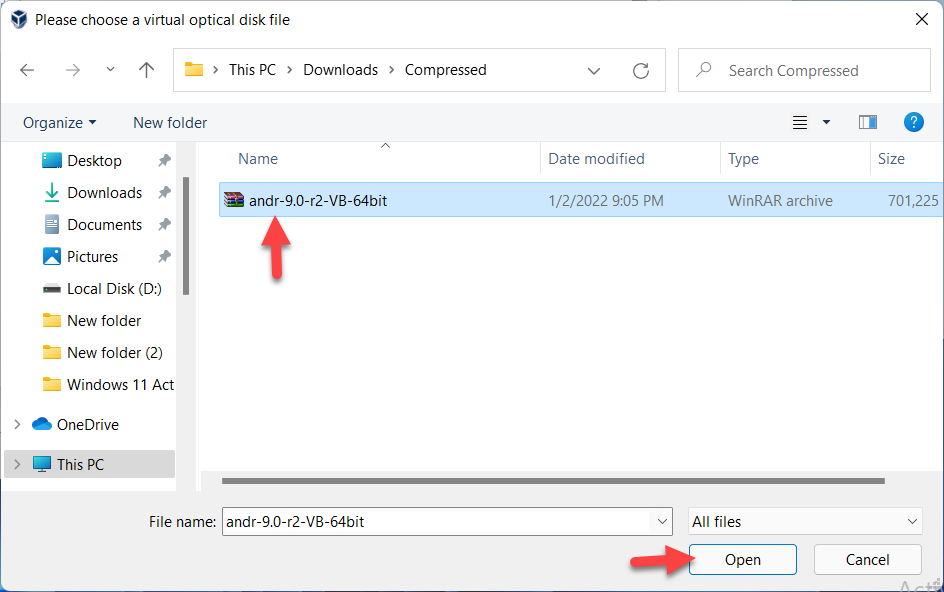 Click On The Open
 Setup and Install Android in VirtualBox
Step 1. When the file is open then click on the Start.
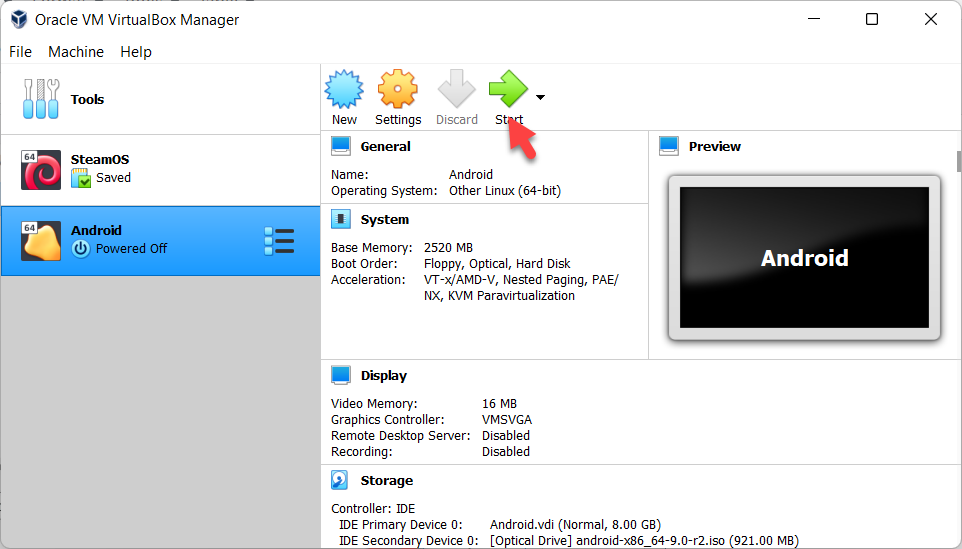 Click on the start
 Step 2. Select the Installation – Installing Android-x86 to hard disk and press enter.
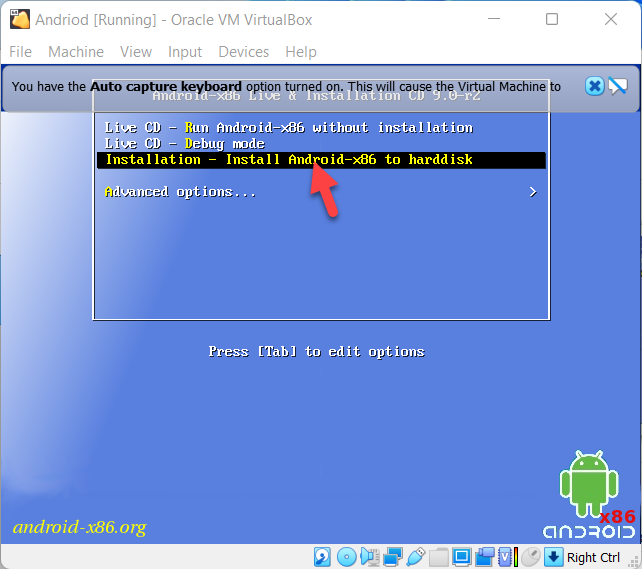 Select the Installation – Installing Android-x86 to hard disk
 Step 3. Select the Create/Modify partitions and click on the OK.
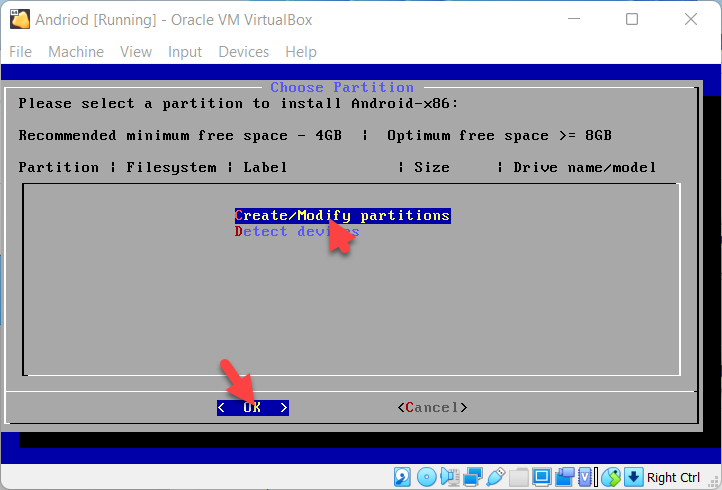 Click on the OK
 Step 4. select the New option, and then select the Primary disk option. Try to keep it anything above 8GB.
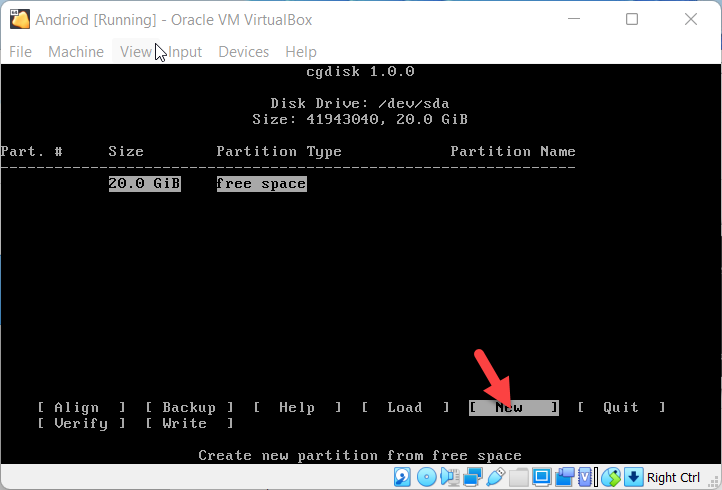 Select the New
 Step 5. Now, from here select the Write.
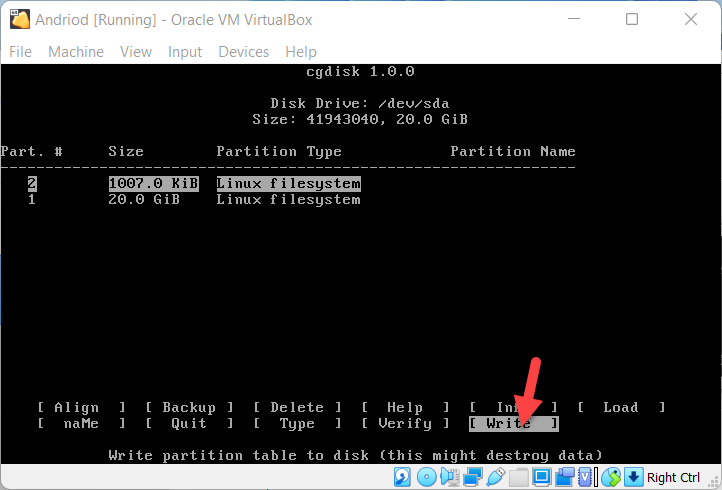 Select The Write
 Step 6. select the partition (sda1) and click on the OK.
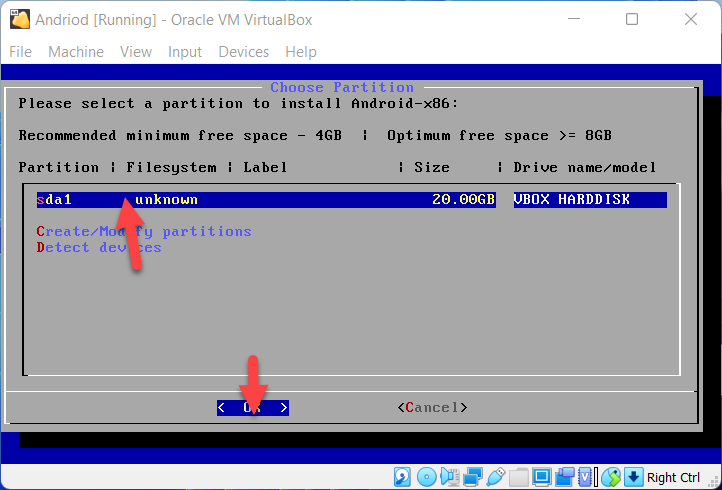 Click On The OK
 Step 7. In the file, the system selects the (ext3) Click On The OK.
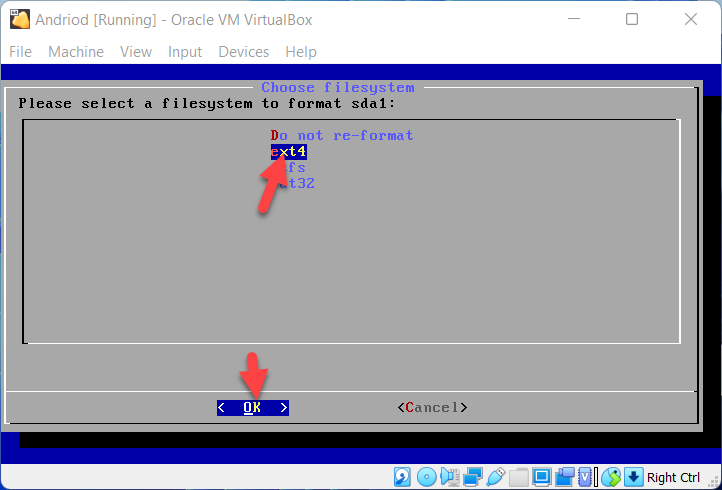 Click On The OK
 Step 8. Now, Andriod is downloaded in Virtualbox on windows 11.
Bottom Line:
It was all about How to Install Android in VirtualBox. I hope this article is very helpful for you to add a follow button. This is the right place where you can easily solve your problem. After following these steps I hope you will not face any kind of problem. If you faced any kind of problem and if you have any type of suggestions then do comment.
Related link:
Tagged
Share This Article
In this article, you will learn How to install Android in VirtualBox. As a geek, we would love to try new things in the world of Technology. VirtualBox is the best place where you can test multiple operating systems for free. Install Android on a PC is an interesting way to use apps of Android within your computer. Running Android unique apps on PC that you don’t have with yourself on PC. Therefore, installing Android on VirtualBox is the only simplest solution to do.
Basically, Android is a handy operating system based on Linux and some other open-source programs are specially created for smartphones and tablets. You can also have full features of Android on PC. Therefore, you might have enough information about Android, so lets’ start the procedure on how to install Android in VirtualBox.
Required Files to Download:
For a better installation process, you will need to have downloaded some required stuff which you will probably need while installation. Go ahead and download all the files down below.
Create Virtual Machine for Android
Step 1. Open your computer and open VirtualBox and click on the New.
 Click On The New
 Step 2. In the name section type Andriod and in type select the Linux and in Version select the Other Linux and then click on the Next.
 Click On The Next
 Step 3. Select the Memory size of anything greater than 512 MB and Click on Next.
 Click On The Next
 Step 4. Select the Create a virtual hard disk now and click on the Create.
 Click On The Create
 Step 5. Select the VDI (Virtualbox Disk Image) and click on the Next.
 Click On The Next
 Step 6. Select the Dynamically Allocated and click on the Next.
 Click On The Next
 Step 7. Choose the path you can keep as default and click on Create.
 Click On The Create
 Step 8. When is created then click on the Setting?
 Click On The Setting
 Step 9. Now, go to the Storage tab and click on the Empty and click on the blue disk icon on the top right corner and then click on the Choose a disk file.
 Click on the Choose a disk file
 Step 10. Select the ISO file that you downloaded and click on the Open.
 Click On The Open
 Setup and Install Android in VirtualBox
Step 1. When the file is open then click on the Start.
 Click on the start
 Step 2. Select the Installation – Installing Android-x86 to hard disk and press enter.
 Select the Installation – Installing Android-x86 to hard disk
 Step 3. Select the Create/Modify partitions and click on the OK.
 Click on the OK
 Step 4. select the New option, and then select the Primary disk option. Try to keep it anything above 8GB.
 Select the New
 Step 5. Now, from here select the Write.
 Select The Write
 Step 6. select the partition (sda1) and click on the OK.
 Click On The OK
 Step 7. In the file, the system selects the (ext3) Click On The OK.
 Click On The OK
 Step 8. Now, Andriod is downloaded in Virtualbox on windows 11.
Bottom Line:
It was all about How to Install Android in VirtualBox. I hope this article is very helpful for you to add a follow button. This is the right place where you can easily solve your problem. After following these steps I hope you will not face any kind of problem. If you faced any kind of problem and if you have any type of suggestions then do comment.
Related link:


