How to Install macOS High Sierra on VirtualBox on Windows PC?

In this article, I am going to guide you on How to Install macOS High Sierra on VirtualBox on Windows PC using an ISO File. As you know that macOS High Sierra is one of the great operating systems of Mac. Basically, it was released on 26th September 2017. It has been released with an amazing event which is called WWDC (Worldwide Developer Conference). It has come up with too many handy and useful features which were absolutely great at that time. Most of the users really like macOS High Sierra because it is lightweight and easy to use as compared to recent operating systems.
It is a really old operating system if we compare it with the latest operating system that is macOS Monterey. Yes, you heard right the latest and recent operating system of Mac is macOS Monterey. macOS Monterey was released in 2021 with extraordinary features and unique design. Still, there are some people who love to use macOS High Sierra because it is convenient.
However, if you haven’t tested macOS High Sierra yet then you can easily install it on a VirtualBox. VirtualBox is a great place to test another operating system for educational purposes. If you really want to try macOS High Sierra then this article is for you. And keep in mind that I am going to install macOS High Sierra on VirtualBox on Windows 11, you can also install it on Windows 10. Just go ahead and follow each step down below.
If you want to Install macOS Monterey on VirtualBox, you can check the below links:
- How to Install macOS Monterey on VMware on Windows PC?
- How to Install macOS Monterey on VirtualBox on Windows PC?
Download Required Files
Steps to Install macOS High Sierra on VirtualBox
Step 1. Open your windows computer and open the Virtualbox.
Step 2. When VirtualBox and click on the New.
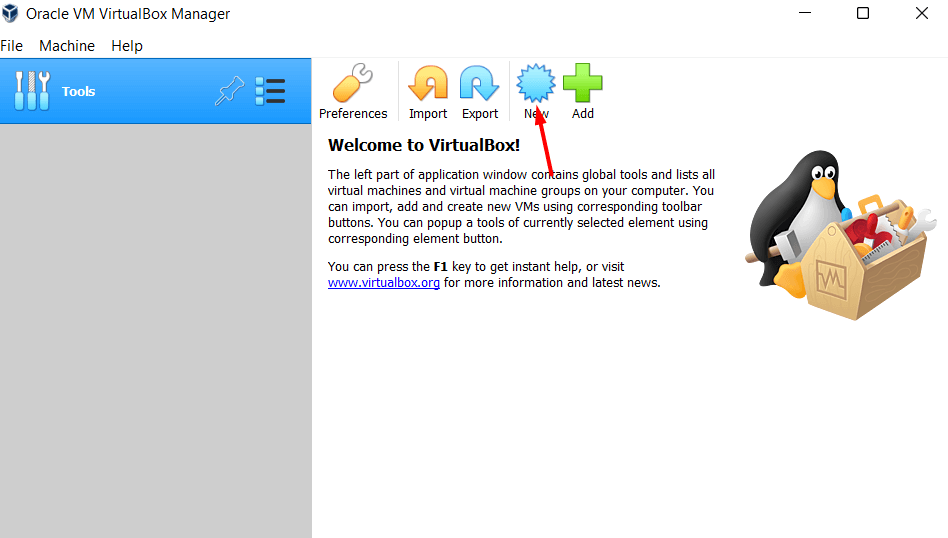 Click on the New
Step 3. Now, type in the name section macOS High Sierra and it will automatically detect the type, version and click on the Next.
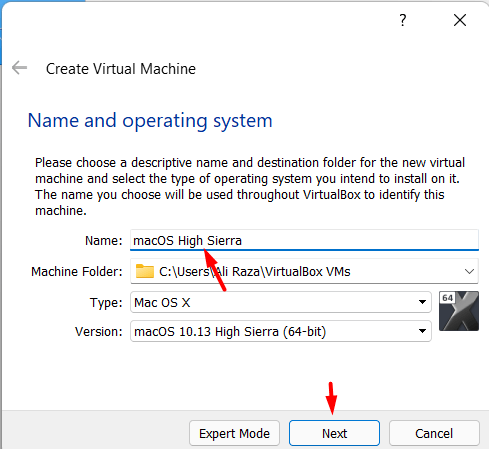 Click on the Next
Step 4. Increase memory size and click on the Next.
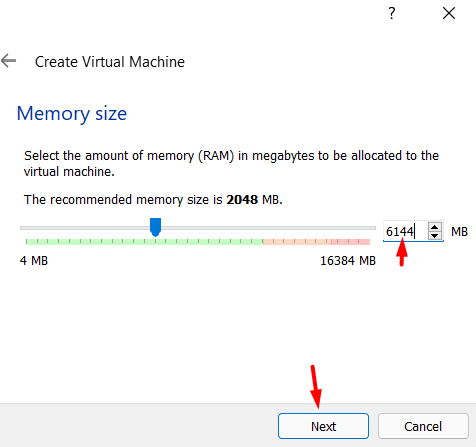 Click on the Next
Step 5. Select the Create a virtual hard disk now and click on the Crate.
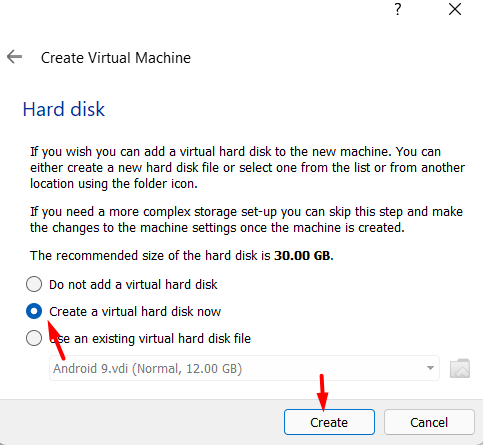 Click on the Create
Step 6. Select the VMDK and then click on the Next.
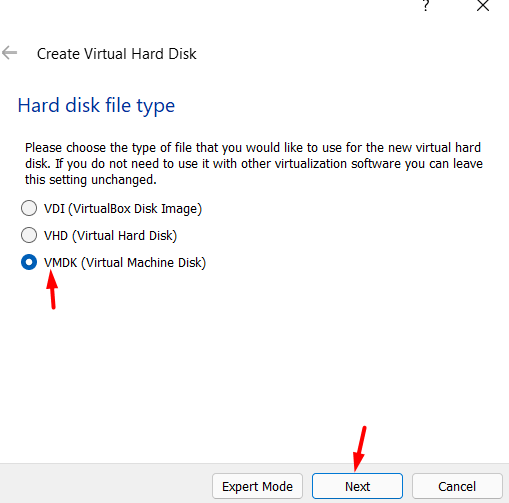 Click on the Next
Step 7. Select the Dynamically allocated and click on the Next.
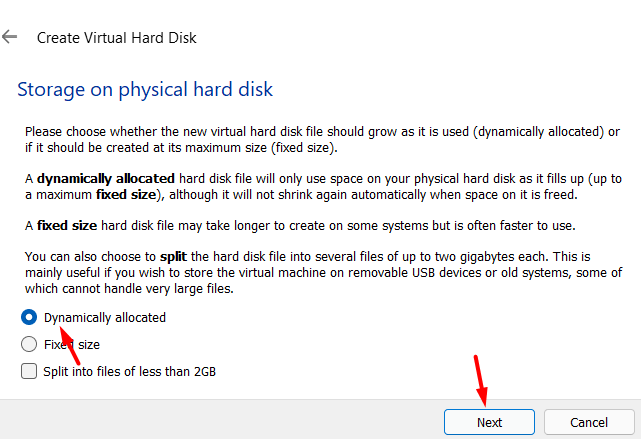 Click on the Next
Step 8. select where you save the file and increase the disk and set 100GB and click on Create.
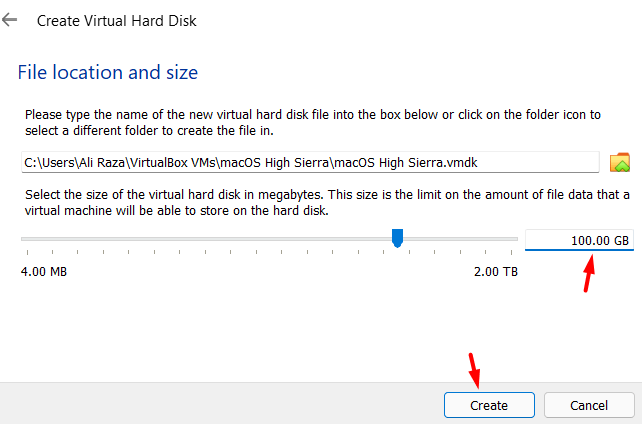 Click on the Create
Set up Virtual Machine Settings
Step 1. When it has been done then click on the setting.
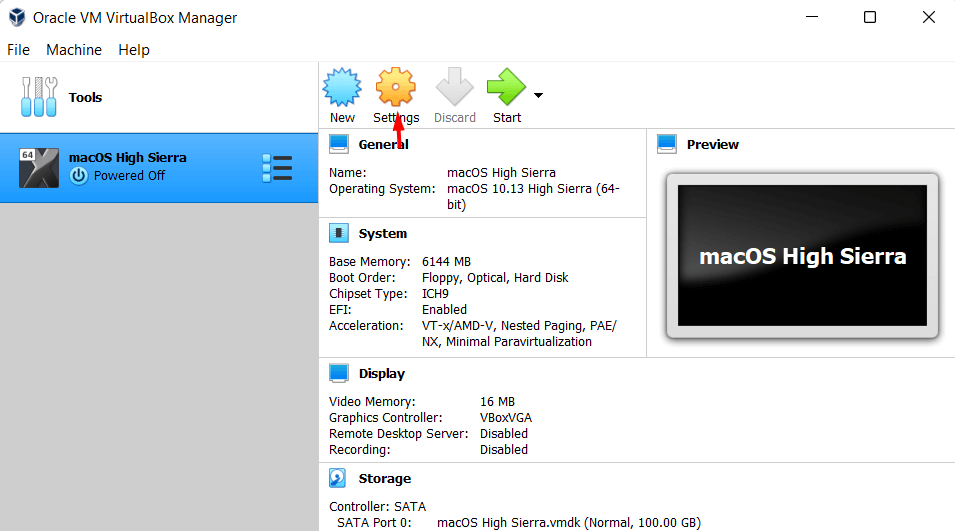 Click on the Setting
Step 2. Go to the System tab and uncheck Floppy change the chipset to PIIX3 and also Enable EFI (special OSes only).
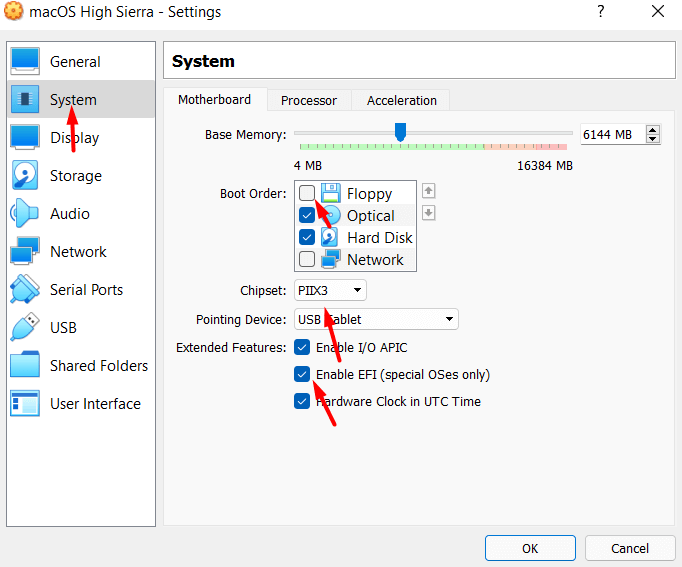 enable EFI (special OSes only)
Step 3. Go to the Processor tab and increase the processor and enable PAE/NX.
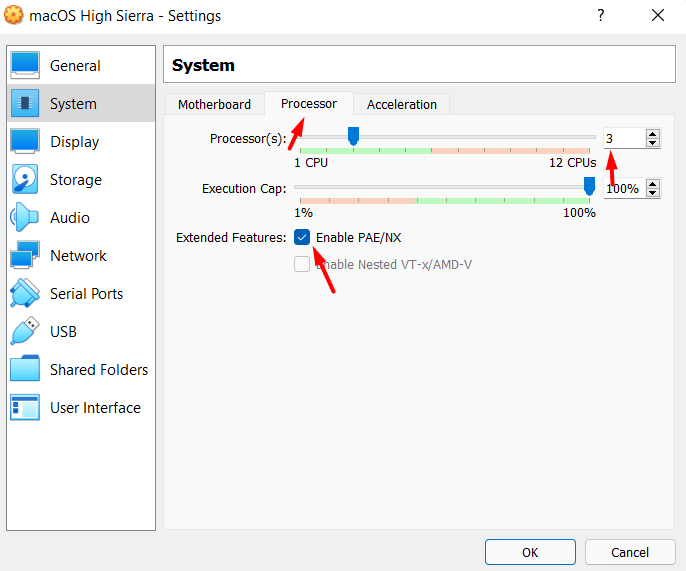 enable PAE/NX
Step 4. Now, go to the Display tab and increase the amount of video memory.
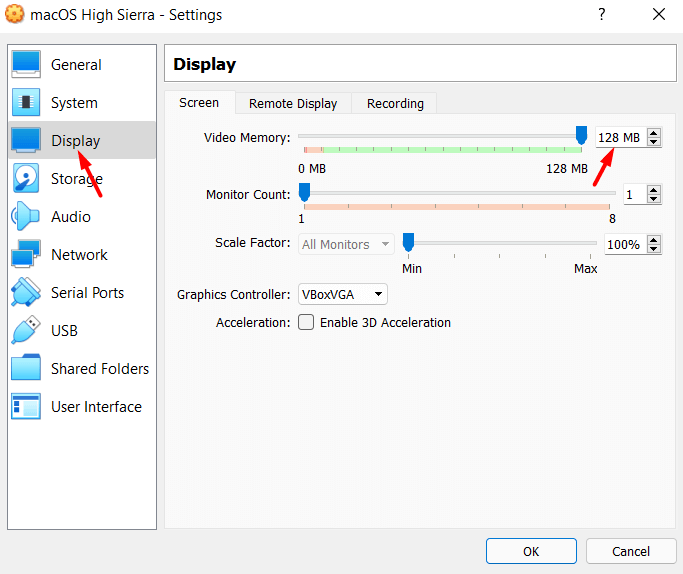 increase the amount of video memory
Step 5. Go to the Storage tab and then click on the Empty CD icon and click on the CD icon and click on the Choose/Create a Virtual Optical Disk.
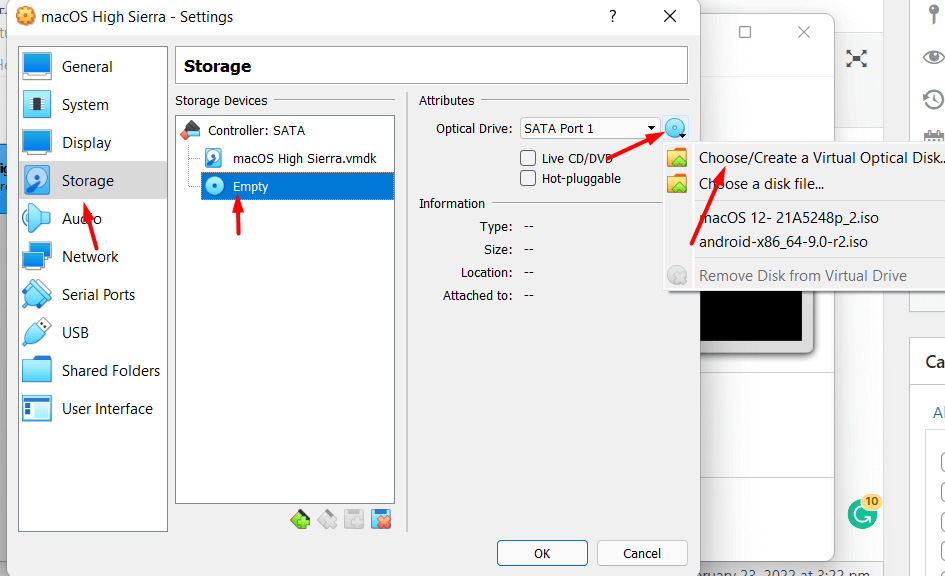 Click on the Choose/Create a Virtual Optical Disk
Step 6. Select the macOS High sierra file and click on the Choose.
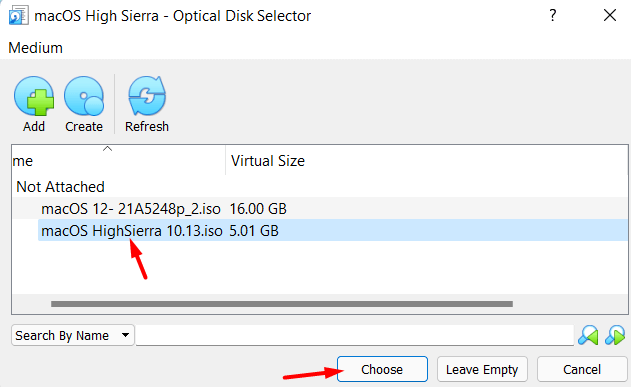 Click on the Choose
Step 7. Now, open Notepad and copy and paste the following command.
cd "C:\Program Files\Oracle\VirtualBox\" VBoxManage.exe modifyvm "Your Virtual Machine Name" --cpuidset 00000001 000106e5 00100800 0098e3fd bfebfbff VBoxManage setextradata "Your Virtual Machine Name" "VBoxInternal/Devices/efi/0/Config/DmiSystemProduct" "iMac11,3" VBoxManage setextradata "Your Virtual Machine Name" "VBoxInternal/Devices/efi/0/Config/DmiSystemVersion" "1.0" VBoxManage setextradata "Your Virtual Machine Name" "VBoxInternal/Devices/efi/0/Config/DmiBoardProduct" "Iloveapple" VBoxManage setextradata "Your Virtual Machine Name" "VBoxInternal/Devices/smc/0/Config/DeviceKey" "ourhardworkbythesewordsguardedpleasedontsteal(c)AppleComputerInc" VBoxManage setextradata "Your Virtual Machine Name" "VBoxInternal/Devices/smc/0/Config/GetKeyFromRealSMC" 1
 Copy And Paste the Following Command
Step 8. Now, press CRTL + H and type the name Your virtual machine name and then in the second type macOS High Sierra and then click on the Replace All.
 Type macOS High Sierra
Step 9. Now, open Command Prompt app and then copy and paste the commands into it and press Enter.
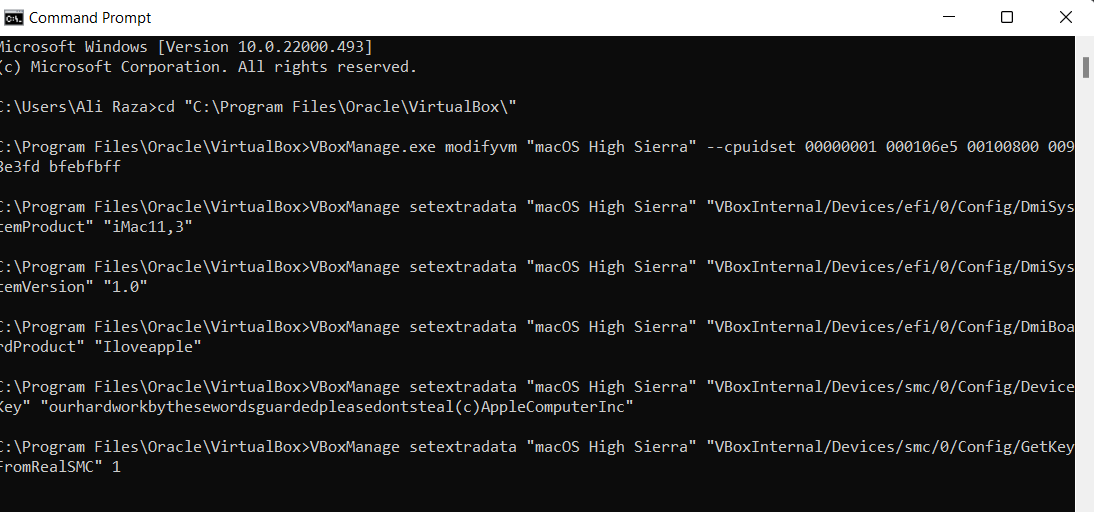 Copy And Paste Command
Clean Installation of macOS High Sierra on VirtualBox
Step 1. Now, again open the VirtualBox and click on the Start.
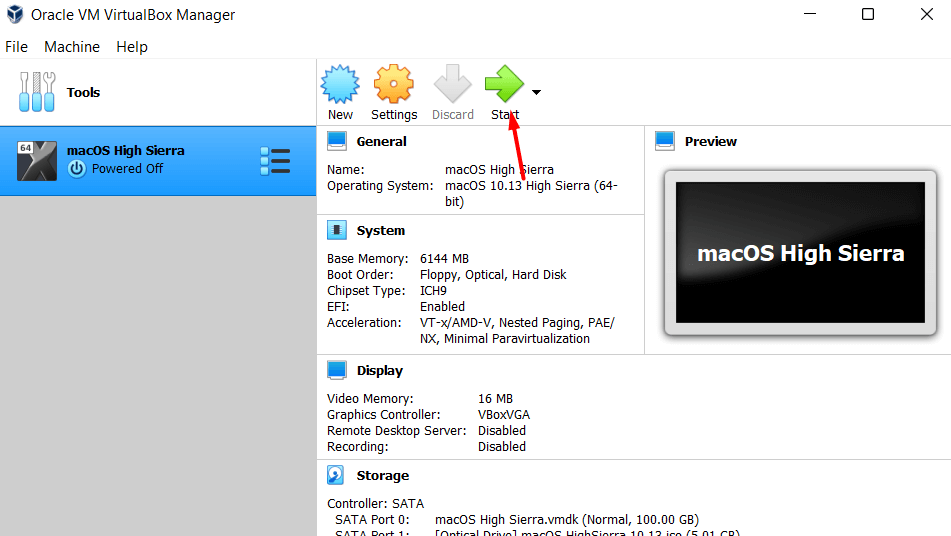 Click on the Start
Step 2. Select your language and click on the Continue icon.
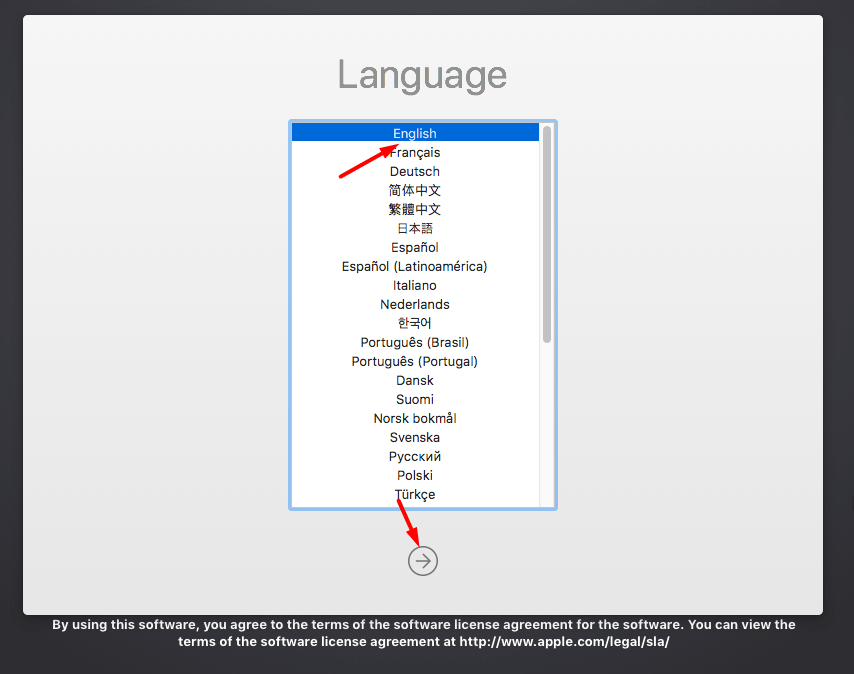 Click on the Continue icon
Step 3. Select the Disk Utility and click on Continue.
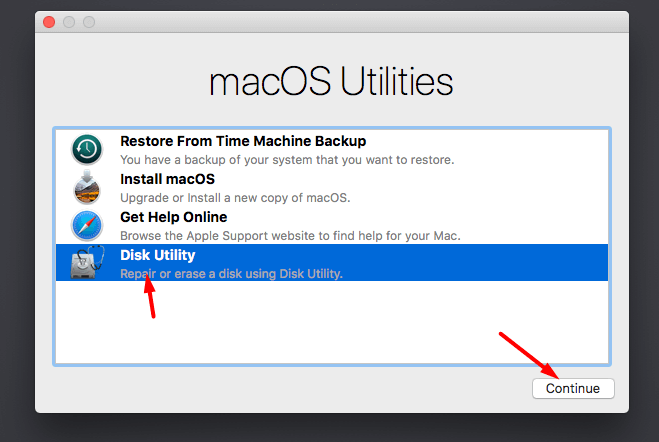 Click on the Continue
Step 4. Go to the VBOX Harddisk tab and click Erase from the top then name it and click on Erase.
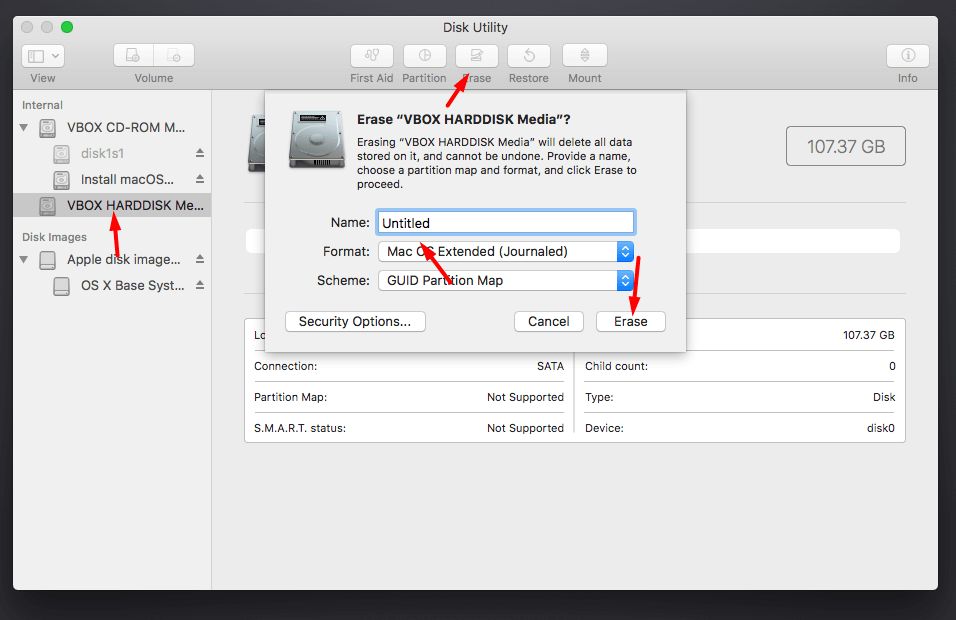 Click on the Erase
Step 5. Now, click on the Done.
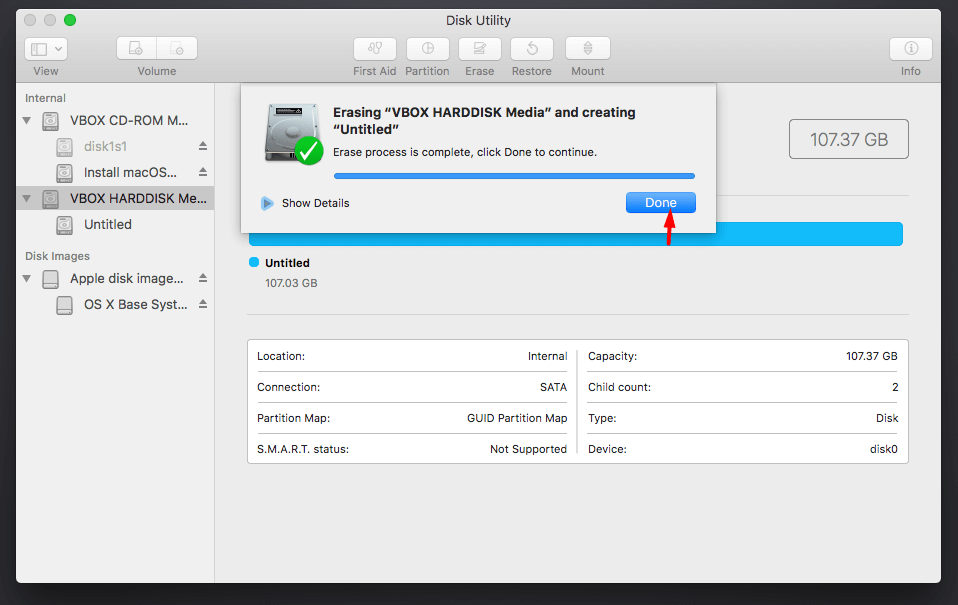 Click on the Done
Step 6. Select Install macOS and click on the Continue.
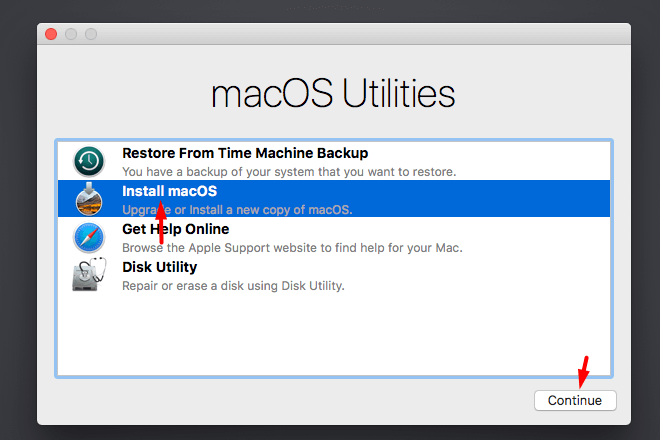 Click on the Continue
Step 7. Click on the Continue.
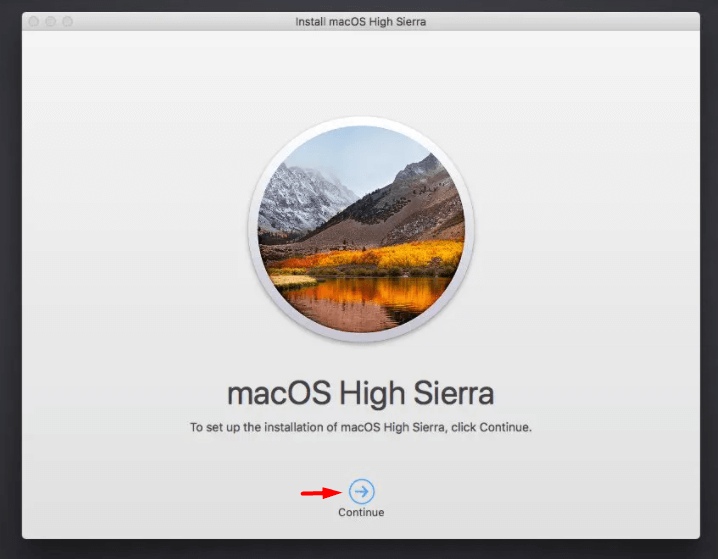 Click on the Continue
Step 8. Click on the Accept.
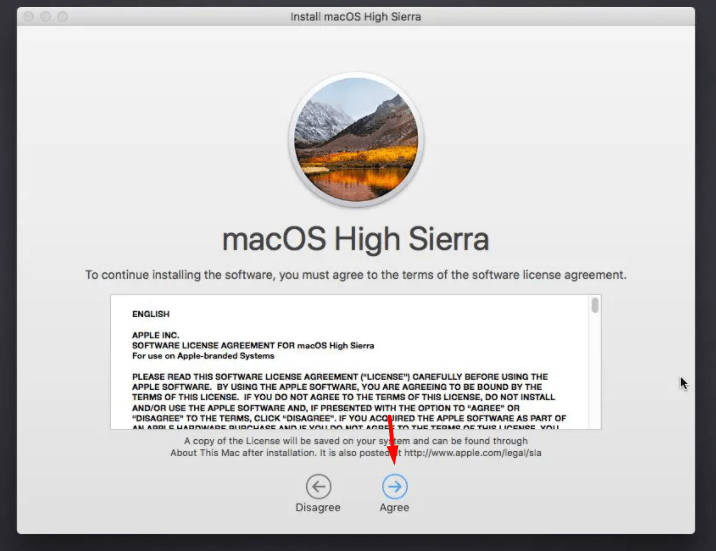 Click on the Agree
Step 9. Select the disk for the installation and click on the Install.
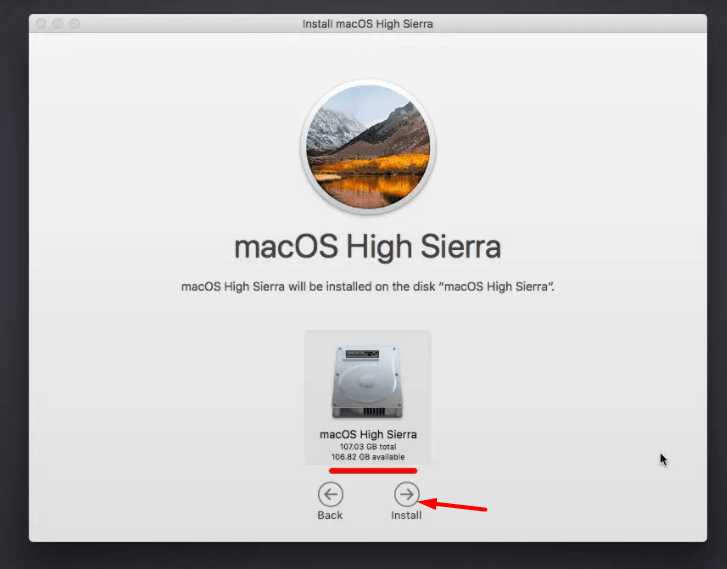 Click on the Continue
Step 10. The macOS will soon begin installing.
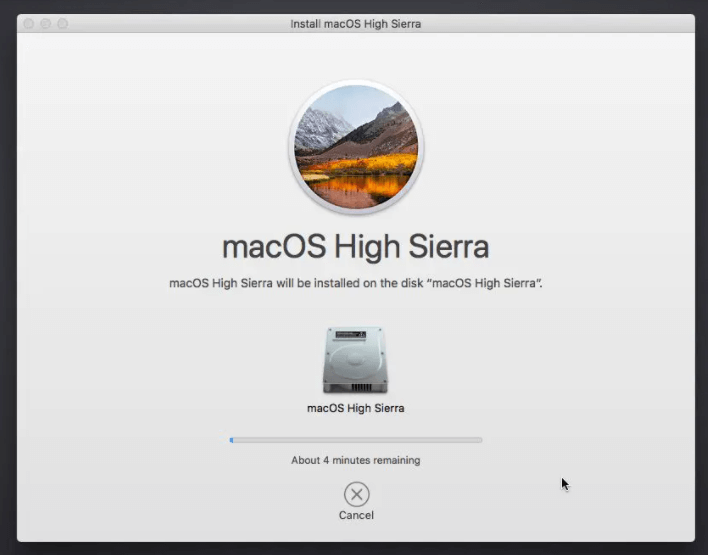 The macOS will soon begin installing
Step 11. When it is finished then select your country and then click on the Continue.
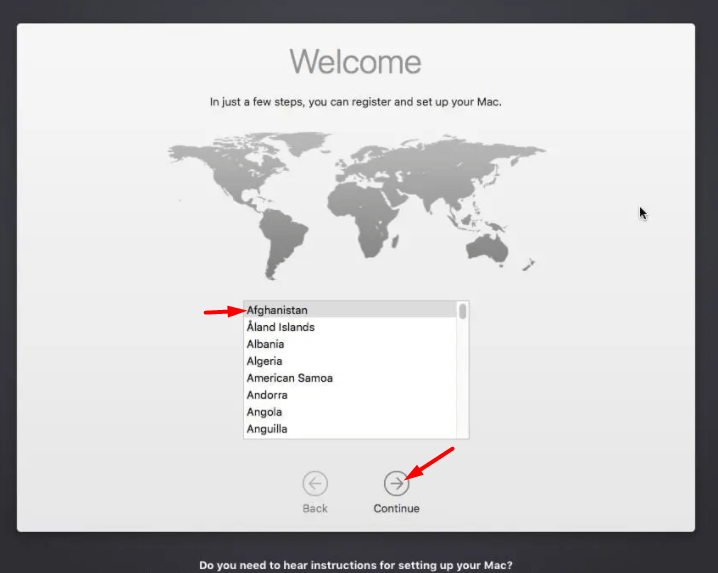 Click on the Continue
Step 12. Now, macOS high sierra is downloaded in VirtualBox.
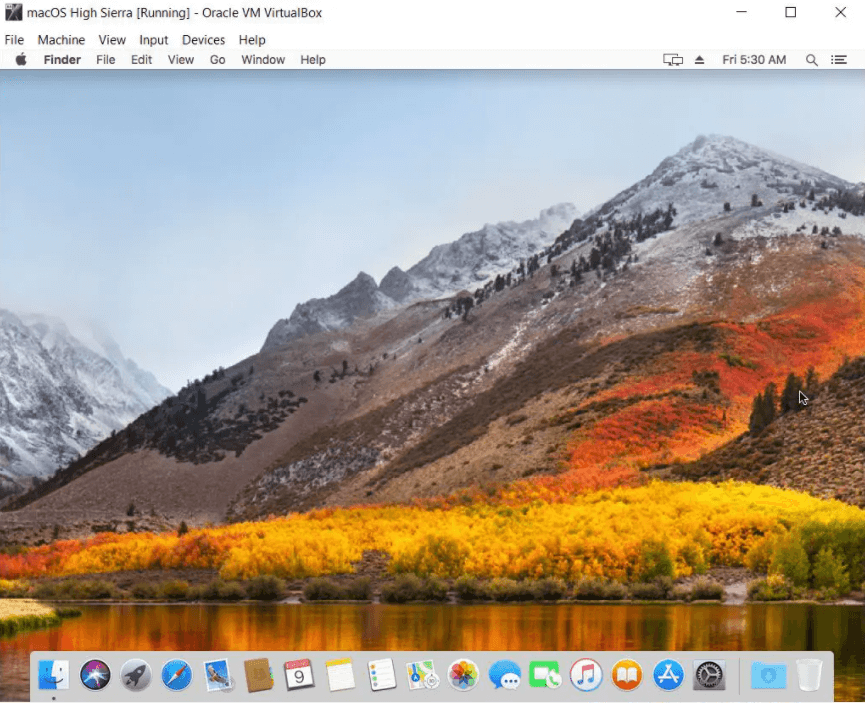 macOS High Sierra is installed
Final Words
That’s all about How to Install macOS High Sierra on VirtualBox on Windows 10. It is the easiest and step-by-step guide. I hope you will be enjoying using macOS High Sierra on VirtualBox. So, if you encounter any problem while the installation process then you can tell us by commenting down below.
Tagged
Share This Article
In this article, I am going to guide you on How to Install macOS High Sierra on VirtualBox on Windows PC using an ISO File. As you know that macOS High Sierra is one of the great operating systems of Mac. Basically, it was released on 26th September 2017. It has been released with an amazing event which is called WWDC (Worldwide Developer Conference). It has come up with too many handy and useful features which were absolutely great at that time. Most of the users really like macOS High Sierra because it is lightweight and easy to use as compared to recent operating systems.
It is a really old operating system if we compare it with the latest operating system that is macOS Monterey. Yes, you heard right the latest and recent operating system of Mac is macOS Monterey. macOS Monterey was released in 2021 with extraordinary features and unique design. Still, there are some people who love to use macOS High Sierra because it is convenient.
However, if you haven’t tested macOS High Sierra yet then you can easily install it on a VirtualBox. VirtualBox is a great place to test another operating system for educational purposes. If you really want to try macOS High Sierra then this article is for you. And keep in mind that I am going to install macOS High Sierra on VirtualBox on Windows 11, you can also install it on Windows 10. Just go ahead and follow each step down below.
If you want to Install macOS Monterey on VirtualBox, you can check the below links:
- How to Install macOS Monterey on VMware on Windows PC?
- How to Install macOS Monterey on VirtualBox on Windows PC?
Download Required Files
Steps to Install macOS High Sierra on VirtualBox
Step 1. Open your windows computer and open the Virtualbox.
Step 2. When VirtualBox and click on the New.
 Click on the New
Step 3. Now, type in the name section macOS High Sierra and it will automatically detect the type, version and click on the Next.
 Click on the Next
Step 4. Increase memory size and click on the Next.
 Click on the Next
Step 5. Select the Create a virtual hard disk now and click on the Crate.
 Click on the Create
Step 6. Select the VMDK and then click on the Next.
 Click on the Next
Step 7. Select the Dynamically allocated and click on the Next.
 Click on the Next
Step 8. select where you save the file and increase the disk and set 100GB and click on Create.
 Click on the Create
Set up Virtual Machine Settings
Step 1. When it has been done then click on the setting.
 Click on the Setting
Step 2. Go to the System tab and uncheck Floppy change the chipset to PIIX3 and also Enable EFI (special OSes only).
 enable EFI (special OSes only)
Step 3. Go to the Processor tab and increase the processor and enable PAE/NX.
 enable PAE/NX
Step 4. Now, go to the Display tab and increase the amount of video memory.
 increase the amount of video memory
Step 5. Go to the Storage tab and then click on the Empty CD icon and click on the CD icon and click on the Choose/Create a Virtual Optical Disk.
 Click on the Choose/Create a Virtual Optical Disk
Step 6. Select the macOS High sierra file and click on the Choose.
 Click on the Choose
Step 7. Now, open Notepad and copy and paste the following command.
cd "C:\Program Files\Oracle\VirtualBox\" VBoxManage.exe modifyvm "Your Virtual Machine Name" --cpuidset 00000001 000106e5 00100800 0098e3fd bfebfbff VBoxManage setextradata "Your Virtual Machine Name" "VBoxInternal/Devices/efi/0/Config/DmiSystemProduct" "iMac11,3" VBoxManage setextradata "Your Virtual Machine Name" "VBoxInternal/Devices/efi/0/Config/DmiSystemVersion" "1.0" VBoxManage setextradata "Your Virtual Machine Name" "VBoxInternal/Devices/efi/0/Config/DmiBoardProduct" "Iloveapple" VBoxManage setextradata "Your Virtual Machine Name" "VBoxInternal/Devices/smc/0/Config/DeviceKey" "ourhardworkbythesewordsguardedpleasedontsteal(c)AppleComputerInc" VBoxManage setextradata "Your Virtual Machine Name" "VBoxInternal/Devices/smc/0/Config/GetKeyFromRealSMC" 1
 Copy And Paste the Following Command
Step 8. Now, press CRTL + H and type the name Your virtual machine name and then in the second type macOS High Sierra and then click on the Replace All.
 Type macOS High Sierra
Step 9. Now, open Command Prompt app and then copy and paste the commands into it and press Enter.
 Copy And Paste Command
Clean Installation of macOS High Sierra on VirtualBox
Step 1. Now, again open the VirtualBox and click on the Start.
 Click on the Start
Step 2. Select your language and click on the Continue icon.
 Click on the Continue icon
Step 3. Select the Disk Utility and click on Continue.
 Click on the Continue
Step 4. Go to the VBOX Harddisk tab and click Erase from the top then name it and click on Erase.
 Click on the Erase
Step 5. Now, click on the Done.
 Click on the Done
Step 6. Select Install macOS and click on the Continue.
 Click on the Continue
Step 7. Click on the Continue.
 Click on the Continue
Step 8. Click on the Accept.
 Click on the Agree
Step 9. Select the disk for the installation and click on the Install.
 Click on the Continue
Step 10. The macOS will soon begin installing.
 The macOS will soon begin installing
Step 11. When it is finished then select your country and then click on the Continue.
 Click on the Continue
Step 12. Now, macOS high sierra is downloaded in VirtualBox.
 macOS High Sierra is installed
Final Words
That’s all about How to Install macOS High Sierra on VirtualBox on Windows 10. It is the easiest and step-by-step guide. I hope you will be enjoying using macOS High Sierra on VirtualBox. So, if you encounter any problem while the installation process then you can tell us by commenting down below.


