How to Install Linux Mint on VirtualBox on Windows PC

In this post, I am going to show you How to Install Linux Mint on VirtualBox on Windows PC. Linux Mint is a community-driven Linux distribution based on Ubuntu which itself is based on Debian and with a variety of free and open-source applications. The user will have full out-of-the-box multimedia support for those who choose to include proprietary software such as multimedia codecs. It is the lightest operating system which everyone loves to use Linux Mint even on their PC. Furthermore, t was released in 2006 and by the passage of time, it got popularity among the users.
In the world of Technology, virtualization is really popular because it enables the user in order try and install another operating system. Nowadays, most of the people is really enjoying macOS on Windows with the help of a virtual machine. So, it will give you all the features and functionalities of an operating system. If you have some assignment to do on Linux Mint then a virtual machine will be the best for you.
However, Linux Mint is a really handy operating system that doesn’t need high requirements. It needs some basic requirements of a PC which is 2GB Ram and 50GB Storage. Therefore, it is really easy and simple to install on Linux Mint on VirtualBox because the ISO File of Linux Mint is only 2GB. For better guidance, make sure to follow the down below steps and clean install Linux Mint on a VirtualBox.
How to Install Linux Mint on VirtualBox on Windows PC
1: Create Virtual Machine
Step 1: First open the VirtualBox on Windows and click on the New.
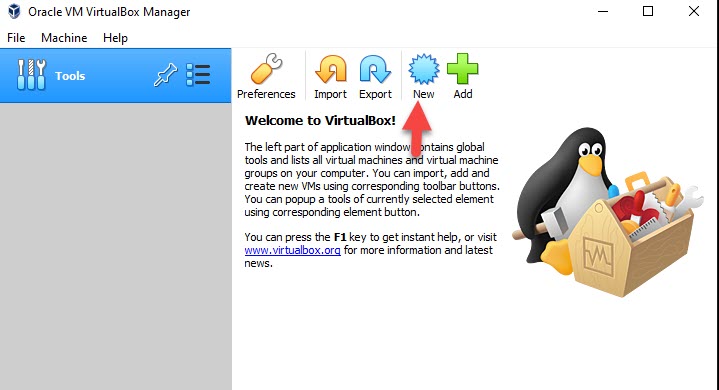 Click On The New
 Step 2: First write Linux Mint in name option and select the folder where you want to save and then it version Ubuntu 64-Bit. and click on the Next.
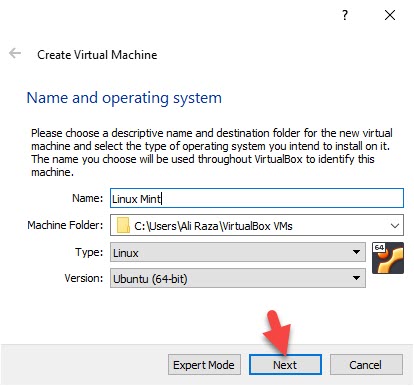 Click On The Next
 Step 3: You increase the memory size and click on the Next.
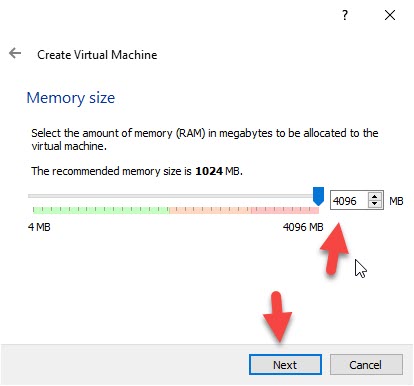 increase the memory size And Click On The Next
 Step 4: Select the Create a virtual hard disk now and then click on the Create.
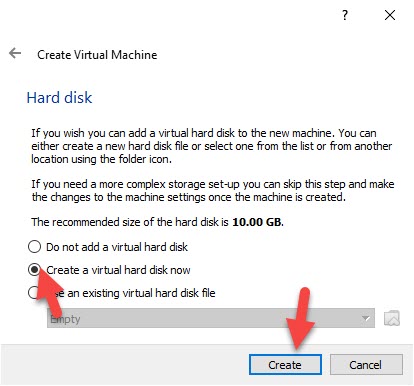 Click On The Next
 Step 5: Select the VDI (Virtual Disk Image) and click on the Next.
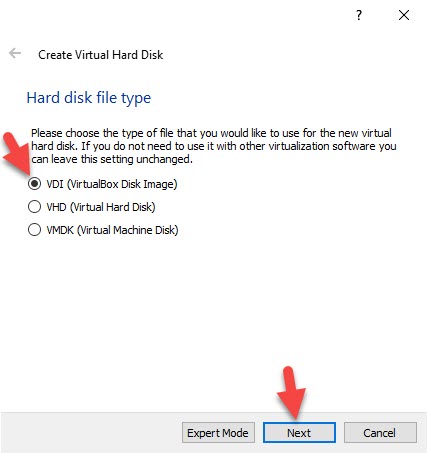 Select The VDI (Virtual Disk Image) And Click On The Next
 Step 6: Again select the Dynamically Allocated and click on the Next.
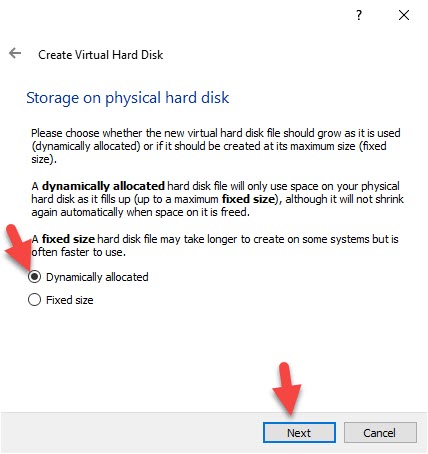 Select The Dynamically Allocated And Click On The Next.
 Step 7: Increase the space for Linux Mint and click on the Create.
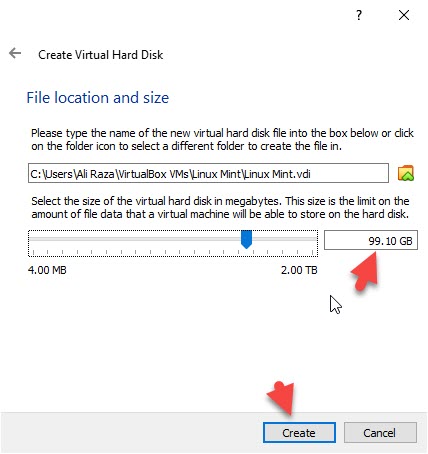 Increase The Space For Linux Mint And Click On The Create.
 2: Edit Virtual Machine Settings
Step 1: When the VirtualBox is created then click on the Setting Option.
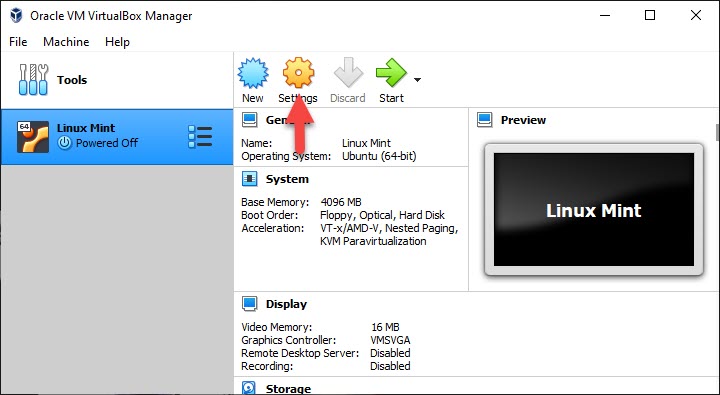 Click On The Setting
 Step 2: When the setting is open then click on the System and uncheck the floppy disk.
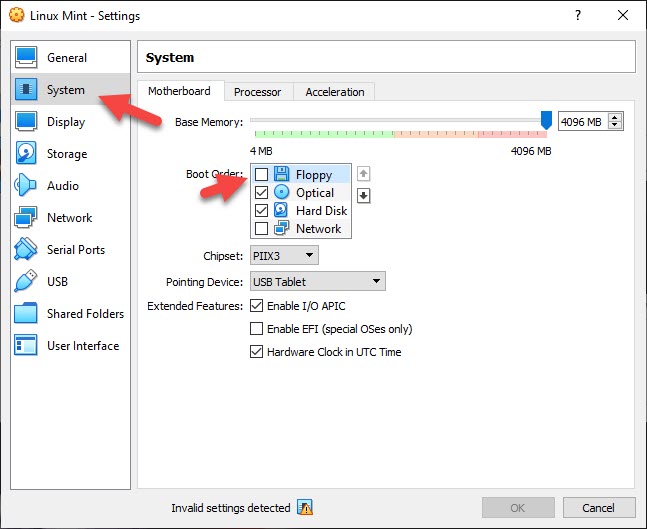 uncheck the floppy disk.
 Step 3: Click on the processor tab, and increase the processor.
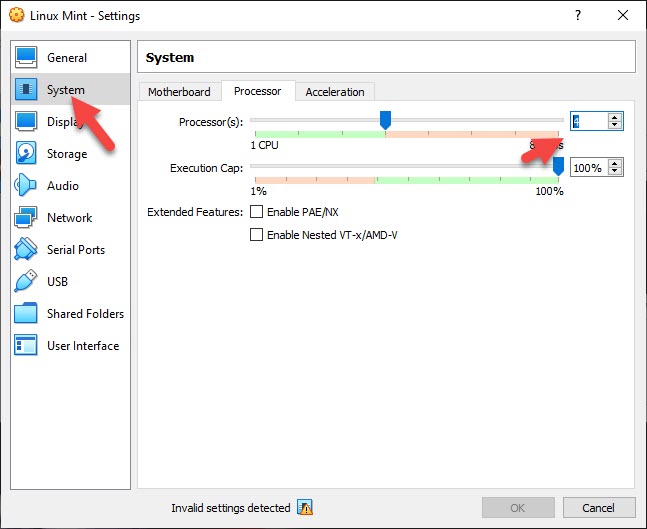 Increase The Processor.
 Step 4: Go to Display and increase the Video Memory up to 128MB.
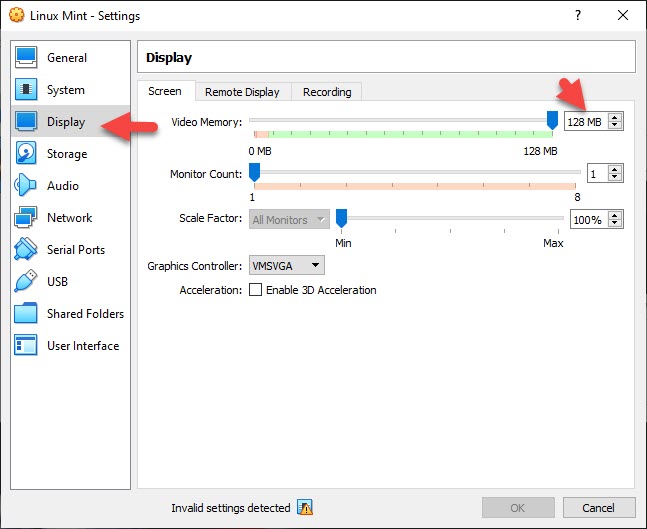 Go To Display And Increase The Video Memory
 Step 5: Select the Storage tab, click on Empty click on the Disk icon and click on the first option.
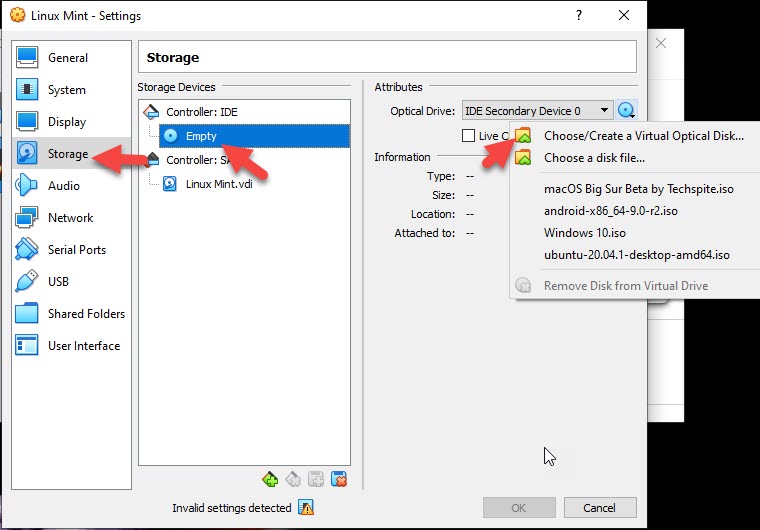 Click On The Disk Icon And Click On The First Option.
 Step 6: Where you have saved the Linux Mint ISO file, then select that image and then click on the Open.
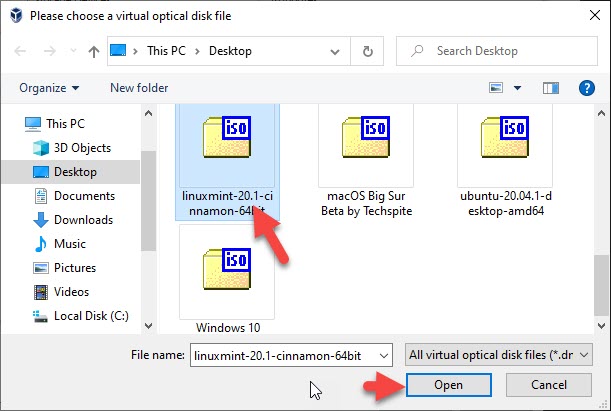 Select That Image And Click Open.
 Step 7: Select the USB and click on the USB 3.0 (xHCI) Controller.
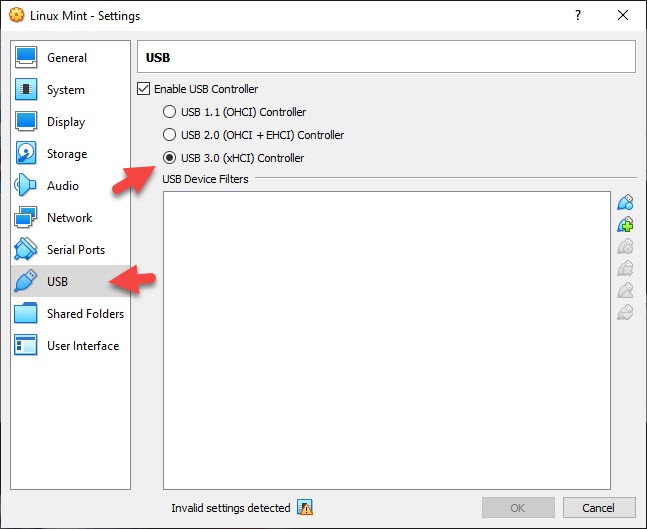 Select The (USB 3.0 (xHCI) Controller) Option.
 3: Install Linux Mint on VirtualBox
Step 1: When the virtual machine is created then click on the Start.
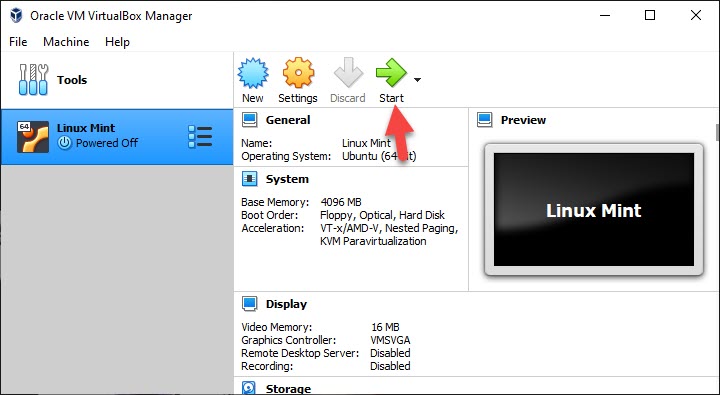 Click On The Start
 Step 2: Click on the Folder icon.
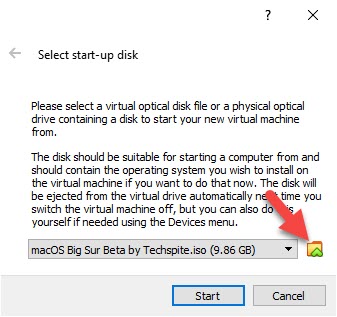 Click On The Folder Icon
 Step 3: Select the Linux Mint image and click on the choose.
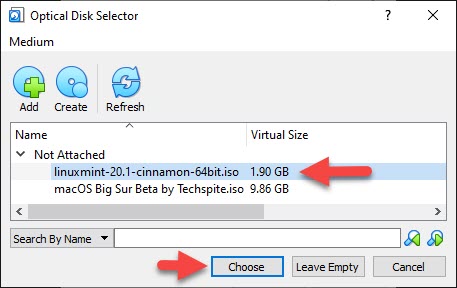 Select Linux Mint Image And Click On The Choose
 Step 4: Now, Click on the Start.
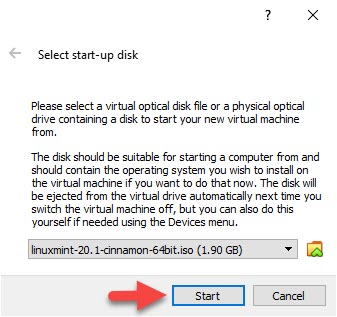 Click On The Start
 Step 5: When the Linux Mint launched select the first option and press the enter key.
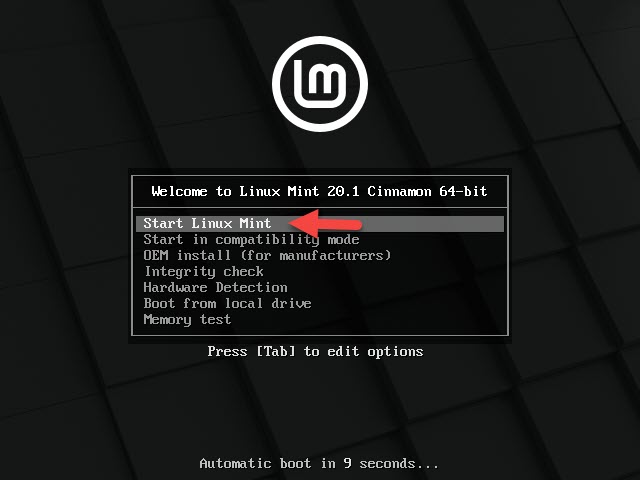 Click On The First Option
 Step 6: Now the Linux Mint window successful and right-click on the install Linux and click on the Open.
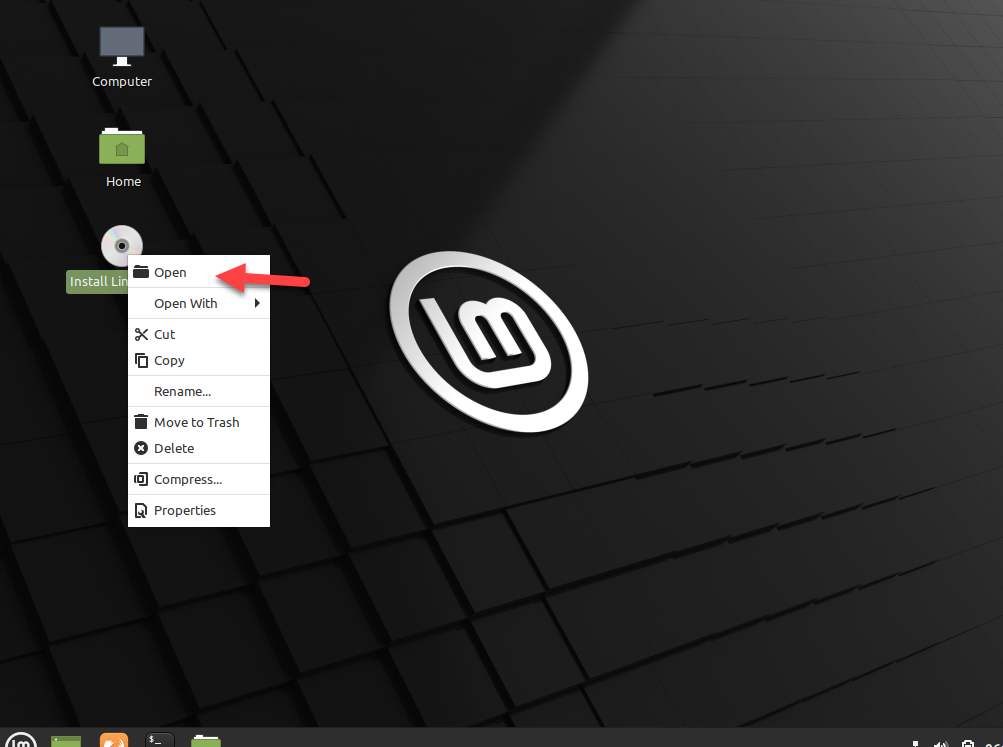 Right Click Linux Mint And Click On The Open
 Step 7: Select your language and click on the Continue.
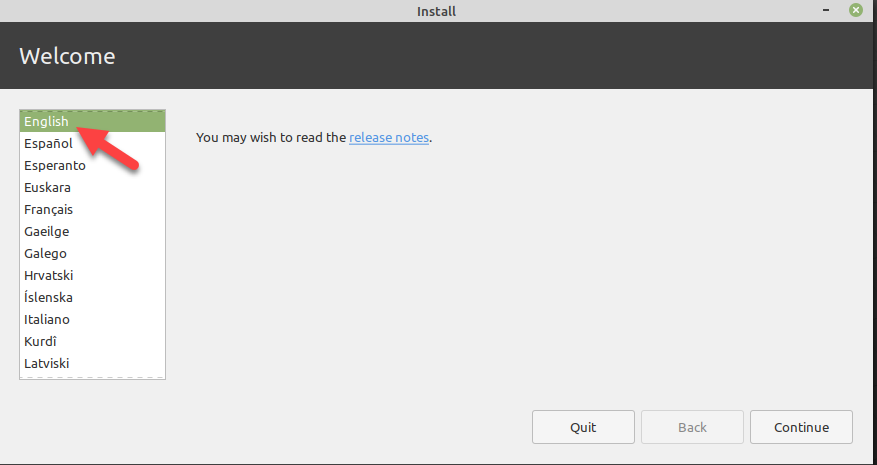 Select Your language And Click On The Continue
 Step 8: First select the Keyboard layout and click on the Continue.
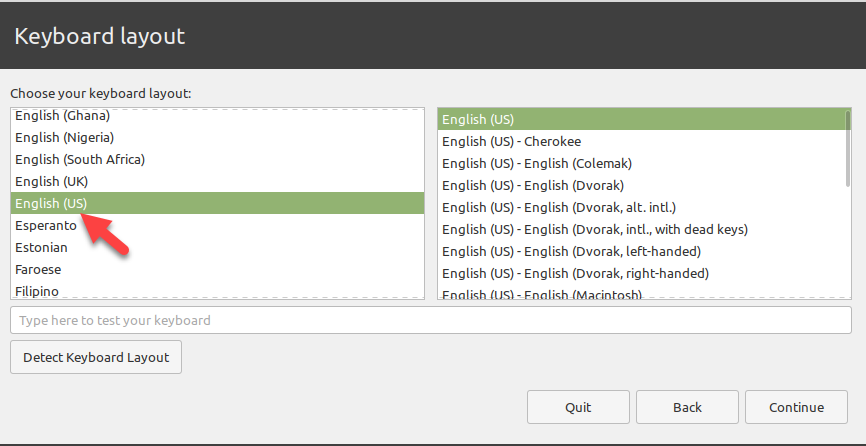 Select Your Keyboard Layout And Click Continue.
 Step 9: Click on the Continue.
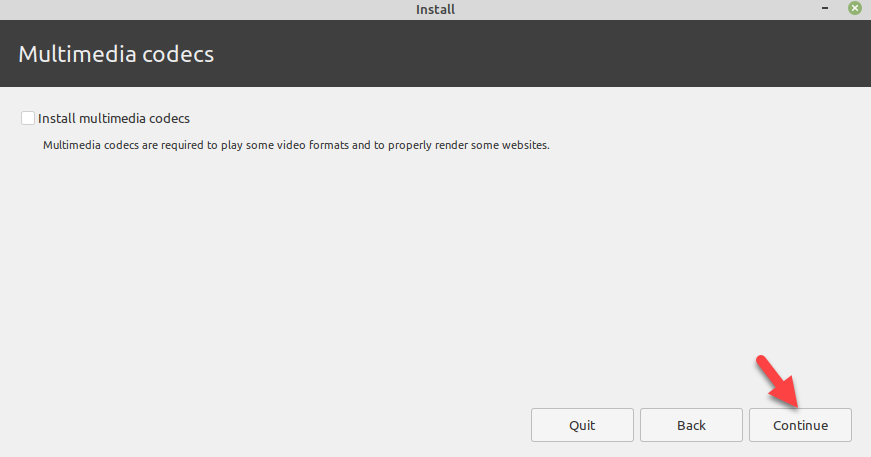 Click On The Continue
 Step 10: Select the Erase disk and install Linux Mint then click on the Install Now.
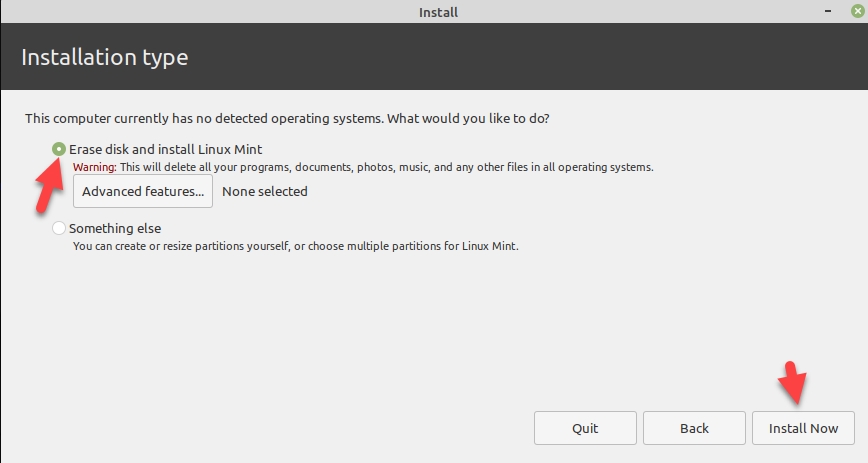 Select The Erase disk and install Linux Mint And Click On The Install Now
 Step 11: Click on the Continue.
 Click On The Continue
 Step 12: So, first select your location and click on the Continue.
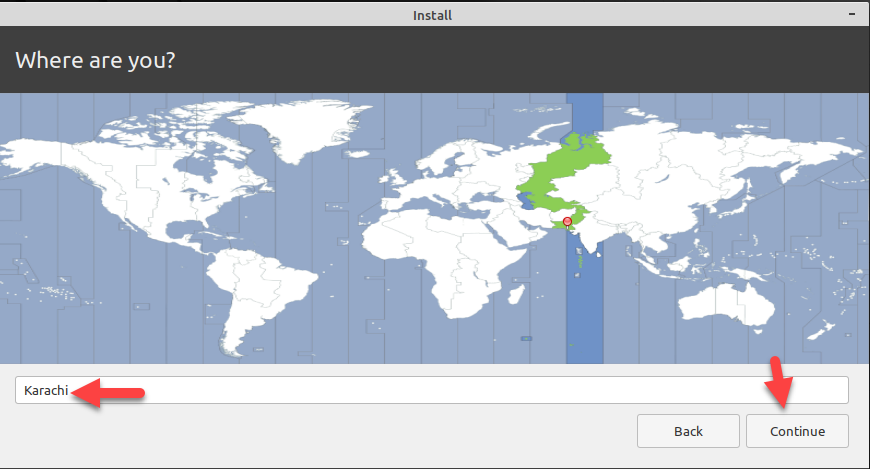 Select Your Location And Click On The Continue
 Step 13: Then, create your computer account, such as Your Name, Computer Name, User Name, Password, Confirm Your Password, then click on the continue.
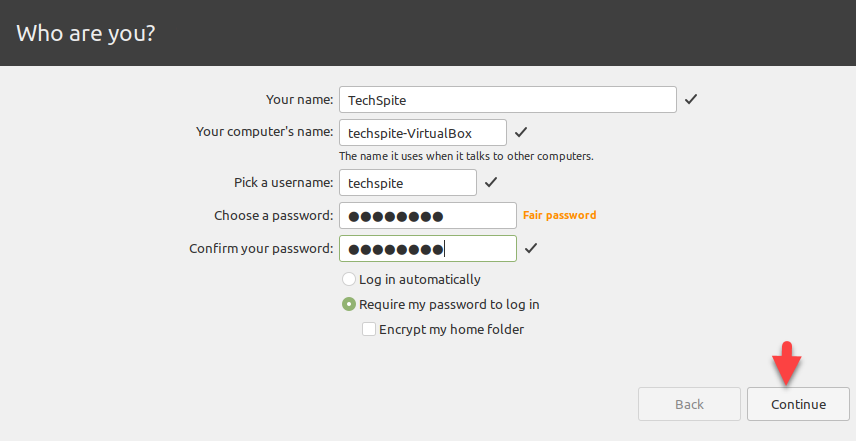 Create your computer account
 Step 14: Now, it starts installing Linux Mint, so it may take some time to be installed.
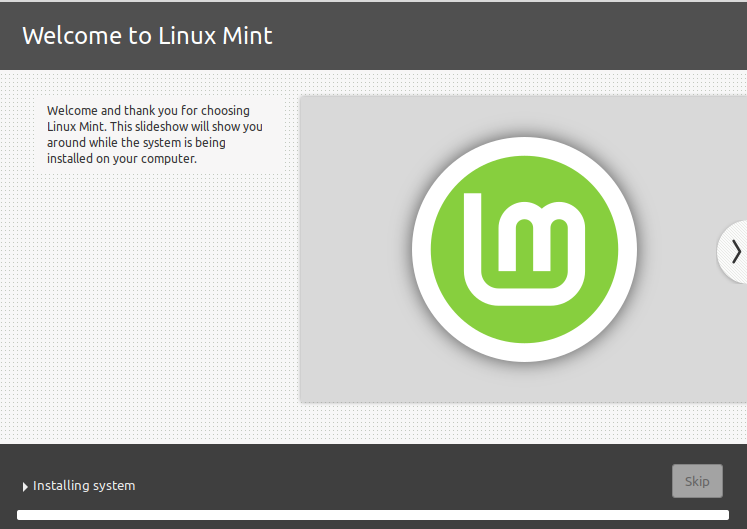 Wait For Install
 Step 15: So, enter your login password and press enter, and successfully Linux Mint is being installed on VirtualBox on Windows.
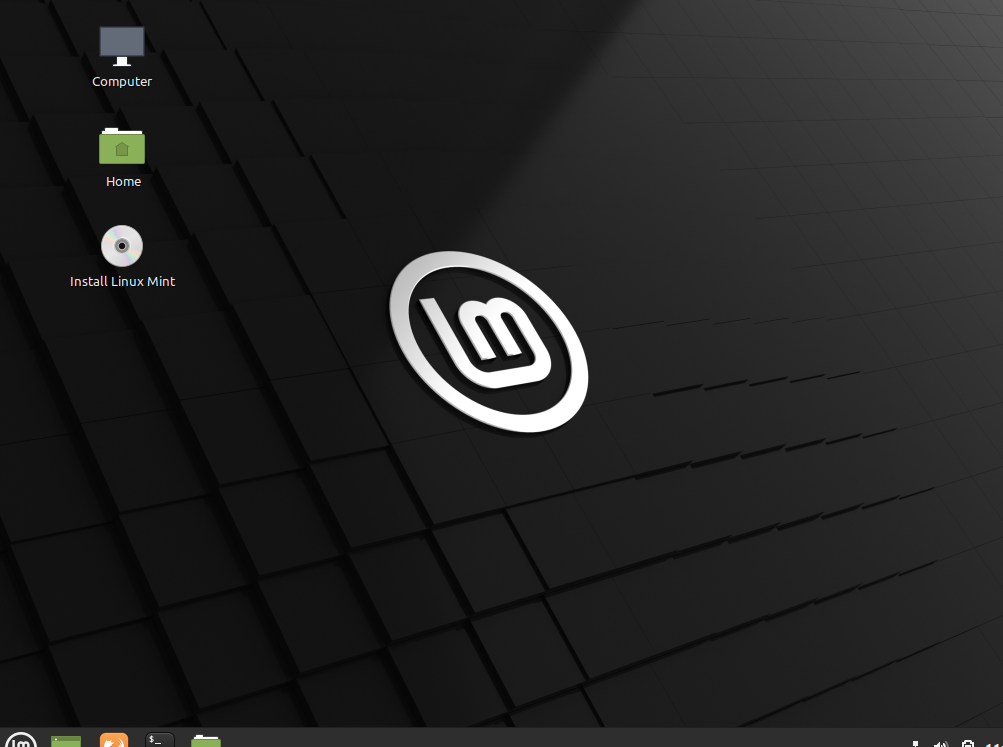 Install
 Related Posts:
- How to Block Adult Videos on YouTube App (4 Methods)
- How to Password Protect Photos on Android in 2021
Bottom Line
It is all about How to Install Linux Mint on VirtualBox on Windows PC. So, the procedure is really simple and easy to install Linux Mint on VirtualBox. However, if you are facing any kind of problem then don’t hesitate to leave comments in the comment section down below.
Tagged
Share This Article
In this post, I am going to show you How to Install Linux Mint on VirtualBox on Windows PC. Linux Mint is a community-driven Linux distribution based on Ubuntu which itself is based on Debian and with a variety of free and open-source applications. The user will have full out-of-the-box multimedia support for those who choose to include proprietary software such as multimedia codecs. It is the lightest operating system which everyone loves to use Linux Mint even on their PC. Furthermore, t was released in 2006 and by the passage of time, it got popularity among the users.
In the world of Technology, virtualization is really popular because it enables the user in order try and install another operating system. Nowadays, most of the people is really enjoying macOS on Windows with the help of a virtual machine. So, it will give you all the features and functionalities of an operating system. If you have some assignment to do on Linux Mint then a virtual machine will be the best for you.
However, Linux Mint is a really handy operating system that doesn’t need high requirements. It needs some basic requirements of a PC which is 2GB Ram and 50GB Storage. Therefore, it is really easy and simple to install on Linux Mint on VirtualBox because the ISO File of Linux Mint is only 2GB. For better guidance, make sure to follow the down below steps and clean install Linux Mint on a VirtualBox.
How to Install Linux Mint on VirtualBox on Windows PC
1: Create Virtual Machine
Step 1: First open the VirtualBox on Windows and click on the New.
 Click On The New
 Step 2: First write Linux Mint in name option and select the folder where you want to save and then it version Ubuntu 64-Bit. and click on the Next.
 Click On The Next
 Step 3: You increase the memory size and click on the Next.
 increase the memory size And Click On The Next
 Step 4: Select the Create a virtual hard disk now and then click on the Create.
 Click On The Next
 Step 5: Select the VDI (Virtual Disk Image) and click on the Next.
 Select The VDI (Virtual Disk Image) And Click On The Next
 Step 6: Again select the Dynamically Allocated and click on the Next.
 Select The Dynamically Allocated And Click On The Next.
 Step 7: Increase the space for Linux Mint and click on the Create.
 Increase The Space For Linux Mint And Click On The Create.
 2: Edit Virtual Machine Settings
Step 1: When the VirtualBox is created then click on the Setting Option.
 Click On The Setting
 Step 2: When the setting is open then click on the System and uncheck the floppy disk.
 uncheck the floppy disk.
 Step 3: Click on the processor tab, and increase the processor.
 Increase The Processor.
 Step 4: Go to Display and increase the Video Memory up to 128MB.
 Go To Display And Increase The Video Memory
 Step 5: Select the Storage tab, click on Empty click on the Disk icon and click on the first option.
 Click On The Disk Icon And Click On The First Option.
 Step 6: Where you have saved the Linux Mint ISO file, then select that image and then click on the Open.
 Select That Image And Click Open.
 Step 7: Select the USB and click on the USB 3.0 (xHCI) Controller.
 Select The (USB 3.0 (xHCI) Controller) Option.
 3: Install Linux Mint on VirtualBox
Step 1: When the virtual machine is created then click on the Start.
 Click On The Start
 Step 2: Click on the Folder icon.
 Click On The Folder Icon
 Step 3: Select the Linux Mint image and click on the choose.
 Select Linux Mint Image And Click On The Choose
 Step 4: Now, Click on the Start.
 Click On The Start
 Step 5: When the Linux Mint launched select the first option and press the enter key.
 Click On The First Option
 Step 6: Now the Linux Mint window successful and right-click on the install Linux and click on the Open.
 Right Click Linux Mint And Click On The Open
 Step 7: Select your language and click on the Continue.
 Select Your language And Click On The Continue
 Step 8: First select the Keyboard layout and click on the Continue.
 Select Your Keyboard Layout And Click Continue.
 Step 9: Click on the Continue.
 Click On The Continue
 Step 10: Select the Erase disk and install Linux Mint then click on the Install Now.
 Select The Erase disk and install Linux Mint And Click On The Install Now
 Step 11: Click on the Continue.
 Click On The Continue
 Step 12: So, first select your location and click on the Continue.
 Select Your Location And Click On The Continue
 Step 13: Then, create your computer account, such as Your Name, Computer Name, User Name, Password, Confirm Your Password, then click on the continue.
 Create your computer account
 Step 14: Now, it starts installing Linux Mint, so it may take some time to be installed.
 Wait For Install
 Step 15: So, enter your login password and press enter, and successfully Linux Mint is being installed on VirtualBox on Windows.
 Install
 Related Posts:
- How to Block Adult Videos on YouTube App (4 Methods)
- How to Password Protect Photos on Android in 2021
Bottom Line
It is all about How to Install Linux Mint on VirtualBox on Windows PC. So, the procedure is really simple and easy to install Linux Mint on VirtualBox. However, if you are facing any kind of problem then don’t hesitate to leave comments in the comment section down below.


