How to Create macOS Monterey Bootable USB Drive on Mac?


macOS is another great operating system. When you have downloaded the macOS Monterey then you can keep your FaceTime calls simultaneously sharing your whole screen or just a specific app. Spatial audion individually voices sound like they’re coming from the direction in which each person is positioned on your screen. Grid views allow you to see people on your FaceTime call in the same size tiles s you can have a better conversation with a large group. Portrait mode inspired by mode on iPhone and powered by the M1 Chip, this new video effect puts the focus on you. If you want to create macOS Monterey Bootable USB then you need to read this article. So, without wasting any time let’s have started. From this article, you will learn How to Create macOS Monterey Bootable USB Drive on Mac.
How to Download macOS Monterey Installer File
- Step 1. First of all, you need to head towards the website of Betsprofiles.
- Step 2. When you reach the website of Betsprofile after that scroll down to find the macOS 12 Install Profile once you find that simply click on it.
- Step 3. Now, wait till the downloading is not done.
- Step 4. Next, when the downloading is done then launch it on your PC and run it by InstallAssistantPackage.file.
- Step 5. Click on the Continue to process the step.
- Step 6. In this step, you need to accept the terms and conditions by clicking on Agree.
- Step 7. Once you reach the page of the installation type the administrator password then simply tap on the Install.
- Step 8. Wait till the package is not downloaded.
- Step 9. At last, click on Upgrade Now.
How to Create macOS Monterey Bootable USB drive on Mac
before we are going to start the method you need to attach the USB drive with your PC. Now, follow the step to create the macOS Monterey Bootable USB drive. The step is down below.
Step 1. At first, open the Disk Utility then format the USB drive by following the easy step down below.
- Tap on the Erase.
- Name: Optional
- Format: APFS
- Scheme: GUID Partition Map
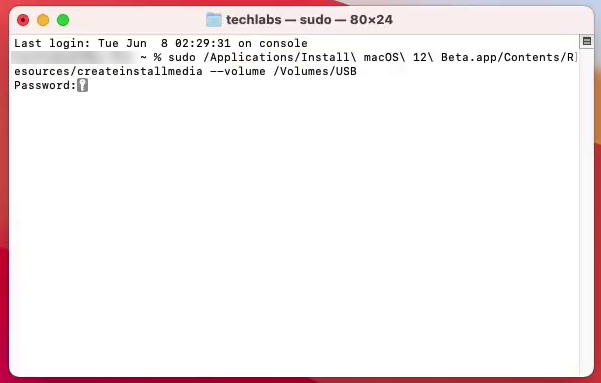
Step 2. However, open the Terminal from your Spotlight and copy and paste the on your Terminal then hit the Enter button after that type the password and hit the Enter.
Sudo /Applications/Install\ macOS\ 12\ Beta.app/Contents/Resources/createinstallmedia --volume /Volumes/USB
 Commands
 Step 3. Moreover, you need to wait until it will create the bootable USB of macOS Monterey. Once the creating is done then Restart your PC.
Step 4. Further, when your PC is restarted then hold the button of Boot key from the boot menu. Then it will install from the bootable USB.
Related Posts:
Bottom Line
It was all about How to Create macOS Monterey Bootable USB Drive on Mac. I hope this article is very helpful for you to create macOS Monterey bootable USB. From this article, you will get something good. This is the right place where you can easily solve your problem. After following these steps I hope you will not face any kind of problem.
Tagged
Share This Article
macOS is another great operating system. When you have downloaded the macOS Monterey then you can keep your FaceTime calls simultaneously sharing your whole screen or just a specific app. Spatial audion individually voices sound like they’re coming from the direction in which each person is positioned on your screen. Grid views allow you to see people on your FaceTime call in the same size tiles s you can have a better conversation with a large group. Portrait mode inspired by mode on iPhone and powered by the M1 Chip, this new video effect puts the focus on you. If you want to create macOS Monterey Bootable USB then you need to read this article. So, without wasting any time let’s have started. From this article, you will learn How to Create macOS Monterey Bootable USB Drive on Mac.
How to Download macOS Monterey Installer File
- Step 1. First of all, you need to head towards the website of Betsprofiles.
- Step 2. When you reach the website of Betsprofile after that scroll down to find the macOS 12 Install Profile once you find that simply click on it.
- Step 3. Now, wait till the downloading is not done.
- Step 4. Next, when the downloading is done then launch it on your PC and run it by InstallAssistantPackage.file.
- Step 5. Click on the Continue to process the step.
- Step 6. In this step, you need to accept the terms and conditions by clicking on Agree.
- Step 7. Once you reach the page of the installation type the administrator password then simply tap on the Install.
- Step 8. Wait till the package is not downloaded.
- Step 9. At last, click on Upgrade Now.
How to Create macOS Monterey Bootable USB drive on Mac
before we are going to start the method you need to attach the USB drive with your PC. Now, follow the step to create the macOS Monterey Bootable USB drive. The step is down below.
Step 1. At first, open the Disk Utility then format the USB drive by following the easy step down below.
- Tap on the Erase.
- Name: Optional
- Format: APFS
- Scheme: GUID Partition Map
Step 2. However, open the Terminal from your Spotlight and copy and paste the on your Terminal then hit the Enter button after that type the password and hit the Enter.
Sudo /Applications/Install\ macOS\ 12\ Beta.app/Contents/Resources/createinstallmedia --volume /Volumes/USB
 Commands
 Step 3. Moreover, you need to wait until it will create the bootable USB of macOS Monterey. Once the creating is done then Restart your PC.
Step 4. Further, when your PC is restarted then hold the button of Boot key from the boot menu. Then it will install from the bootable USB.
Related Posts:
Bottom Line
It was all about How to Create macOS Monterey Bootable USB Drive on Mac. I hope this article is very helpful for you to create macOS Monterey bootable USB. From this article, you will get something good. This is the right place where you can easily solve your problem. After following these steps I hope you will not face any kind of problem.


