How to Change Your Account Picture in Windows 10


When you start a Windows 10 or when you go to the login screen then you will see a picture. So by default in windows is set a picture when you log in to your PC or laptop for a user account. So manually when you want to change your login picture then it will easy for you to change the picture. However, After following my steps you will learn to change your account picture then you can change it any time. Moreover, when you change your account picture so when you on your PC or laptop you will see it on the login screen. From this article, you will learn How to Change Your Account Picture in Windows 10.
How to Change Your Account Picture in Windows 10
Step 1. At first, you need to click on the Start Menu at the bottom left corner.
 Click on the Start Menu
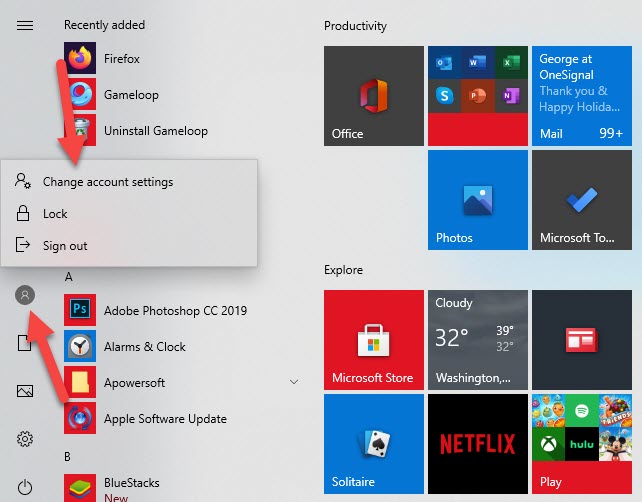
Step 2. Further, click on the Profile Icon then click on the Change Account Setting.
 Click on the Profile Icon Then Click on the Change Account Setting
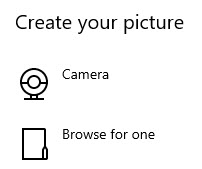
Step 3. Furthermore, in this window, you will see two options Camera or Browse for One when you want to take pictures then click on the camera so if you want to take one from your folders then click on the browse for one.

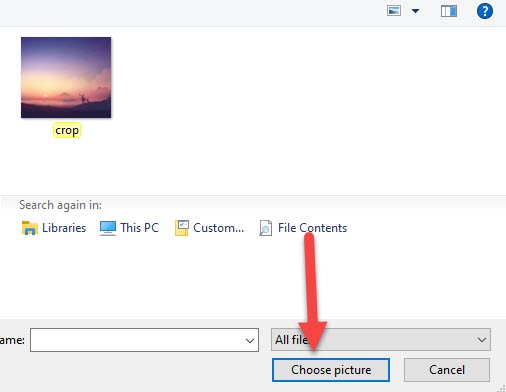
Step 4. Moreover, choose a picture then click on the Choose Picture.
 Click on the Choosing Photos
Step 5. However, when you choose your picture then you will see it on the login screen anytime.
 Finally, You Will change Your Account Picture
Related Guide:
How to Remove Internet Explorer on Windows 10 Permanently
How to Change Your Display Name On Gmail
Bottom Line
It was all about How to Change Your Account Picture in Windows 10. Here are the steps to change your account picture. I hope after reading this article you get more information about the account picture. So, you are facing any kind of problem or any suggestion then you will give your suggestion in the comment box down below.
Tagged
Share This Article
When you start a Windows 10 or when you go to the login screen then you will see a picture. So by default in windows is set a picture when you log in to your PC or laptop for a user account. So manually when you want to change your login picture then it will easy for you to change the picture. However, After following my steps you will learn to change your account picture then you can change it any time. Moreover, when you change your account picture so when you on your PC or laptop you will see it on the login screen. From this article, you will learn How to Change Your Account Picture in Windows 10.
How to Change Your Account Picture in Windows 10
Step 1. At first, you need to click on the Start Menu at the bottom left corner.
 Click on the Start Menu
Step 2. Further, click on the Profile Icon then click on the Change Account Setting.
 Click on the Profile Icon Then Click on the Change Account Setting
Step 3. Furthermore, in this window, you will see two options Camera or Browse for One when you want to take pictures then click on the camera so if you want to take one from your folders then click on the browse for one.

Step 4. Moreover, choose a picture then click on the Choose Picture.
 Click on the Choosing Photos
Step 5. However, when you choose your picture then you will see it on the login screen anytime.
 Finally, You Will change Your Account Picture
Related Guide:
How to Remove Internet Explorer on Windows 10 Permanently
How to Change Your Display Name On Gmail
Bottom Line
It was all about How to Change Your Account Picture in Windows 10. Here are the steps to change your account picture. I hope after reading this article you get more information about the account picture. So, you are facing any kind of problem or any suggestion then you will give your suggestion in the comment box down below.


