How to Fix Mouse & Keyboard Stuck on macOS Mojave on VirtualBox

When you finished the complete installation macOS Mojave on VirtualBox. It is not done yet because there are many problems you need to fix. Therefore, I am going to guide you How to Fix Mouse & Keyboard Stuck on macOS Mojave on VirtualBox. So, macOS Mojave is the most popular operating system which is released by Apple company. Apple Company announced first beta macOS Mojave at there 2018 WWDC (WorldWide Developer Conference). There are many amazing features in macOS Mojave but the recent update is Dark Mode which is very attractive. So, most of the Mac users like the macOS Mojave more than macOS High Sierra. And Good news for windows user because they can use and test the macOS Mojave Operating System easily on their windows PC without any physical problem. Nowadays many windows users using macOS Mojave through Virtual machines.
Yes, of course, you can use and check the macOS Mojave on your windows PC with full functionalities. There are many virtual machines on the market but one of the most popular is VMware and VirtualBox. So, when you installed macOS Mojave on the Virtualbox then you will face various type of issues with your macOS Mojave. You might solve some of them but the biggest issue on that is Mouse & Keyboard stuck which you will be unable to use macOS Mojave in the proper way. Here’s a quick guide to fix mouse and keyboard which is macOS Mojave Operating system.
Fix Mouse & Keyboard Stuck on macOS Mojave
First thing you need to do that completely off the virtual machine. Simply click on the close button at the right-hand top and click on Power off the machine. Otherwise, you won’t be able to fix the issue.
Once you power off the machine then you need to go to the VirtualBox Download Website and under VirtualBox Extension Pack, click on the All supported platforms link and it will start downloading.
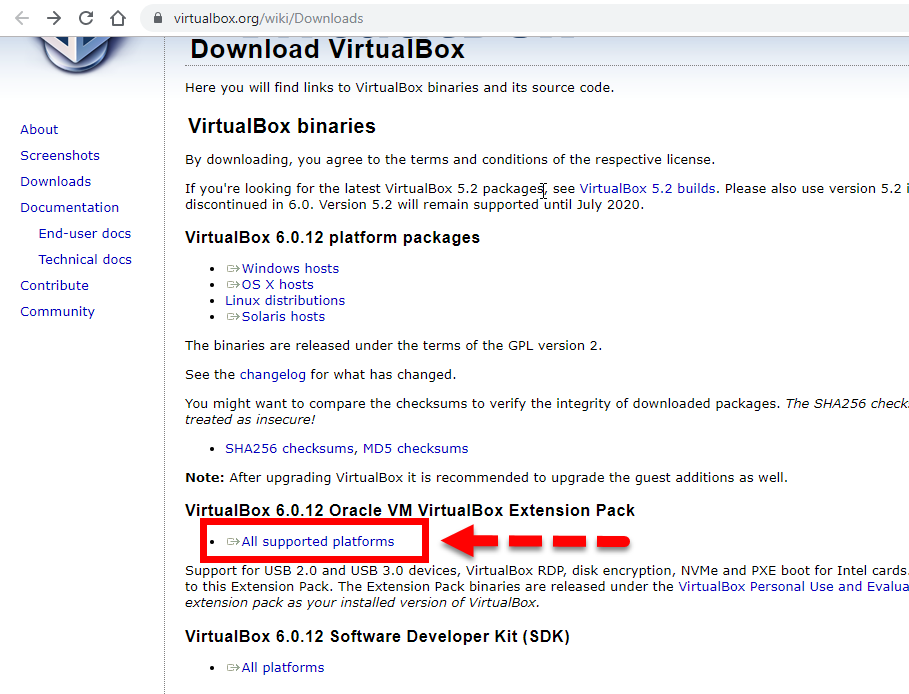 Download VirtualBox Extension Pack
 Step 1. When extension file download, then you need to click on File option then click on the Preference or press Ctrl+G shortcut key.
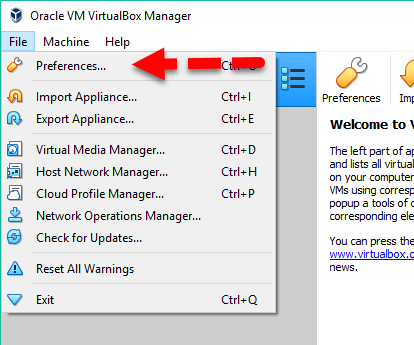 Preferences…
 Step 2. In this window, you need to click on the Extension which is located at the left side and click on + icon in order to browse the VirtualBox Extension Pack.
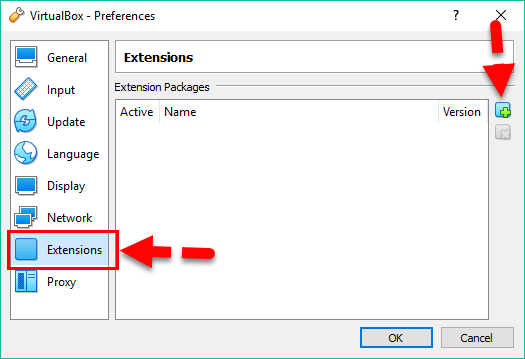 Add the Extension Pack
 When the screen appears, you’ll need to choose the extension pack that you downloaded, and click on the Open.
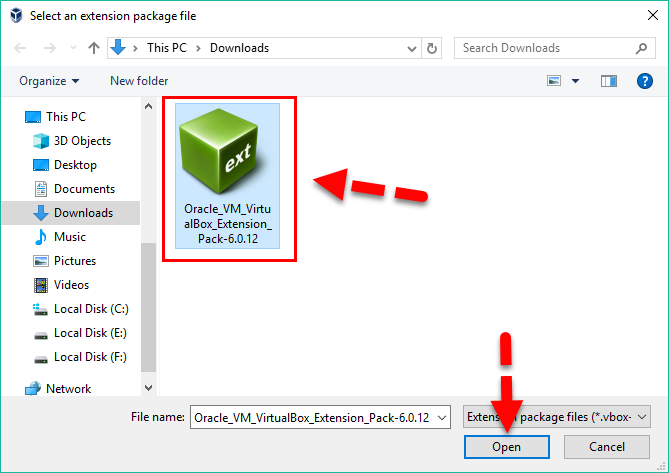 Select the Extension Pack
 Step 3. When you add extension pack, then the confirmation dialog will appear, you have to click Install and continue.
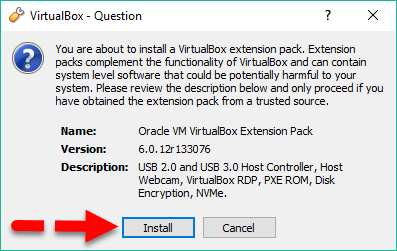 Install Extension Pack
 Step 4. When you click on Install Button then next you will see the VirtualBox License, you need to read and simply click on the I agree.
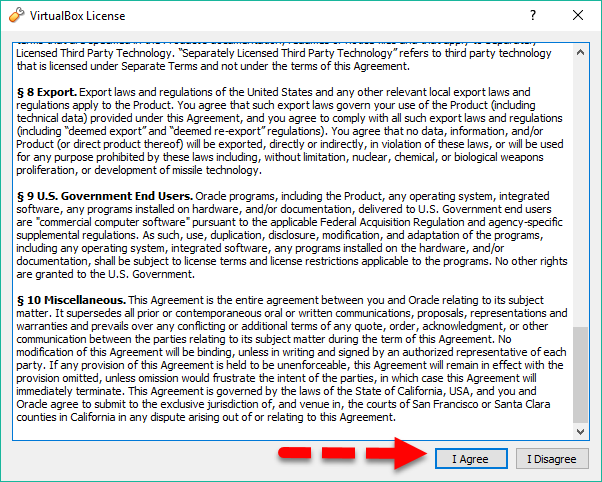 Agree with VirtualBox License
 There’s all set with the installation Extension Pack. Therefore, you need to click on Ok on the install dialog box and also click Ok on the preferences window.
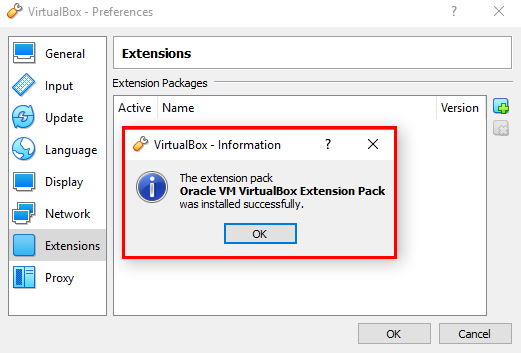 Successfully Installed VirtualBox Extension Pack
 Enable USB 3.0 (xHCI) Controller
Step 1. Now, click on Setting of VirtualBox which is located at the left-hand of the VirtualBox.
Step 2. Then click on USB at the left side and Enable USB Controller and select USB 3.0 (xHCI), Controller.
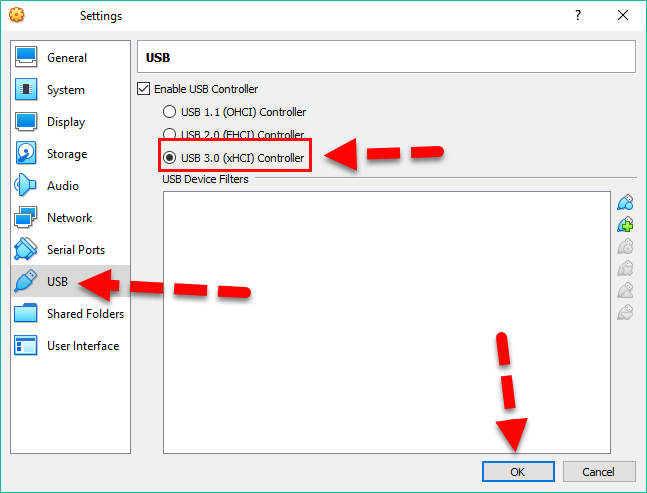 USB Setting
 That’s all about How to Fix Mouse & Keyboard Stuck on macOS Mojave on VirtualBox. If you have a question or any problem then do comment below. Don’t forget to comment your feedback and suggestion.
Tagged
Share This Article
When you finished the complete installation macOS Mojave on VirtualBox. It is not done yet because there are many problems you need to fix. Therefore, I am going to guide you How to Fix Mouse & Keyboard Stuck on macOS Mojave on VirtualBox. So, macOS Mojave is the most popular operating system which is released by Apple company. Apple Company announced first beta macOS Mojave at there 2018 WWDC (WorldWide Developer Conference). There are many amazing features in macOS Mojave but the recent update is Dark Mode which is very attractive. So, most of the Mac users like the macOS Mojave more than macOS High Sierra. And Good news for windows user because they can use and test the macOS Mojave Operating System easily on their windows PC without any physical problem. Nowadays many windows users using macOS Mojave through Virtual machines.
Yes, of course, you can use and check the macOS Mojave on your windows PC with full functionalities. There are many virtual machines on the market but one of the most popular is VMware and VirtualBox. So, when you installed macOS Mojave on the Virtualbox then you will face various type of issues with your macOS Mojave. You might solve some of them but the biggest issue on that is Mouse & Keyboard stuck which you will be unable to use macOS Mojave in the proper way. Here’s a quick guide to fix mouse and keyboard which is macOS Mojave Operating system.
Fix Mouse & Keyboard Stuck on macOS Mojave
First thing you need to do that completely off the virtual machine. Simply click on the close button at the right-hand top and click on Power off the machine. Otherwise, you won’t be able to fix the issue.
Once you power off the machine then you need to go to the VirtualBox Download Website and under VirtualBox Extension Pack, click on the All supported platforms link and it will start downloading.
 Download VirtualBox Extension Pack
 Step 1. When extension file download, then you need to click on File option then click on the Preference or press Ctrl+G shortcut key.
 Preferences…
 Step 2. In this window, you need to click on the Extension which is located at the left side and click on + icon in order to browse the VirtualBox Extension Pack.
 Add the Extension Pack
 When the screen appears, you’ll need to choose the extension pack that you downloaded, and click on the Open.
 Select the Extension Pack
 Step 3. When you add extension pack, then the confirmation dialog will appear, you have to click Install and continue.
 Install Extension Pack
 Step 4. When you click on Install Button then next you will see the VirtualBox License, you need to read and simply click on the I agree.
 Agree with VirtualBox License
 There’s all set with the installation Extension Pack. Therefore, you need to click on Ok on the install dialog box and also click Ok on the preferences window.
 Successfully Installed VirtualBox Extension Pack
 Enable USB 3.0 (xHCI) Controller
Step 1. Now, click on Setting of VirtualBox which is located at the left-hand of the VirtualBox.
Step 2. Then click on USB at the left side and Enable USB Controller and select USB 3.0 (xHCI), Controller.
 USB Setting
 That’s all about How to Fix Mouse & Keyboard Stuck on macOS Mojave on VirtualBox. If you have a question or any problem then do comment below. Don’t forget to comment your feedback and suggestion.


