How to Fix macOS Mojave iMessage, iCloud, App Store on VMware

In this article, I am going to guide How to Fix macOS Mojave iMessage, iCloud, App Store on VMware. This is a common issue nowadays. Most of the people are using the Mac operating system such as Mojave and Catalina on their Windows PC. They use it through virtualization technology such as VirtualBox and VMware Workstation or player. So, these virtual machines full authority to the user in order to install and use it with full functionalities and features. Furthermore, most people install and use Mac operating system such as Mojave and Catalina directly to their physical PC which is well known Hackintosh. Therefore, these two ways are totally and completely different from each other because of installing procedure. However, you will face a little bit of issues while using it on VMware workstation especially.
Those who install macOS Mojave on VMware or VirtualBox, while going through these way people often face many problems, and the common issues while using it on VMware such as iMessage, iCloud, and App Store don’t work properly or even it doesn’t open at all. So, we will cover and help you in order to get rid of this unwanted issue.
 How Fix macOS Mojave iMessage, iCloud, App Store on VMware
 Fix macOS Mojave iMessage, iCloud, App Store on VMware
You might know the reason for this issue if you know then feel free to common your professional knowledge down below. So, after researching I got a solid reason for that when you install any Mac OS X on Vmware Workstation the default system definition is not compatible with some of the devices that is why this issue occurs. iMessage, iCloud and other apps don’t open properly and even don’t work. Therefore, the applications recognize the device. Once you change the system definition to MacBook Pro or iMac 18.x then the apps might recognize the system and think it’s the real Apple device and it will work.
Step 1. First of all, go to the macOS Mojave or the later version of the Mac OS X virtual machine and find the VMX File extension. The exact or default location is My Documents > Virtual Machines > macOS Mojave > macOS Mojave.vmx. You have to right-click on the file and open via notepad.
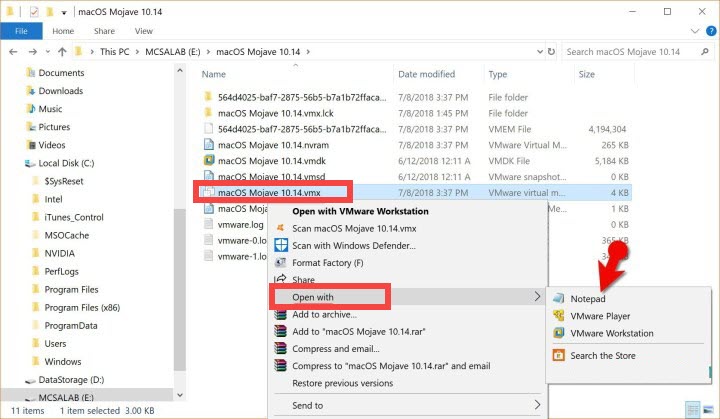 Edit macOS Mojave VMX File
 Step 2. After that, you have to find out board-id.reflectHost = “True” and once you have found that change True into False. Now, add the system definition at that blank line.
Some common system definition
- iMac 13,2
board-id = “Mac-FC02E91DDD3FA6A4”
hw.model.reflectHost = “FALSE”
hw.model = “iMac13,2”
serialNumber.reflectHost = “FALSE”
serialNumber = “C02H82KLDNCW”
smbios.reflectHost = “FALSE”
efi.nvram.var.ROM.reflectHost = “FALSE”
efi.nvram.var.MLB.reflectHost = “FALSE”
efi.nvram.var.ROM = “3c0754a2f9be” - iMac 14,2
board-id = “Mac-27ADBB7B4CEE8E61”
hw.model.reflectHost = “FALSE”
hw.model = “iMac14,2”
serialNumber.reflectHost = “FALSE”
serialNumber = “C02KP7A9F8JC”
smbios.reflectHost = “FALSE”
efi.nvram.var.ROM.reflectHost = “FALSE”
efi.nvram.var.MLB.reflectHost = “FALSE”
efi.nvram.var.ROM = “3c0754a2f9be” - iMac 18,3
board-id = “Mac-BE088AF8C5EB4FA2”
hw.model.reflectHost = “FALSE”
hw.model = “iMac18,3”
serialNumber.reflectHost = “FALSE”
serialNumber = “C02TC4YKJ1GJ”
smbios.reflectHost = “FALSE”
efi.nvram.var.ROM.reflectHost = “FALSE”
efi.nvram.var.MLB.reflectHost = “FALSE”
efi.nvram.var.ROM = “3c0754a2f9be” - MacBook Pro 14,3
board-id = “Mac-551B86E5744E2388”
hw.model.reflectHost = “FALSE”
hw.model = “MacBookPro14,3”
serialNumber.reflectHost = “FALSE”
serialNumber = “C02TX2EZHTD5”
smbios.reflectHost = “FALSE”
efi.nvram.var.ROM.reflectHost = “FALSE”
efi.nvram.var.MLB.reflectHost = “FALSE”
efi.nvram.var.ROM = “3c0754a2f9be”
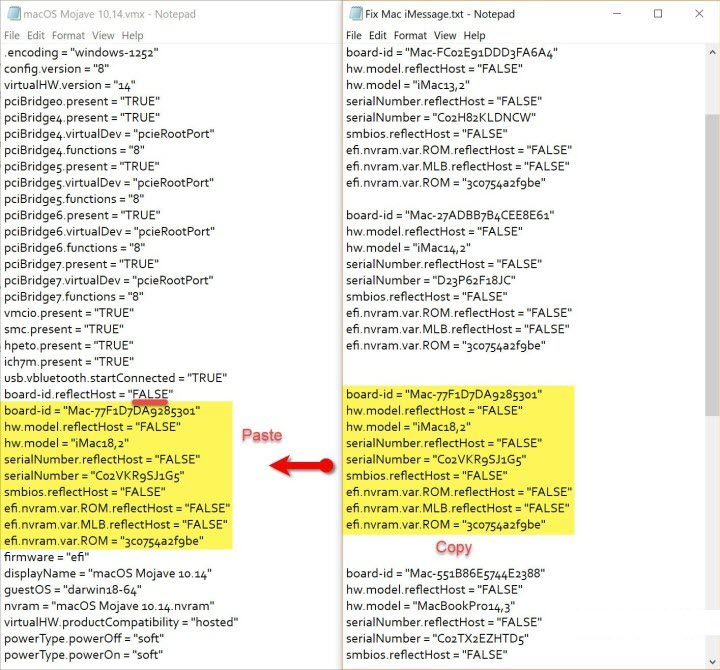 Add your System Definition
 when you have added your system definition to the macOS Mojave VMX File after that save that and restart the virtual machine in which macOS Mojave is runnimg.
Another Solution How to Fix macOS Mojave iMessage, iCloud, App Store on VMware
If the first solution didn’t work well for you in order to get rid of issue, then we tried well in order to find out a new and easy solution. Therefore, make sure to follow and go through all the steps below so that it should work for you very well. So, the solution is to change the serial number of the Mac, for that head towards below.
Step 1. First of all, you have to download Clover Configurator and must be the latest version of that software. Then open clover configurator on the virtual machine in which macOS is installed. After that, you have to click on the SMBIOS which is located at the left-hand side. Once you have selected the version of macOS (iMac 18,3, MacBook Pro 14,2) then Click on “Generate New”. It’ll generate a new serial number for the system definition you’ve chosen.
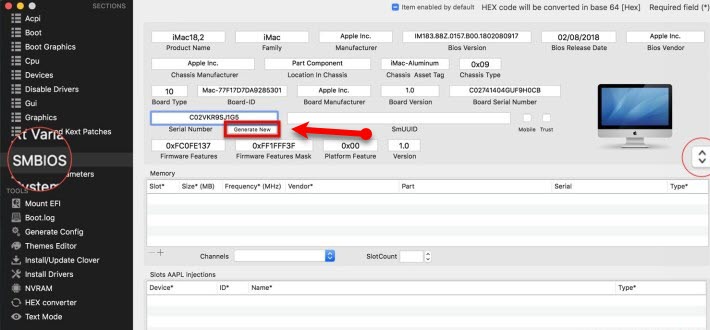 Change the serial number
 Step 2. Once you have successfully generated the new serial from the software. So, you have to open macOS Mojave.vmx file then add the new serial number
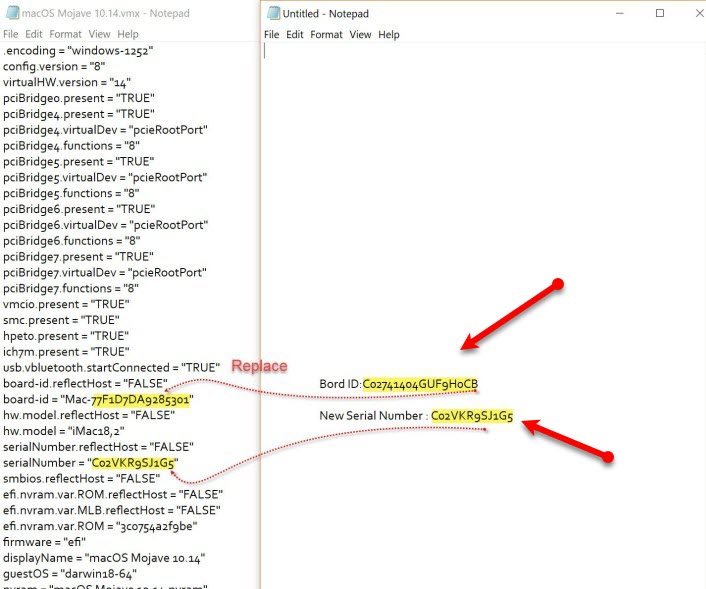 Replace the serial number
 Troubleshooting Apps Opening on macOS Mojave
However, when you get any error while opening any app, just you need to close the error window
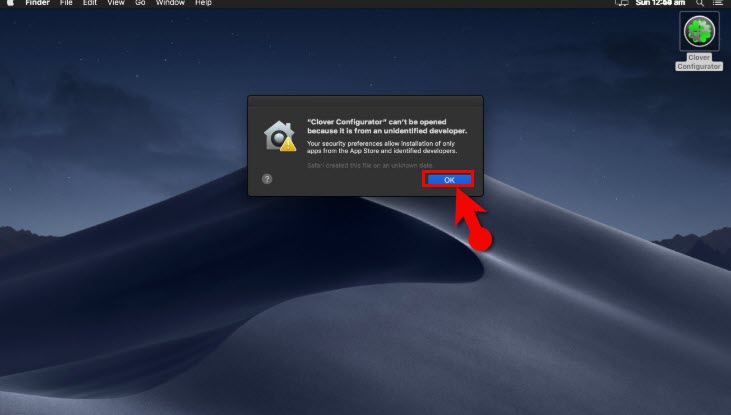 Close the application
 After that, you have to open Preferences and click on Security & Privacy.
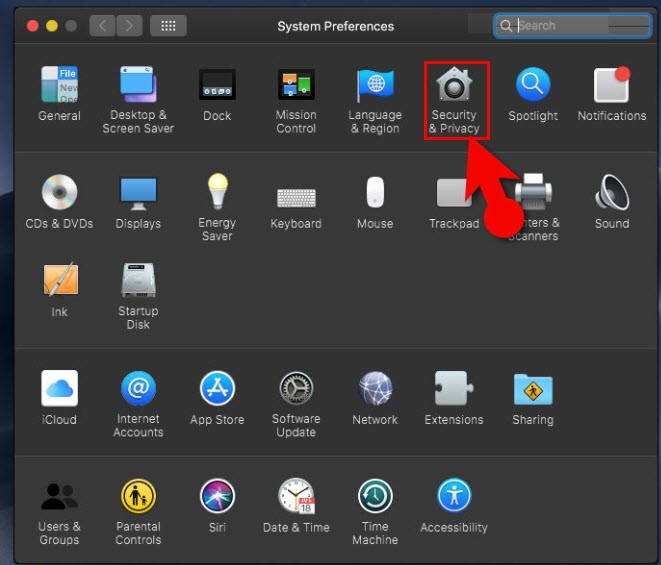 Security & Privacy
 So, click Allow or Open Anyway button and open the application.
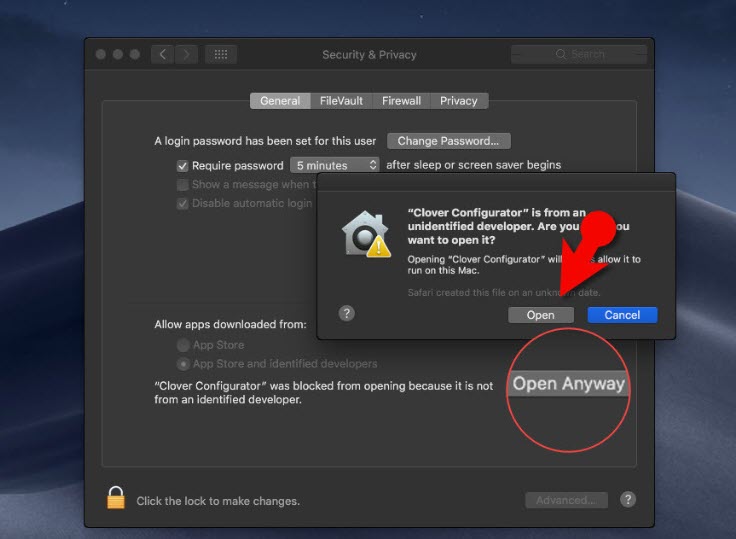 Open anyway
 Related
- How to Change Login Screen Background on macOS Catalina
- How to Change User Picture on macOS Catalina 10.15
Final Words
That’s all about How to Fix macOS Mojave iMessage, iCloud, App Store on VMware. So, it was all the solution which will help you to solve the unpleasant issue. However, if you have any kind of problem or any question then feel free to leave comments.
Tagged
Share This Article
In this article, I am going to guide How to Fix macOS Mojave iMessage, iCloud, App Store on VMware. This is a common issue nowadays. Most of the people are using the Mac operating system such as Mojave and Catalina on their Windows PC. They use it through virtualization technology such as VirtualBox and VMware Workstation or player. So, these virtual machines full authority to the user in order to install and use it with full functionalities and features. Furthermore, most people install and use Mac operating system such as Mojave and Catalina directly to their physical PC which is well known Hackintosh. Therefore, these two ways are totally and completely different from each other because of installing procedure. However, you will face a little bit of issues while using it on VMware workstation especially.
Those who install macOS Mojave on VMware or VirtualBox, while going through these way people often face many problems, and the common issues while using it on VMware such as iMessage, iCloud, and App Store don’t work properly or even it doesn’t open at all. So, we will cover and help you in order to get rid of this unwanted issue.
 How Fix macOS Mojave iMessage, iCloud, App Store on VMware
 Fix macOS Mojave iMessage, iCloud, App Store on VMware
You might know the reason for this issue if you know then feel free to common your professional knowledge down below. So, after researching I got a solid reason for that when you install any Mac OS X on Vmware Workstation the default system definition is not compatible with some of the devices that is why this issue occurs. iMessage, iCloud and other apps don’t open properly and even don’t work. Therefore, the applications recognize the device. Once you change the system definition to MacBook Pro or iMac 18.x then the apps might recognize the system and think it’s the real Apple device and it will work.
Step 1. First of all, go to the macOS Mojave or the later version of the Mac OS X virtual machine and find the VMX File extension. The exact or default location is My Documents > Virtual Machines > macOS Mojave > macOS Mojave.vmx. You have to right-click on the file and open via notepad.
 Edit macOS Mojave VMX File
 Step 2. After that, you have to find out board-id.reflectHost = “True” and once you have found that change True into False. Now, add the system definition at that blank line.
Some common system definition
- iMac 13,2
board-id = “Mac-FC02E91DDD3FA6A4”
hw.model.reflectHost = “FALSE”
hw.model = “iMac13,2”
serialNumber.reflectHost = “FALSE”
serialNumber = “C02H82KLDNCW”
smbios.reflectHost = “FALSE”
efi.nvram.var.ROM.reflectHost = “FALSE”
efi.nvram.var.MLB.reflectHost = “FALSE”
efi.nvram.var.ROM = “3c0754a2f9be” - iMac 14,2
board-id = “Mac-27ADBB7B4CEE8E61”
hw.model.reflectHost = “FALSE”
hw.model = “iMac14,2”
serialNumber.reflectHost = “FALSE”
serialNumber = “C02KP7A9F8JC”
smbios.reflectHost = “FALSE”
efi.nvram.var.ROM.reflectHost = “FALSE”
efi.nvram.var.MLB.reflectHost = “FALSE”
efi.nvram.var.ROM = “3c0754a2f9be” - iMac 18,3
board-id = “Mac-BE088AF8C5EB4FA2”
hw.model.reflectHost = “FALSE”
hw.model = “iMac18,3”
serialNumber.reflectHost = “FALSE”
serialNumber = “C02TC4YKJ1GJ”
smbios.reflectHost = “FALSE”
efi.nvram.var.ROM.reflectHost = “FALSE”
efi.nvram.var.MLB.reflectHost = “FALSE”
efi.nvram.var.ROM = “3c0754a2f9be” - MacBook Pro 14,3
board-id = “Mac-551B86E5744E2388”
hw.model.reflectHost = “FALSE”
hw.model = “MacBookPro14,3”
serialNumber.reflectHost = “FALSE”
serialNumber = “C02TX2EZHTD5”
smbios.reflectHost = “FALSE”
efi.nvram.var.ROM.reflectHost = “FALSE”
efi.nvram.var.MLB.reflectHost = “FALSE”
efi.nvram.var.ROM = “3c0754a2f9be”
 Add your System Definition
 when you have added your system definition to the macOS Mojave VMX File after that save that and restart the virtual machine in which macOS Mojave is runnimg.
Another Solution How to Fix macOS Mojave iMessage, iCloud, App Store on VMware
If the first solution didn’t work well for you in order to get rid of issue, then we tried well in order to find out a new and easy solution. Therefore, make sure to follow and go through all the steps below so that it should work for you very well. So, the solution is to change the serial number of the Mac, for that head towards below.
Step 1. First of all, you have to download Clover Configurator and must be the latest version of that software. Then open clover configurator on the virtual machine in which macOS is installed. After that, you have to click on the SMBIOS which is located at the left-hand side. Once you have selected the version of macOS (iMac 18,3, MacBook Pro 14,2) then Click on “Generate New”. It’ll generate a new serial number for the system definition you’ve chosen.
 Change the serial number
 Step 2. Once you have successfully generated the new serial from the software. So, you have to open macOS Mojave.vmx file then add the new serial number
 Replace the serial number
 Troubleshooting Apps Opening on macOS Mojave
However, when you get any error while opening any app, just you need to close the error window
 Close the application
 After that, you have to open Preferences and click on Security & Privacy.
 Security & Privacy
 So, click Allow or Open Anyway button and open the application.
 Open anyway
 Related
- How to Change Login Screen Background on macOS Catalina
- How to Change User Picture on macOS Catalina 10.15
Final Words
That’s all about How to Fix macOS Mojave iMessage, iCloud, App Store on VMware. So, it was all the solution which will help you to solve the unpleasant issue. However, if you have any kind of problem or any question then feel free to leave comments.


