How to Display Your Internet Speed on the Taskbar in Windows 10
In this article, I am going to guide you on How to Display Internet Speed on the Taskbar in Windows 10. Your computer on windows running slowly. You want to know if it’s an Internet issue or a problem with your computer then easy is to show internet speed on the taskbar in order to see easily. Do you have programs running in the background slowing things down, or is the Internet speed slow? You would love to check the speed quickly from the taskbar, but Windows does not offer a native app to monitor the speed of your Internet. And also you can’t display from the setting of your Windows 10. You can see the current situation or record of your internet speed from the taskbar easily.
In this case, we are going through the small tool or software in order to see the internet speed quickly to see the problem by displaying it on the Taskbar of Windows. As I researched that there is not an option on the setting of windows to display internet speed on the taskbar. But we have found a new way and a tool which will allow you to display internet speed on the taskbar. Therefore, you have to follow and go through each and every step below.
NetSpeedMonitor is a simple and old tool that will allow you to display the internet speed on the taskbar of your windows 10.
NetSpeedMonitor Features
To use the NetSpeedMonitor tool you need to have to be running Windows XP or later. The program was developed for an earlier version of Windows, but if you use Windows 10, you can run the program in compatibility mode if it won’t install. You must make sure that you have downloaded the correct program, though. The name of the file should end in “x64_setup”. If you use the one ending in “x86_setup,” it will not run on a Windows 10 machine, even if you run it in compatibility mode.
As I think, NetSpeedMonitor does not have more and better features, which keep it neat and clean to use it because it is just a simple tool.
How to Display Your Internet Speed on the Taskbar in Windows 10
Step 1. When you have downloaded the NewSpeedMonitor from the above link.
Step 2. After downloading, you have to click on the file. If you are running Windows XP, Windows 7, and Windows then you will face any error or issue while installing. But if you are running windows 10 then you might face an error Operating system not supported error.
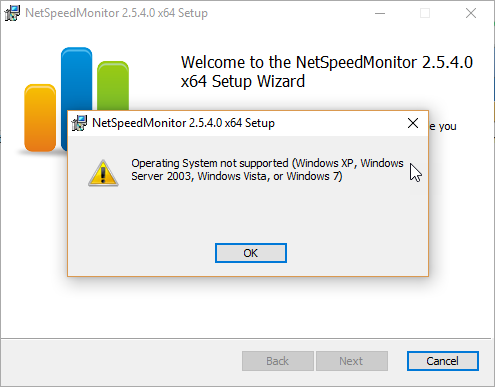 NetSpeedMonitor error on Windows 10
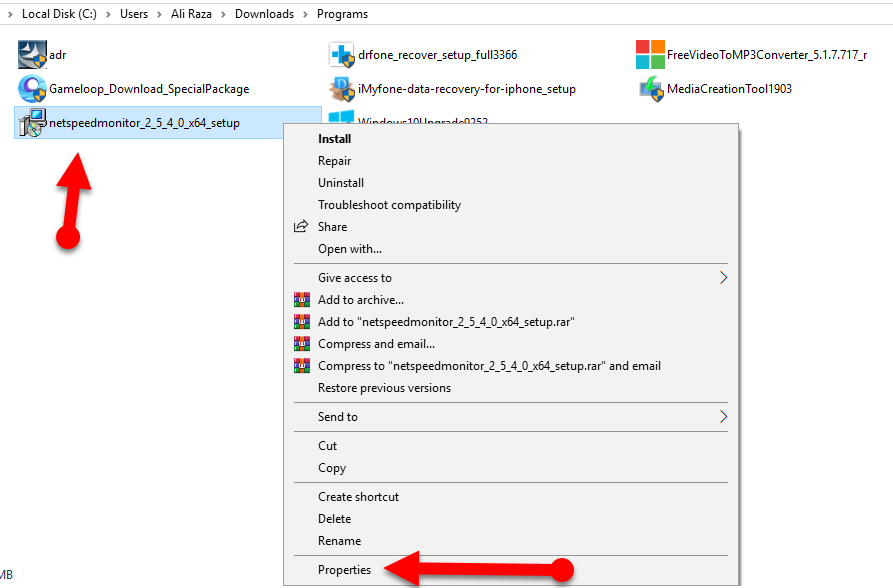
Step 3. Now if you want to run in compatibility mode, you need to find the download in the file explorer and right-click. And click on the Properties of that file.
 Properties
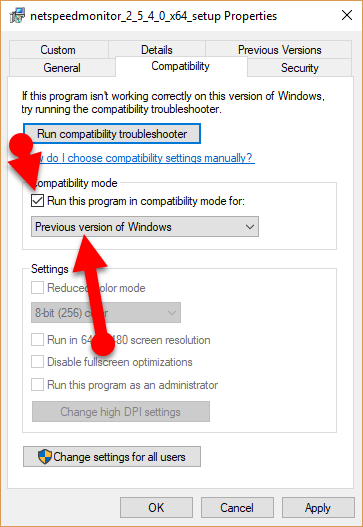
Step 4. In a properties section, you will see many options for that file. So, you need to click on the Compatibility tab. Then, click to check the box next to Run this program in compatibility mode for and make sure the drop-down below the option is on Previous Versions of Windows. Therefore, when you have done all the required things then you have to click on the Ok button from the below.
 Turn on Compatibility
Step 5. Now, again double-click on the NetSpeedMonitor to install it again.
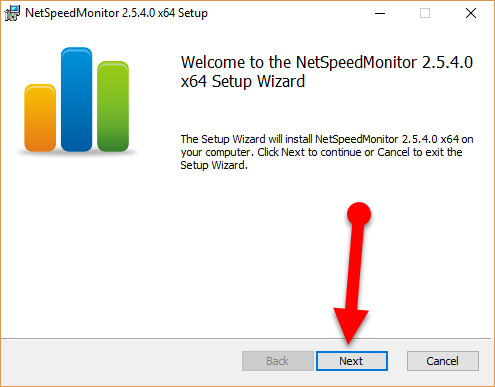
Step 6. Then setup wizard will appear just you have to click on the Next in order to continue.
 Next
Next
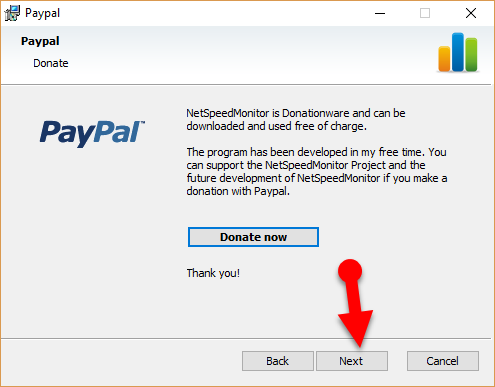
Step 7. A new window will appear again click on the Next.
 Next to go-ahead
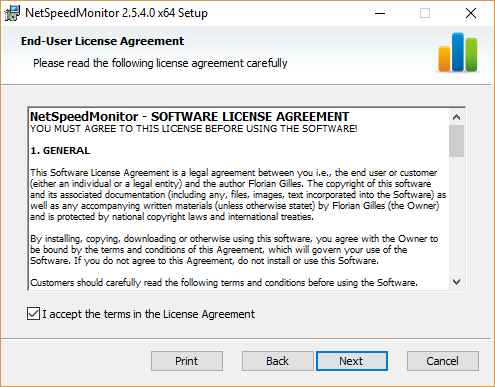
Step 8. Be agree with the terms and conditions of NetSpeedMonitor. For that, you have to check the box and click on the Next.
 User License
Step 9. Once the program installs, a prompt will appear asking if you want to add the bandwidth monitoring toolbar to the taskbar. You need to click on the Yes.
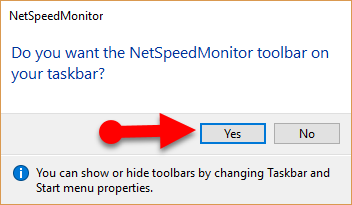 NetSpeedMonitor on the Taskbar
Step 10. A configuration window will open where you can make any changes to your language and network adapter. When they are correct, click Save.
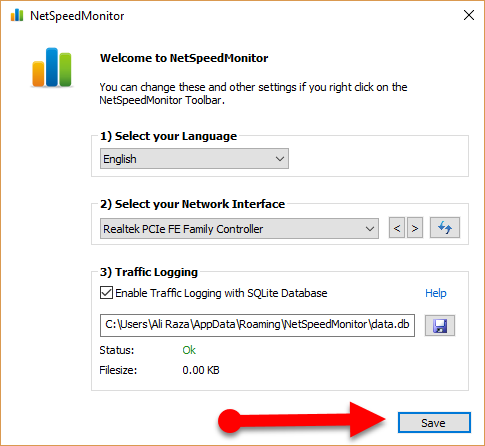 Save
Save
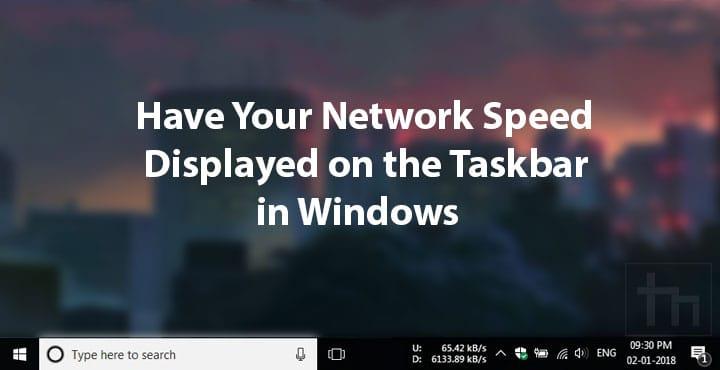
Step 11. When you hit the Save button, the download and upload speed toolbar will appear on the right side of the taskbar beside the date and time.
 Internet Speed on the Taskbar
Using of NetSpeedMonitor on the Taskbar
By default, NetSpeedMonitor will measure and show you the speed of the internet in the Kbit (kilobits). You might want to change it from the kbit into Mbit (Megabit) because most of the internet providers will report its speed in Megabits per second. In order to change the setting of NetSpeedMonitor, you have to right-click on the speed display and select Configuration, then click on the drop-down menu next to “Bitrate,” and select “Mbit/s.” Hit Apply.
When you open the configuration window, you can make other adjustments such as the font family, size, and toolbar alignment. NetSpeedMonitor is simple to download and use to monitor your upload and download speeds right on your taskbar on Windows devices. You can check them anytime to make sure your Internet is working correctly.
Related:
- Run and Install Windows 10 in macOS Catalina with a Free Emulator
- Download and Install Tik Tok for PC Free
Final Words
That’s all about How to Display Your Internet Speed on the Taskbar in Windows 10. I hope you found this article useful for your Windows 10. Now, you can see the speed of your internet from the taskbar of Windows and also you can check the problem. If you faced any kind of problem or any question then feel free to comment down below. Don’t forget to also comment on your feedback and suggestion about these tips and tricks.
Tagged
Share This Article
In this article, I am going to guide you on How to Display Internet Speed on the Taskbar in Windows 10. Your computer on windows running slowly. You want to know if it’s an Internet issue or a problem with your computer then easy is to show internet speed on the taskbar in order to see easily. Do you have programs running in the background slowing things down, or is the Internet speed slow? You would love to check the speed quickly from the taskbar, but Windows does not offer a native app to monitor the speed of your Internet. And also you can’t display from the setting of your Windows 10. You can see the current situation or record of your internet speed from the taskbar easily.
In this case, we are going through the small tool or software in order to see the internet speed quickly to see the problem by displaying it on the Taskbar of Windows. As I researched that there is not an option on the setting of windows to display internet speed on the taskbar. But we have found a new way and a tool which will allow you to display internet speed on the taskbar. Therefore, you have to follow and go through each and every step below.
NetSpeedMonitor is a simple and old tool that will allow you to display the internet speed on the taskbar of your windows 10.
NetSpeedMonitor Features
To use the NetSpeedMonitor tool you need to have to be running Windows XP or later. The program was developed for an earlier version of Windows, but if you use Windows 10, you can run the program in compatibility mode if it won’t install. You must make sure that you have downloaded the correct program, though. The name of the file should end in “x64_setup”. If you use the one ending in “x86_setup,” it will not run on a Windows 10 machine, even if you run it in compatibility mode.
As I think, NetSpeedMonitor does not have more and better features, which keep it neat and clean to use it because it is just a simple tool.
How to Display Your Internet Speed on the Taskbar in Windows 10
Step 1. When you have downloaded the NewSpeedMonitor from the above link.
Step 2. After downloading, you have to click on the file. If you are running Windows XP, Windows 7, and Windows then you will face any error or issue while installing. But if you are running windows 10 then you might face an error Operating system not supported error.
NetSpeedMonitor error on Windows 10
Step 3. Now if you want to run in compatibility mode, you need to find the download in the file explorer and right-click. And click on the Properties of that file.
Properties
Step 4. In a properties section, you will see many options for that file. So, you need to click on the Compatibility tab. Then, click to check the box next to Run this program in compatibility mode for and make sure the drop-down below the option is on Previous Versions of Windows. Therefore, when you have done all the required things then you have to click on the Ok button from the below.
Turn on Compatibility
Step 5. Now, again double-click on the NetSpeedMonitor to install it again.
Step 6. Then setup wizard will appear just you have to click on the Next in order to continue.
Next
Step 7. A new window will appear again click on the Next.
Next to go-ahead
Step 8. Be agree with the terms and conditions of NetSpeedMonitor. For that, you have to check the box and click on the Next.
User License
Step 9. Once the program installs, a prompt will appear asking if you want to add the bandwidth monitoring toolbar to the taskbar. You need to click on the Yes.
NetSpeedMonitor on the Taskbar
Step 10. A configuration window will open where you can make any changes to your language and network adapter. When they are correct, click Save.
Save
Step 11. When you hit the Save button, the download and upload speed toolbar will appear on the right side of the taskbar beside the date and time.
Internet Speed on the Taskbar
Using of NetSpeedMonitor on the Taskbar
By default, NetSpeedMonitor will measure and show you the speed of the internet in the Kbit (kilobits). You might want to change it from the kbit into Mbit (Megabit) because most of the internet providers will report its speed in Megabits per second. In order to change the setting of NetSpeedMonitor, you have to right-click on the speed display and select Configuration, then click on the drop-down menu next to “Bitrate,” and select “Mbit/s.” Hit Apply.
When you open the configuration window, you can make other adjustments such as the font family, size, and toolbar alignment. NetSpeedMonitor is simple to download and use to monitor your upload and download speeds right on your taskbar on Windows devices. You can check them anytime to make sure your Internet is working correctly.
Related:
- Run and Install Windows 10 in macOS Catalina with a Free Emulator
- Download and Install Tik Tok for PC Free
Final Words
That’s all about How to Display Your Internet Speed on the Taskbar in Windows 10. I hope you found this article useful for your Windows 10. Now, you can see the speed of your internet from the taskbar of Windows and also you can check the problem. If you faced any kind of problem or any question then feel free to comment down below. Don’t forget to also comment on your feedback and suggestion about these tips and tricks.