How to Create Windows 10 Install USB on Mac
Running Windows 10 on a Mac allows you the freedom to enjoy the vast repertoire of Windows utilities that may not be available for Apple products. Since Apple’s ecosystem is a lot tighter, there are far more tools for Windows than there are for a computer running Mac OS X or macOS. In this article, we’ll show you two ways to install Windows 10 on a Mac using a USB flash drive.
Method 1: Create and Use USB Windows 10 Installer on Mac (with Boot Camp Assistant)
Installing Windows 10 on a Mac using Boot Camp Assistant requires you to create an installer on your Mac, and then use that to install a dual-boot with Windows 10 and macOS on the same machine. Technically, we’re not using Boot Camp for the installation, but we do need it to download and install the support software and drivers for Windows 10. This will allow your Mac hardware to control Windows functions.
The problem with Boot Camp Assistant nowadays is that Windows 10 ISO files (disk images) are too large for the assistant to handle. You’ll end up getting an error telling you there’s not enough space on the disk. For that reason, it’s better to create your own USB installer and use that to install Windows 10 on your Mac.
Let’s see how to create the Windows 10 installer and then use Boot Camp Assistant to help complete the setup process.
Step 1: Before creating the USB installer for Windows 10, launch Boot Camp Assistant, go to Actions and click on Download Windows Support Software. Select a destination location and click OK to confirm the download.
Step 2: Download the appropriate Windows 10 ISO file from Microsoft’s website and save it in a convenient location.
Step 3: The next step is to create the USB installer, so close Boot Camp Assistant and open Disk Utility. Insert a blank USB drive or make sure there are no important documents since everything will be deleted. An 8GB drive should be enough, but some experts recommend a 32GB USB stick. Now click on the drive on the left panel of Disk Utility and click on Erase. This will show you a prompt, where you can name your USB. The format for the drive should be FAT.
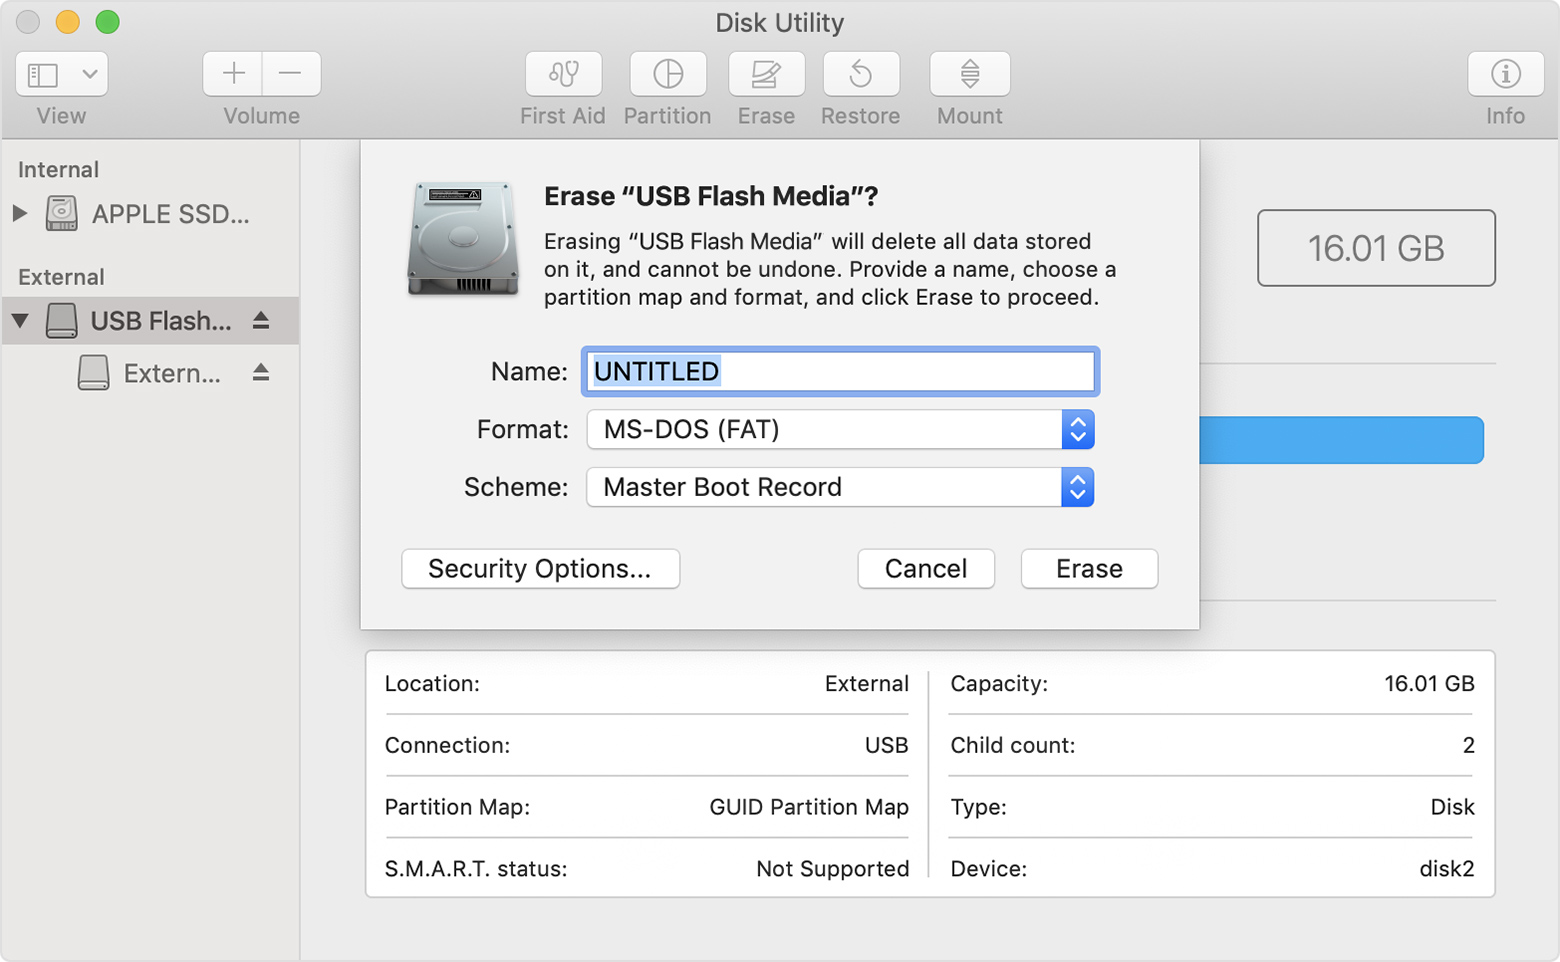 Erase USB on Mac
Step 4: Mount the downloaded Windows 10 ISO file by double-clicking it. Select all the installation files in that ISO, copy them with Cmd + C and paste them to your USB with Cmd + V.
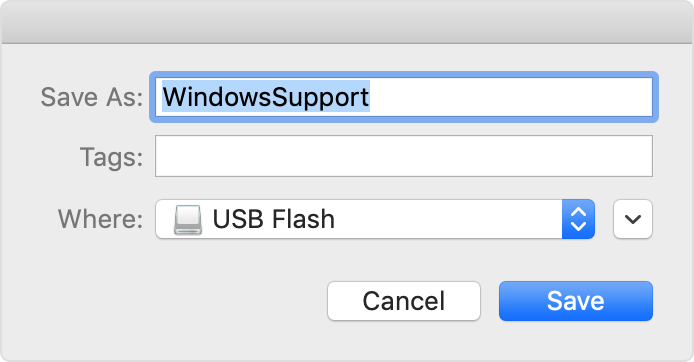
Step 5: Now navigate to the Windows drivers that you downloaded before, copy everything in the WindowsSupport folder and paste them in your USB installer in the root directory.
Step 6: Launch Boot Camp Assistant again and click on Continue. This time, uncheck all the boxes (you’ve already done these steps) except the one that says Install Windows 7 or later version. Click Continue.
Step 7: Allocate the amount of space you want to assign to Windows 10. You can also click on Divide Equally to distribute allocation evenly between the two operating systems. Click on Install and enter your Mac password to begin the Windows installation.
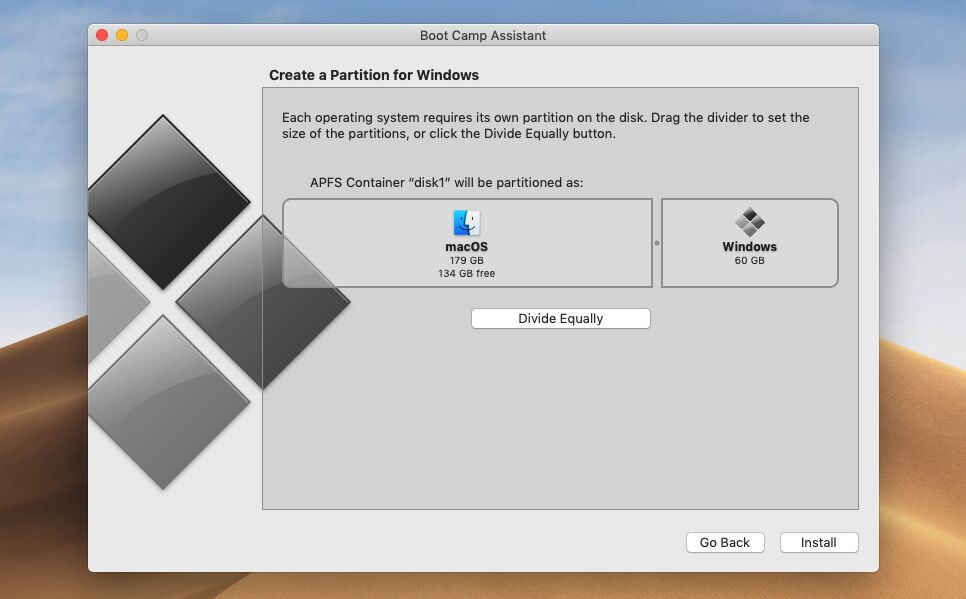 Boot Camp
Step 8: Follow the on-screen instructions for the Windows 10 installation. Choose the Home or Pro version, depending on the license or product key you have. Even if you don’t have it, you can click I Don’t Have a Product Key to continue the installation. The computer will restart a few times, and then boot up with the Boot Camp Installer open.
Step 9: Click on Next and then on Install to install all the drivers from your USB drive. Restart Windows 10 when prompted. Once it reboots to Windows 10, you can start using your Mac as a Windows 10 PC. All hardware should work as expected.
This is obviously a bit of a roundabout method of installing Windows. If you want a simpler method, you can try a utility like UUByte ISO Editor for Mac to create the bootable USB with Windows 10.
Method 2: Create USB Installer on Mac using UUByte ISO Editor (without Boot Camp Assistant)
UUByte ISO Editor is a versatile utility that lets you create bootable USB on a Mac. You can get the Windows 10 installation file from Microsoft, then easily burn it to a USB to create the installer. Once this is done, you will be able to partition your drive with Disk Utility and install Windows 10 using the newly created USB installer.
Step 1: Download Windows 10 ISO image from Microsoft’s website. Then download UUByte ISO Editor from UUByte.com and install it. Launch Boot Camp Assistant, click on Action and Download Windows Support Software and click Save to put the files in your Downloads folder. This is the only step that requires Boot Camp Assistant. The rest of the process can be completed without it.
 Download Windows Support Software Boot Camp
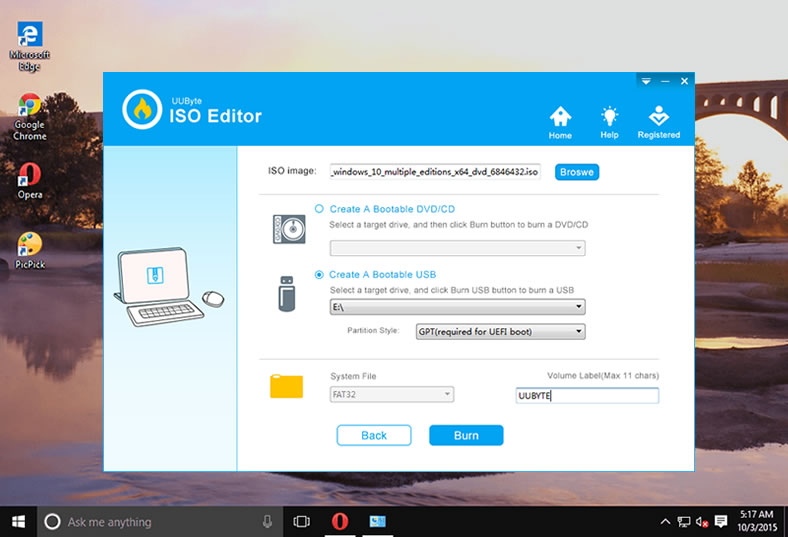
Step 2: Insert a USB drive into your Mac and launch UUByte. Inside, click on the Burn option to make the bootable drive. Click Burn again in the next window, but make sure you click the button next to the automatically identified USB drive. This will create your installation disk for Windows 10.
 Uubyte Burm
Step 3: Partition your drive by launching Disk Utility and clicking on Partition. Click the + symbol, assign a name for the drive and allocate adequate drive space. 100GB is usually enough unless you’re a pro user. The format should be MS-DOS (FAT).
Step 4: Disconnect all USB devices except the USB installer and wired keyboard if you’re using one.
Step 5: Restart your Mac and hold down the Option (Alt) key until you see a list of bootable drives. Choose USB, which will most likely be called EFIBoot.
Step 6: Select the partition you created with Disk Utility and click on Delete. It will show as unallocated space once deleted. Select it and click New to create an NTFS partition for Windows 10. The computer will now boot into Windows.
Step 7: Run this file from your USB drive to complete the setup process: Windows Support/BootCamp/Setup.exe. Now reboot to Windows.
This is a much easier method to use if you don’t want to encounter Boot Camp Assistant errors while creating your USB installer.
Related:
- Run and Install Windows 10 in macOS Catalina with a Free Emulator
- How to Install Final Cut Pro on Windows 10 – Download for Windows 2019
Final Thoughts
That’s all about How to Create a Windows 10 Install USB on Mac. I hope you found these tips and tricks useful. So, it was two easiest way to Create a Windows 10 Install USB on Mac. If you faced any kind of problem then feel free to comment below. Don’t forget to comment on your Feedback and Suggestion about this.
Tagged
Share This Article
Running Windows 10 on a Mac allows you the freedom to enjoy the vast repertoire of Windows utilities that may not be available for Apple products. Since Apple’s ecosystem is a lot tighter, there are far more tools for Windows than there are for a computer running Mac OS X or macOS. In this article, we’ll show you two ways to install Windows 10 on a Mac using a USB flash drive.
Method 1: Create and Use USB Windows 10 Installer on Mac (with Boot Camp Assistant)
Installing Windows 10 on a Mac using Boot Camp Assistant requires you to create an installer on your Mac, and then use that to install a dual-boot with Windows 10 and macOS on the same machine. Technically, we’re not using Boot Camp for the installation, but we do need it to download and install the support software and drivers for Windows 10. This will allow your Mac hardware to control Windows functions.
The problem with Boot Camp Assistant nowadays is that Windows 10 ISO files (disk images) are too large for the assistant to handle. You’ll end up getting an error telling you there’s not enough space on the disk. For that reason, it’s better to create your own USB installer and use that to install Windows 10 on your Mac.
Let’s see how to create the Windows 10 installer and then use Boot Camp Assistant to help complete the setup process.
Step 1: Before creating the USB installer for Windows 10, launch Boot Camp Assistant, go to Actions and click on Download Windows Support Software. Select a destination location and click OK to confirm the download.
Step 2: Download the appropriate Windows 10 ISO file from Microsoft’s website and save it in a convenient location.
Step 3: The next step is to create the USB installer, so close Boot Camp Assistant and open Disk Utility. Insert a blank USB drive or make sure there are no important documents since everything will be deleted. An 8GB drive should be enough, but some experts recommend a 32GB USB stick. Now click on the drive on the left panel of Disk Utility and click on Erase. This will show you a prompt, where you can name your USB. The format for the drive should be FAT.
Erase USB on Mac
Step 4: Mount the downloaded Windows 10 ISO file by double-clicking it. Select all the installation files in that ISO, copy them with Cmd + C and paste them to your USB with Cmd + V.
Step 5: Now navigate to the Windows drivers that you downloaded before, copy everything in the WindowsSupport folder and paste them in your USB installer in the root directory.
Step 6: Launch Boot Camp Assistant again and click on Continue. This time, uncheck all the boxes (you’ve already done these steps) except the one that says Install Windows 7 or later version. Click Continue.
Step 7: Allocate the amount of space you want to assign to Windows 10. You can also click on Divide Equally to distribute allocation evenly between the two operating systems. Click on Install and enter your Mac password to begin the Windows installation.
Boot Camp
Step 8: Follow the on-screen instructions for the Windows 10 installation. Choose the Home or Pro version, depending on the license or product key you have. Even if you don’t have it, you can click I Don’t Have a Product Key to continue the installation. The computer will restart a few times, and then boot up with the Boot Camp Installer open.
Step 9: Click on Next and then on Install to install all the drivers from your USB drive. Restart Windows 10 when prompted. Once it reboots to Windows 10, you can start using your Mac as a Windows 10 PC. All hardware should work as expected.
This is obviously a bit of a roundabout method of installing Windows. If you want a simpler method, you can try a utility like UUByte ISO Editor for Mac to create the bootable USB with Windows 10.
Method 2: Create USB Installer on Mac using UUByte ISO Editor (without Boot Camp Assistant)
UUByte ISO Editor is a versatile utility that lets you create bootable USB on a Mac. You can get the Windows 10 installation file from Microsoft, then easily burn it to a USB to create the installer. Once this is done, you will be able to partition your drive with Disk Utility and install Windows 10 using the newly created USB installer.
Step 1: Download Windows 10 ISO image from Microsoft’s website. Then download UUByte ISO Editor from UUByte.com and install it. Launch Boot Camp Assistant, click on Action and Download Windows Support Software and click Save to put the files in your Downloads folder. This is the only step that requires Boot Camp Assistant. The rest of the process can be completed without it.
Download Windows Support Software Boot Camp
Step 2: Insert a USB drive into your Mac and launch UUByte. Inside, click on the Burn option to make the bootable drive. Click Burn again in the next window, but make sure you click the button next to the automatically identified USB drive. This will create your installation disk for Windows 10.
Uubyte Burm
Step 3: Partition your drive by launching Disk Utility and clicking on Partition. Click the + symbol, assign a name for the drive and allocate adequate drive space. 100GB is usually enough unless you’re a pro user. The format should be MS-DOS (FAT).
Step 4: Disconnect all USB devices except the USB installer and wired keyboard if you’re using one.
Step 5: Restart your Mac and hold down the Option (Alt) key until you see a list of bootable drives. Choose USB, which will most likely be called EFIBoot.
Step 6: Select the partition you created with Disk Utility and click on Delete. It will show as unallocated space once deleted. Select it and click New to create an NTFS partition for Windows 10. The computer will now boot into Windows.
Step 7: Run this file from your USB drive to complete the setup process: Windows Support/BootCamp/Setup.exe. Now reboot to Windows.
This is a much easier method to use if you don’t want to encounter Boot Camp Assistant errors while creating your USB installer.
Related:
- Run and Install Windows 10 in macOS Catalina with a Free Emulator
- How to Install Final Cut Pro on Windows 10 – Download for Windows 2019
Final Thoughts
That’s all about How to Create a Windows 10 Install USB on Mac. I hope you found these tips and tricks useful. So, it was two easiest way to Create a Windows 10 Install USB on Mac. If you faced any kind of problem then feel free to comment below. Don’t forget to comment on your Feedback and Suggestion about this.