How to Make a Bootable Windows 11 USB Installer on Ubuntu?


In this article, I will guide you on How to Make a Bootable Windows 11 USB Installer on Ubuntu. It is still a hard thing for someone who wants to make bootable of Windows 11 USB installer on Ubuntu. You do not require any kind of third-party software, it will be done by the official website of Microsoft. When you want to make bootable of it then you don’t know the way. However, when you don’t know then you will search on YouTube then the video you are watching maybe not be clear. If you want to make a bootable Windows 11 UDB installer on Ubuntu then you need to read this article. So, without wasting any time let’s get started.
Check the Requirements:
It is important to know about the requirements and what things are needed before making it bootable.
- Get a 6 GB+ USB drive
- A computer or laptop with a processor that is 1 GHz or faster
- 4GB+ RAM
- 60GB+ hard disk
- DirectX 12 or late (graphics) compatible
- Supports UEFI, and Secure Boot
- Supports TPM 2.0 or WinPE (in old devices)
How to Install Windows Subsystem For Linux
One thing the Windows Subsystem for Linux is installed on your PC. We will just give the steps to check if the WSL is installed or not.
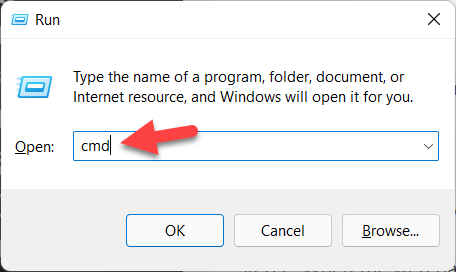
Step 1. First of all, you have to press and hold Win Key + R to open the run then search CMD, and don’t forget to run it as administrator by pressing Ctrl + Shift + Enter.
Step 2. Now, copy and paste the following command and hit Enter.
wsl –install
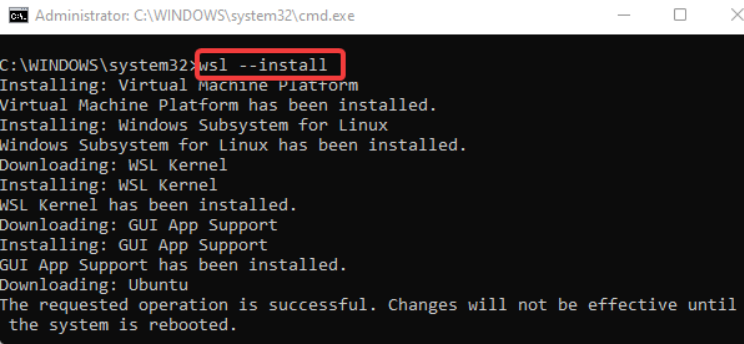
Step 3. Then when the command is executed then you will see the message in the last line which is said the requested operation is successful. Changes will not be effective until the system is rebooted.
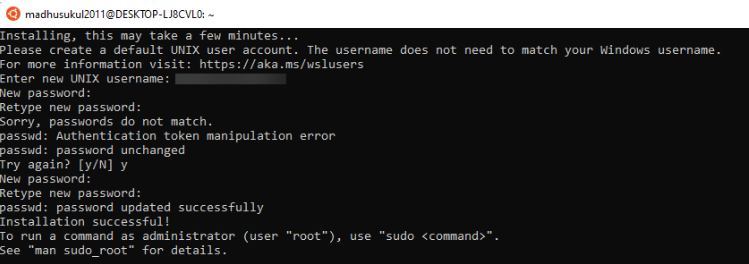
Step 4. Next, restart your PC to start the process of installing WSL. It will be done in the console app of Ubuntu.
Step 5. At last, enter the new password and username.
How to Make a Bootable Windows 11 USB Installer on Ubuntu
Step 1. Firstly, go to the website of Microsoft’s Official Page for Software Download.
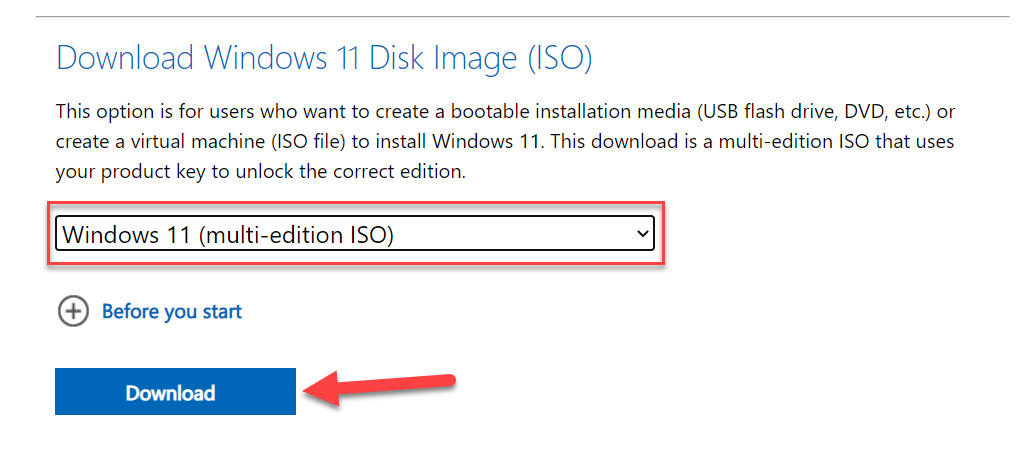
Step 2. When the web page is open then scroll down to the section of Download Windows 11 Disk Image (ISO) then select Windows 11 (multi-edition ISO) from the drop-down menu after that tap on the Download.
 Click on the Download
 Step 3. Now, it is time to select the language which you can understand then click on the Confirm.
 Click on the Confirm
 Step 4. At last, click on the 64-Bit Download to create a bootable USB installer.
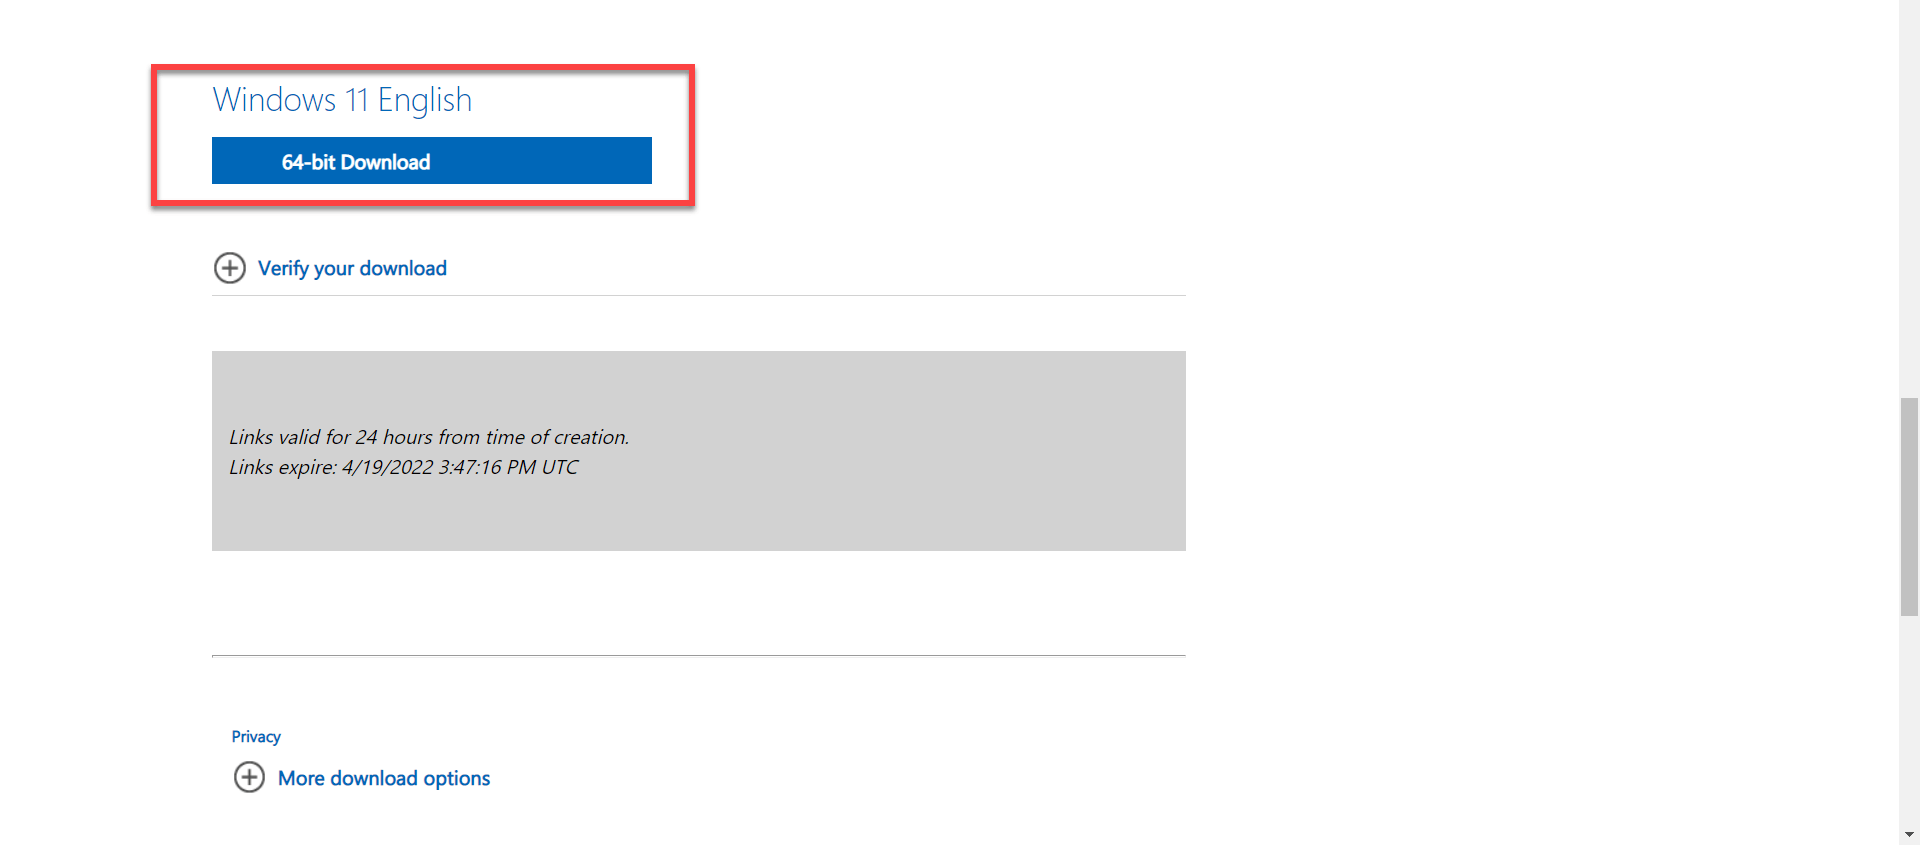 64-Bit Download
 Final Words
It was all about How to Make a Bootable Windows 11 USB Installer on Ubuntu. I hope this article is very helpful for you to make a Bootable. This was the step-by-step guide on creating a bootable Windows 11 USB installer on Ubuntu. From this article, you will get something good. This is the right place where you can easily solve your problem. After following these steps I hope you will not face any kind of problem. If you faced any kind of problem and if you have any type of suggestions then do comment.
Explore More:
Tagged
Share This Article
In this article, I will guide you on How to Make a Bootable Windows 11 USB Installer on Ubuntu. It is still a hard thing for someone who wants to make bootable of Windows 11 USB installer on Ubuntu. You do not require any kind of third-party software, it will be done by the official website of Microsoft. When you want to make bootable of it then you don’t know the way. However, when you don’t know then you will search on YouTube then the video you are watching maybe not be clear. If you want to make a bootable Windows 11 UDB installer on Ubuntu then you need to read this article. So, without wasting any time let’s get started.
Check the Requirements:
It is important to know about the requirements and what things are needed before making it bootable.
- Get a 6 GB+ USB drive
- A computer or laptop with a processor that is 1 GHz or faster
- 4GB+ RAM
- 60GB+ hard disk
- DirectX 12 or late (graphics) compatible
- Supports UEFI, and Secure Boot
- Supports TPM 2.0 or WinPE (in old devices)
How to Install Windows Subsystem For Linux
One thing the Windows Subsystem for Linux is installed on your PC. We will just give the steps to check if the WSL is installed or not.
Step 1. First of all, you have to press and hold Win Key + R to open the run then search CMD, and don’t forget to run it as administrator by pressing Ctrl + Shift + Enter.

Step 2. Now, copy and paste the following command and hit Enter.
wsl –install

Step 3. Then when the command is executed then you will see the message in the last line which is said the requested operation is successful. Changes will not be effective until the system is rebooted.
Step 4. Next, restart your PC to start the process of installing WSL. It will be done in the console app of Ubuntu.
Step 5. At last, enter the new password and username.

How to Make a Bootable Windows 11 USB Installer on Ubuntu
Step 1. Firstly, go to the website of Microsoft’s Official Page for Software Download.
Step 2. When the web page is open then scroll down to the section of Download Windows 11 Disk Image (ISO) then select Windows 11 (multi-edition ISO) from the drop-down menu after that tap on the Download.
 Click on the Download
 Step 3. Now, it is time to select the language which you can understand then click on the Confirm.
 Click on the Confirm
 Step 4. At last, click on the 64-Bit Download to create a bootable USB installer.
 64-Bit Download
 Final Words
It was all about How to Make a Bootable Windows 11 USB Installer on Ubuntu. I hope this article is very helpful for you to make a Bootable. This was the step-by-step guide on creating a bootable Windows 11 USB installer on Ubuntu. From this article, you will get something good. This is the right place where you can easily solve your problem. After following these steps I hope you will not face any kind of problem. If you faced any kind of problem and if you have any type of suggestions then do comment.
Explore More:


