How to Create Bootable USB for Kali Linux on Windows

Kali Linux is a powerful and useful operating system ever. Everybody uses it for different purposes. Most of the people use Kali for Digital Forensics and Penetration testing. However, Kali Linux is the distribution of Linux Family which is used by professional users, students, network administrators, system administrators, and many more people. You might know that some of the people use Kali Linux for hacking also.
It is in use of Hackers and IT experts and normal users also can use but can’t work professional programs. Basically, Kali Linux has two different interfaces graphical interface and command-line interface. Therefore, it totally depends on you that which interface you will use. In this article, I will guide you How to Create Bootable USB for Kali Linux on Windows.
In my case, testing a new operating system is great fun for the user. I really enjoy using the new operating system. However, for using the different operating systems I mostly use virtual machines using VirtualBox and VMware. And most of the dual boot the operating system which means that using two operating systems in a single PC. Furthermore, you might don’t know Creating a Bootable USB on Android Phones without PC. And the good news is here that with CMD you can make bootable USB.
Sometimes you want to dual boot Windows 10 with Kali Linux. But, I will totally cover How to Create USB Bootable for Kali Linux on Windows. Therefore, it is never a difficult task for creating USB Bootable. Windows is a very useful operating system because that you can create USB Bootable of any operating system which you want. Creating a Bootable USB for any operating system in Windows 10 is not that much hard hat you think because the user is totally alow in order to perform the task without restriction. There is much software available for the USB bootable but I have chosen the best one which will work perfectly for creating USB Bootable for Kali Linux.
For the purpose of this article, I am going to use Power ISO for creating bootable USB. So, you might know about the Power ISO that you use to burn the ISO Files of the different operating systems. Below you will have the complete information and features of the software. I will also tell you about the requirement for creating a bootable USB.
Power ISO
Power ISO is free and powerful disc image processing tool, which completely give chance to the users in order to manipulate files in several ways for example open, extract, burn, create, edit, compress, encrypt, split and convert image files, and mount these files with an internal virtual drive. However, Power ISO software also supports all the popular CD, DVD, and Blu-ray disc images.
Every individual uses it for different purposes such as ISO editor, ISO burner, CD burner, and so on. Therefore, for the purpose of this guide, we are going to use it for creating Bootable USB for Kali Linux. Let’s head over towards the process below.
Requirements to Create USB Bootable for Kali Linux
For creating a proper USB Bootable for Kali Linux in Windows. You need to have some important for it so that you can complete the process otherwise it is not possible. However, as you know for creating a USB bootable we need to have the ISO file of Kali Linux. You need to download the below-required files for creating a successful Bootable USB. If you need to try Kali Linux 2020 then download from the given link below.
- Download Power ISO: It is used for creating a USB Bootable. Without this software you can create a bootable USB.
- Download Kali Linux ISO File: Click that click and go to the official website of Kali Linux then choose any version which you want to download. Keep in mind that you can also download Kali Linux 202 ISO File from the given link above.
- Have a USB Flash Drive with a minimum of 8GB storage.
How to Create USB Bootable for Kali Linux on Windows
Before starting the process, you need to make sure that you have the ISO File of Kali Linux. And as well as the Power ISO software which is very important for this process. Therefore, you need to follow each step below so that you should create a successfully bootable USB
Once you have Power ISO. Open it. From the top, you need to click on the Tools and you will see several options but make to click on the Create bootable USB drive.
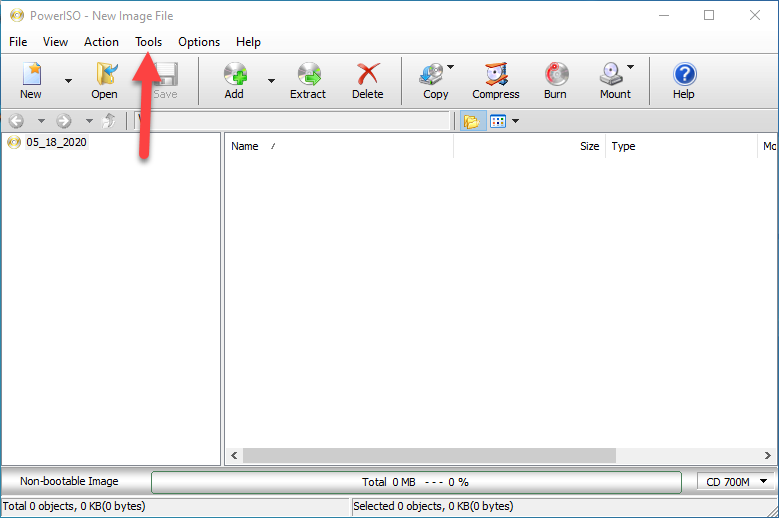 Tools – Create a bootable USB drive
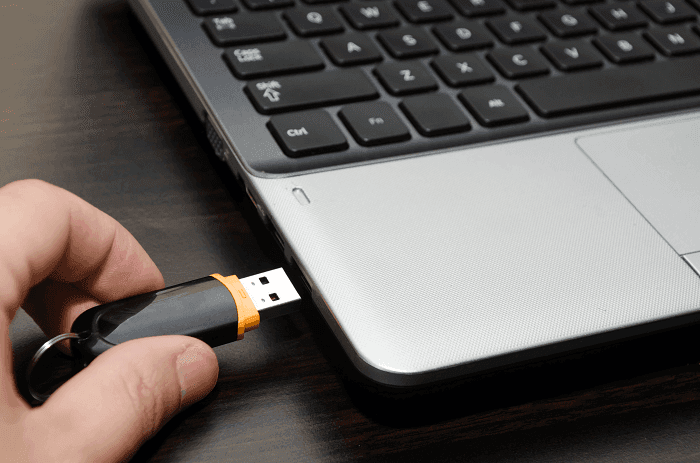
 Now, insert your USB drive which should be a minimum of 8GB. Then select the USB under the USB drive. And you need to click on the folder icon in front of the image file.
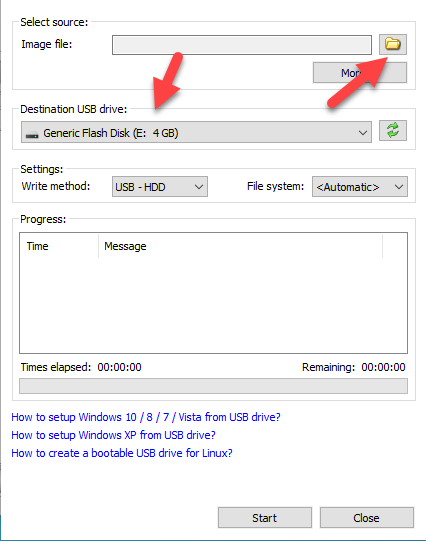 Select USB
 Select the Kali Linux ISO file and make sure to click on the Open.
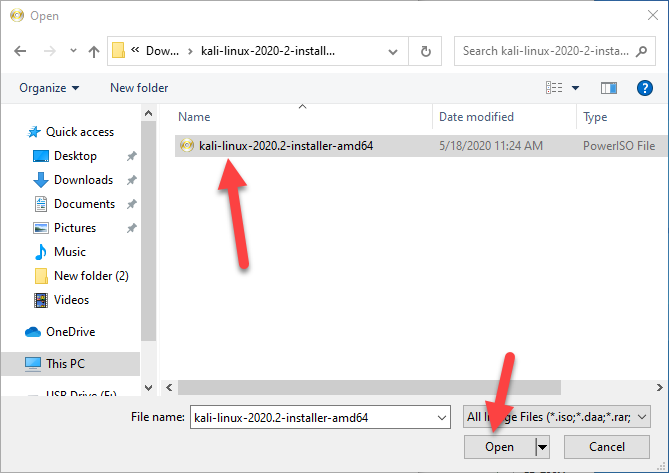 Choose Kali Linux ISO
 Once you have done all the steps clearly, at last click on the Start in order to create successful bootable USB.
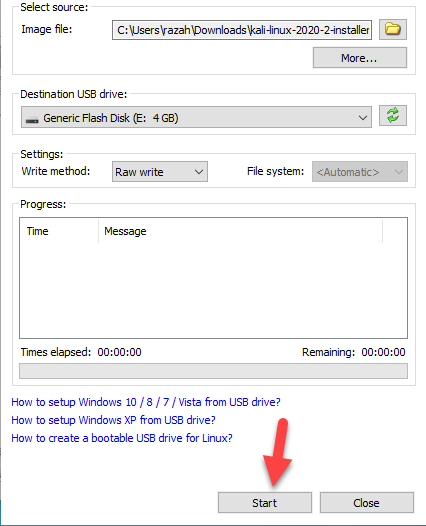 Start Bootable USB
 Final Words
There is much software in the market for creating Bootable USB. But Power ISO has handy features and it is easy to use. However, I have covered the complete steps on How to Create Bootable USB for Kali Linux on Windows. I hope you have gotten something from the guide. If you faced any kind of problem while creating Bootable USB for Kali Linux then don’t hesitate to leave comments in the comments section below.
Tagged
Share This Article
Kali Linux is a powerful and useful operating system ever. Everybody uses it for different purposes. Most of the people use Kali for Digital Forensics and Penetration testing. However, Kali Linux is the distribution of Linux Family which is used by professional users, students, network administrators, system administrators, and many more people. You might know that some of the people use Kali Linux for hacking also.
It is in use of Hackers and IT experts and normal users also can use but can’t work professional programs. Basically, Kali Linux has two different interfaces graphical interface and command-line interface. Therefore, it totally depends on you that which interface you will use. In this article, I will guide you How to Create Bootable USB for Kali Linux on Windows.
In my case, testing a new operating system is great fun for the user. I really enjoy using the new operating system. However, for using the different operating systems I mostly use virtual machines using VirtualBox and VMware. And most of the dual boot the operating system which means that using two operating systems in a single PC. Furthermore, you might don’t know Creating a Bootable USB on Android Phones without PC. And the good news is here that with CMD you can make bootable USB.
Sometimes you want to dual boot Windows 10 with Kali Linux. But, I will totally cover How to Create USB Bootable for Kali Linux on Windows. Therefore, it is never a difficult task for creating USB Bootable. Windows is a very useful operating system because that you can create USB Bootable of any operating system which you want. Creating a Bootable USB for any operating system in Windows 10 is not that much hard hat you think because the user is totally alow in order to perform the task without restriction. There is much software available for the USB bootable but I have chosen the best one which will work perfectly for creating USB Bootable for Kali Linux.
For the purpose of this article, I am going to use Power ISO for creating bootable USB. So, you might know about the Power ISO that you use to burn the ISO Files of the different operating systems. Below you will have the complete information and features of the software. I will also tell you about the requirement for creating a bootable USB.
Power ISO
Power ISO is free and powerful disc image processing tool, which completely give chance to the users in order to manipulate files in several ways for example open, extract, burn, create, edit, compress, encrypt, split and convert image files, and mount these files with an internal virtual drive. However, Power ISO software also supports all the popular CD, DVD, and Blu-ray disc images.
Every individual uses it for different purposes such as ISO editor, ISO burner, CD burner, and so on. Therefore, for the purpose of this guide, we are going to use it for creating Bootable USB for Kali Linux. Let’s head over towards the process below.
Requirements to Create USB Bootable for Kali Linux
For creating a proper USB Bootable for Kali Linux in Windows. You need to have some important for it so that you can complete the process otherwise it is not possible. However, as you know for creating a USB bootable we need to have the ISO file of Kali Linux. You need to download the below-required files for creating a successful Bootable USB. If you need to try Kali Linux 2020 then download from the given link below.
- Download Power ISO: It is used for creating a USB Bootable. Without this software you can create a bootable USB.
- Download Kali Linux ISO File: Click that click and go to the official website of Kali Linux then choose any version which you want to download. Keep in mind that you can also download Kali Linux 202 ISO File from the given link above.
- Have a USB Flash Drive with a minimum of 8GB storage.
How to Create USB Bootable for Kali Linux on Windows
Before starting the process, you need to make sure that you have the ISO File of Kali Linux. And as well as the Power ISO software which is very important for this process. Therefore, you need to follow each step below so that you should create a successfully bootable USB
Once you have Power ISO. Open it. From the top, you need to click on the Tools and you will see several options but make to click on the Create bootable USB drive.
 Tools – Create a bootable USB drive
 Now, insert your USB drive which should be a minimum of 8GB. Then select the USB under the USB drive. And you need to click on the folder icon in front of the image file.
 Select USB
 Select the Kali Linux ISO file and make sure to click on the Open.
 Choose Kali Linux ISO
 Once you have done all the steps clearly, at last click on the Start in order to create successful bootable USB.
 Start Bootable USB
 Final Words
There is much software in the market for creating Bootable USB. But Power ISO has handy features and it is easy to use. However, I have covered the complete steps on How to Create Bootable USB for Kali Linux on Windows. I hope you have gotten something from the guide. If you faced any kind of problem while creating Bootable USB for Kali Linux then don’t hesitate to leave comments in the comments section below.


