How to Dual Boot Linux Mint and Windows 10 – Step by Step

In this article, I am going to show you How to Dual Boot Linux Mint and Windows 10 – Step by Step. Have you taken a decision in order to use and install Linux Mint on your Windows 10? Therefore, you are right because dual-booting Linux and Windows 10 is very simple and easy. In simple words, Dual Boot actually means that installing and use two operating systems in a Computer. A boot manager of the system will let the user in order to choose which operating system to load when you perform dual boot. However, dual booting is the best option when you want to use two operating systems in one PC. And dual-booting won’t slow down the performance of the system. Using the Linux Mint is a good decision for beginner users because it is extremely easy.
Enjoying and using two operating systems on a computer is very interesting. Testing the Linux Mint is free of cost with a dual boot on Windows 10. When you perform dual boot then you will get experience with two operating systems at once. Furthermore, you can easily reboot from one operating system into another operating system without facing any serious problems and difficulties. The dual-booting operating systems have a very lengthy procedure but very easy and simple. You need to have a cup of coffee with yourself for fun.
Before we should go towards the procedure you need to Back up your data to an external drive in case something goes wrong. Make sure you have a recovery of the live disk for Windows. In case your boot fails, have a boot repair disk available. After being careful then go with the below steps in order to Dual Boot Linux Mint and Windows 10.
 How to Dual Boot Linux Mint and Windows 10
How to Dual Boot Linux Mint and Windows 10 – Step by Step
In order to dual boot Linux Mint and Windows 10 you need to download the ISO file of Linux Mint from the below link. And make sure to create bootable USB for Linux Mint.
Create Bootable USB for Linux
After the downloading of Linux Mint ISO File. Now it is time to create bootable USB for Linux. For that, you have to download software from the given link below to create a Live USB from the ISO you just downloaded.
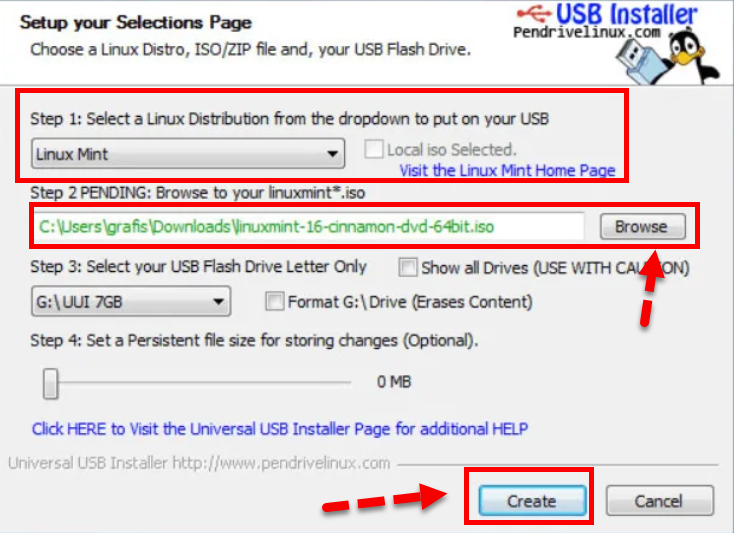
I hope now you have both Linux Mint ISO and USB installer software in order to burn ISO to USB. Then, you have to plug the USB into your PC. But the USB should be more than 8GB (GigaByte). And open the Universal USB Installer.
You need to select the Linux Mint for the distribution. After that, make sure Browse to the ISO file Linux Mint. It can usually be found in your downloads file. Then choose the USB drive. It will take a few minutes to burn your ISO to the USB.
 Bootable USB for Linux Mint
Create a Partition for Linux Mint
Now the main step you have to be somehow responsible, You must create a partition for the Linux Mint in order to dual boot without any problem. If you create a partition then your existing data will be pretty safe. Furthermore, you will be able to install Linux Mint under 10 GBs, however, if the size is not a concern then I strongly prefer you in order to use 30 or 40GBs for having the clean installation. So, for creating a new partition you have to follow the below steps.
- From the start menu, type partition to bring up the Disk Management utility.
- To create some space to install Linux, shrink the C drive by right-clicking on it.
- Windows will suggest how much of the available space to shrink. How much space you allocate will depend upon how much space you have on your computer.
- After you select the amount of space, click Shrink. You will now have a new partition where you can install Linux.
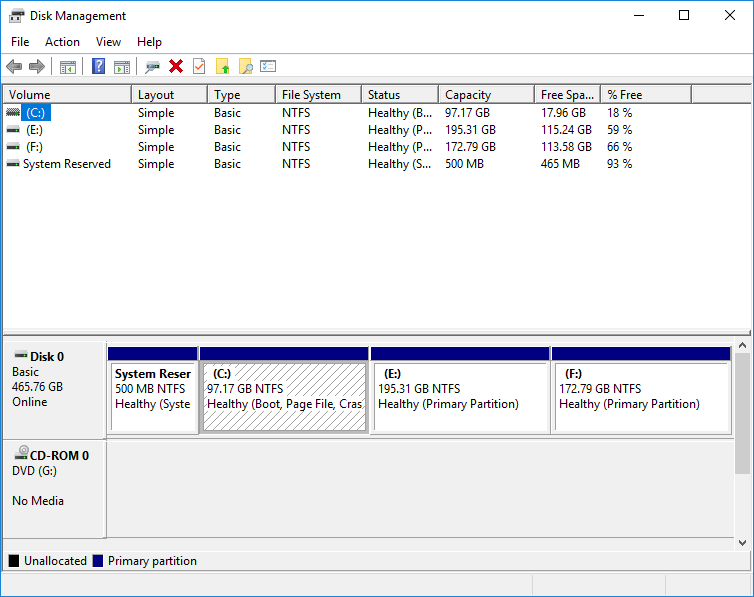 Disk Management
Boot into Live USB
Now if you have done all the above steps. However, you have to plug in the USB which you had bootable for Linux mint. Press the F12, F1, or F10 function key while it is booting to get to the boot menu (which key will vary depending upon your computer.) Choose the option to boot from USB or Removable Media.
Start the installation of Linux Mint
1. Whenever your system boots into the live USB. After that, you have to double-click on the Install Linux Mint icon from the desktop.
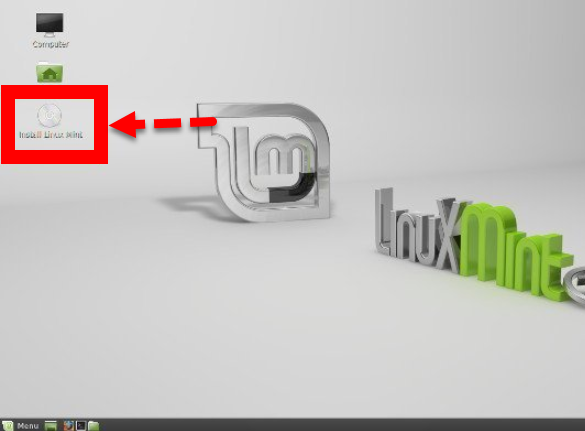 Install Linux Mint
2. After some moments, a new screen will be open, there you will be asked in order to provide your Language, Keyboard Layout.
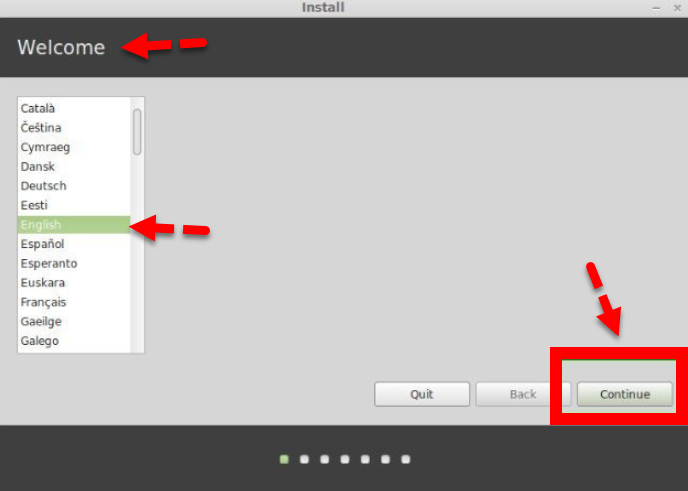 Welcome Screen
3. Choose Install Linux Mint alongside Windows Boot Manager. The next step is to select how much space you want to allocate for Windows and Linux Mint.
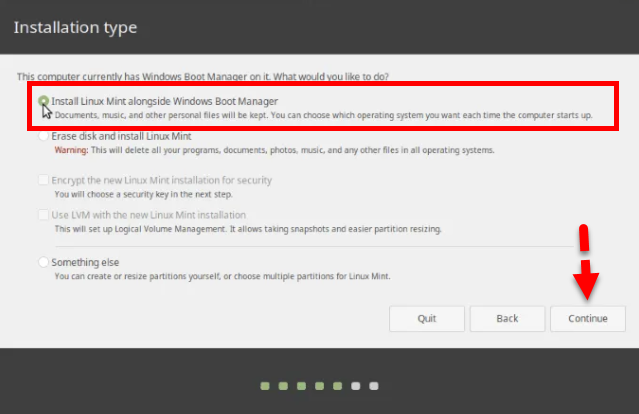 Installation Type
4. You can drag the middle bar in either direction to determine or change the amount of space for both. Then click Install Now.
5. A warning will pop up, letting you know your system will make some final changes. Since you have already backed up the data on your hard drive, you are safe to Continue.
6. Another pop up will ask for confirmation. Click Continue.
7. The installation will be processing in the background while you see a global map asking you to identify and set your location and time zone. Next click Continue.
8. Fill in the form fields with your name, the computer’s name, username, and your password twice.
9. If you tick off Log in Automatically, it means your system will boot directly into the desktop. It’s better to choose to Require my password to log in.
10. If you want, you can check off Encrypt my home folder to protect your data from anyone who doesn’t have your password.
11. To proceed, click Continue.
Final Words
Tagged
Share This Article
In this article, I am going to show you How to Dual Boot Linux Mint and Windows 10 – Step by Step. Have you taken a decision in order to use and install Linux Mint on your Windows 10? Therefore, you are right because dual-booting Linux and Windows 10 is very simple and easy. In simple words, Dual Boot actually means that installing and use two operating systems in a Computer. A boot manager of the system will let the user in order to choose which operating system to load when you perform dual boot. However, dual booting is the best option when you want to use two operating systems in one PC. And dual-booting won’t slow down the performance of the system. Using the Linux Mint is a good decision for beginner users because it is extremely easy.
Enjoying and using two operating systems on a computer is very interesting. Testing the Linux Mint is free of cost with a dual boot on Windows 10. When you perform dual boot then you will get experience with two operating systems at once. Furthermore, you can easily reboot from one operating system into another operating system without facing any serious problems and difficulties. The dual-booting operating systems have a very lengthy procedure but very easy and simple. You need to have a cup of coffee with yourself for fun.
Before we should go towards the procedure you need to Back up your data to an external drive in case something goes wrong. Make sure you have a recovery of the live disk for Windows. In case your boot fails, have a boot repair disk available. After being careful then go with the below steps in order to Dual Boot Linux Mint and Windows 10.
 How to Dual Boot Linux Mint and Windows 10
How to Dual Boot Linux Mint and Windows 10 – Step by Step
In order to dual boot Linux Mint and Windows 10 you need to download the ISO file of Linux Mint from the below link. And make sure to create bootable USB for Linux Mint.
Create Bootable USB for Linux
After the downloading of Linux Mint ISO File. Now it is time to create bootable USB for Linux. For that, you have to download software from the given link below to create a Live USB from the ISO you just downloaded.
I hope now you have both Linux Mint ISO and USB installer software in order to burn ISO to USB. Then, you have to plug the USB into your PC. But the USB should be more than 8GB (GigaByte). And open the Universal USB Installer.
You need to select the Linux Mint for the distribution. After that, make sure Browse to the ISO file Linux Mint. It can usually be found in your downloads file. Then choose the USB drive. It will take a few minutes to burn your ISO to the USB.
 Bootable USB for Linux Mint
Create a Partition for Linux Mint
Now the main step you have to be somehow responsible, You must create a partition for the Linux Mint in order to dual boot without any problem. If you create a partition then your existing data will be pretty safe. Furthermore, you will be able to install Linux Mint under 10 GBs, however, if the size is not a concern then I strongly prefer you in order to use 30 or 40GBs for having the clean installation. So, for creating a new partition you have to follow the below steps.
- From the start menu, type partition to bring up the Disk Management utility.
- To create some space to install Linux, shrink the C drive by right-clicking on it.
- Windows will suggest how much of the available space to shrink. How much space you allocate will depend upon how much space you have on your computer.
- After you select the amount of space, click Shrink. You will now have a new partition where you can install Linux.
 Disk Management
Boot into Live USB
Now if you have done all the above steps. However, you have to plug in the USB which you had bootable for Linux mint. Press the F12, F1, or F10 function key while it is booting to get to the boot menu (which key will vary depending upon your computer.) Choose the option to boot from USB or Removable Media.
Start the installation of Linux Mint
1. Whenever your system boots into the live USB. After that, you have to double-click on the Install Linux Mint icon from the desktop.
 Install Linux Mint
2. After some moments, a new screen will be open, there you will be asked in order to provide your Language, Keyboard Layout.
 Welcome Screen
3. Choose Install Linux Mint alongside Windows Boot Manager. The next step is to select how much space you want to allocate for Windows and Linux Mint.
 Installation Type
4. You can drag the middle bar in either direction to determine or change the amount of space for both. Then click Install Now.
5. A warning will pop up, letting you know your system will make some final changes. Since you have already backed up the data on your hard drive, you are safe to Continue.
6. Another pop up will ask for confirmation. Click Continue.
7. The installation will be processing in the background while you see a global map asking you to identify and set your location and time zone. Next click Continue.
8. Fill in the form fields with your name, the computer’s name, username, and your password twice.
9. If you tick off Log in Automatically, it means your system will boot directly into the desktop. It’s better to choose to Require my password to log in.
10. If you want, you can check off Encrypt my home folder to protect your data from anyone who doesn’t have your password.
11. To proceed, click Continue.


