How to Write NTFS Drives on macOS Monterey

From this article, you will learn How to Write NTFS Drives on macOS Monterey. macOS Monterey is one of the newest operating systems for Mac computers. Apple is always trying to make a better and more advanced operating system every year. In the meantime, Monterey comes from Monterey Bay. You will find many awesome and useful features in macOS Monterey.
Writing NTFS drives is a really common problem for Mac users because Mac doesn’t allow us to write NTFS drives on it. Also, the new macOS Monterey software update cannot write NTFS drives. Furthermore, NTFS has been used in Windows operating systems for decades. If you are a Mac user then we will go through 2 easy methods which will help you to write NTFS drives on macOS Monterey.
Related Post: How to Install VMware Workstation Pro on Windows 11
How to Write NTFS Drives With Terminal
Step 1. First of all, you need to launch the Application after that head towards the Disk Utility.
Step 2. Now, in the section of disk utility right-click on your USB after that select Unmount.
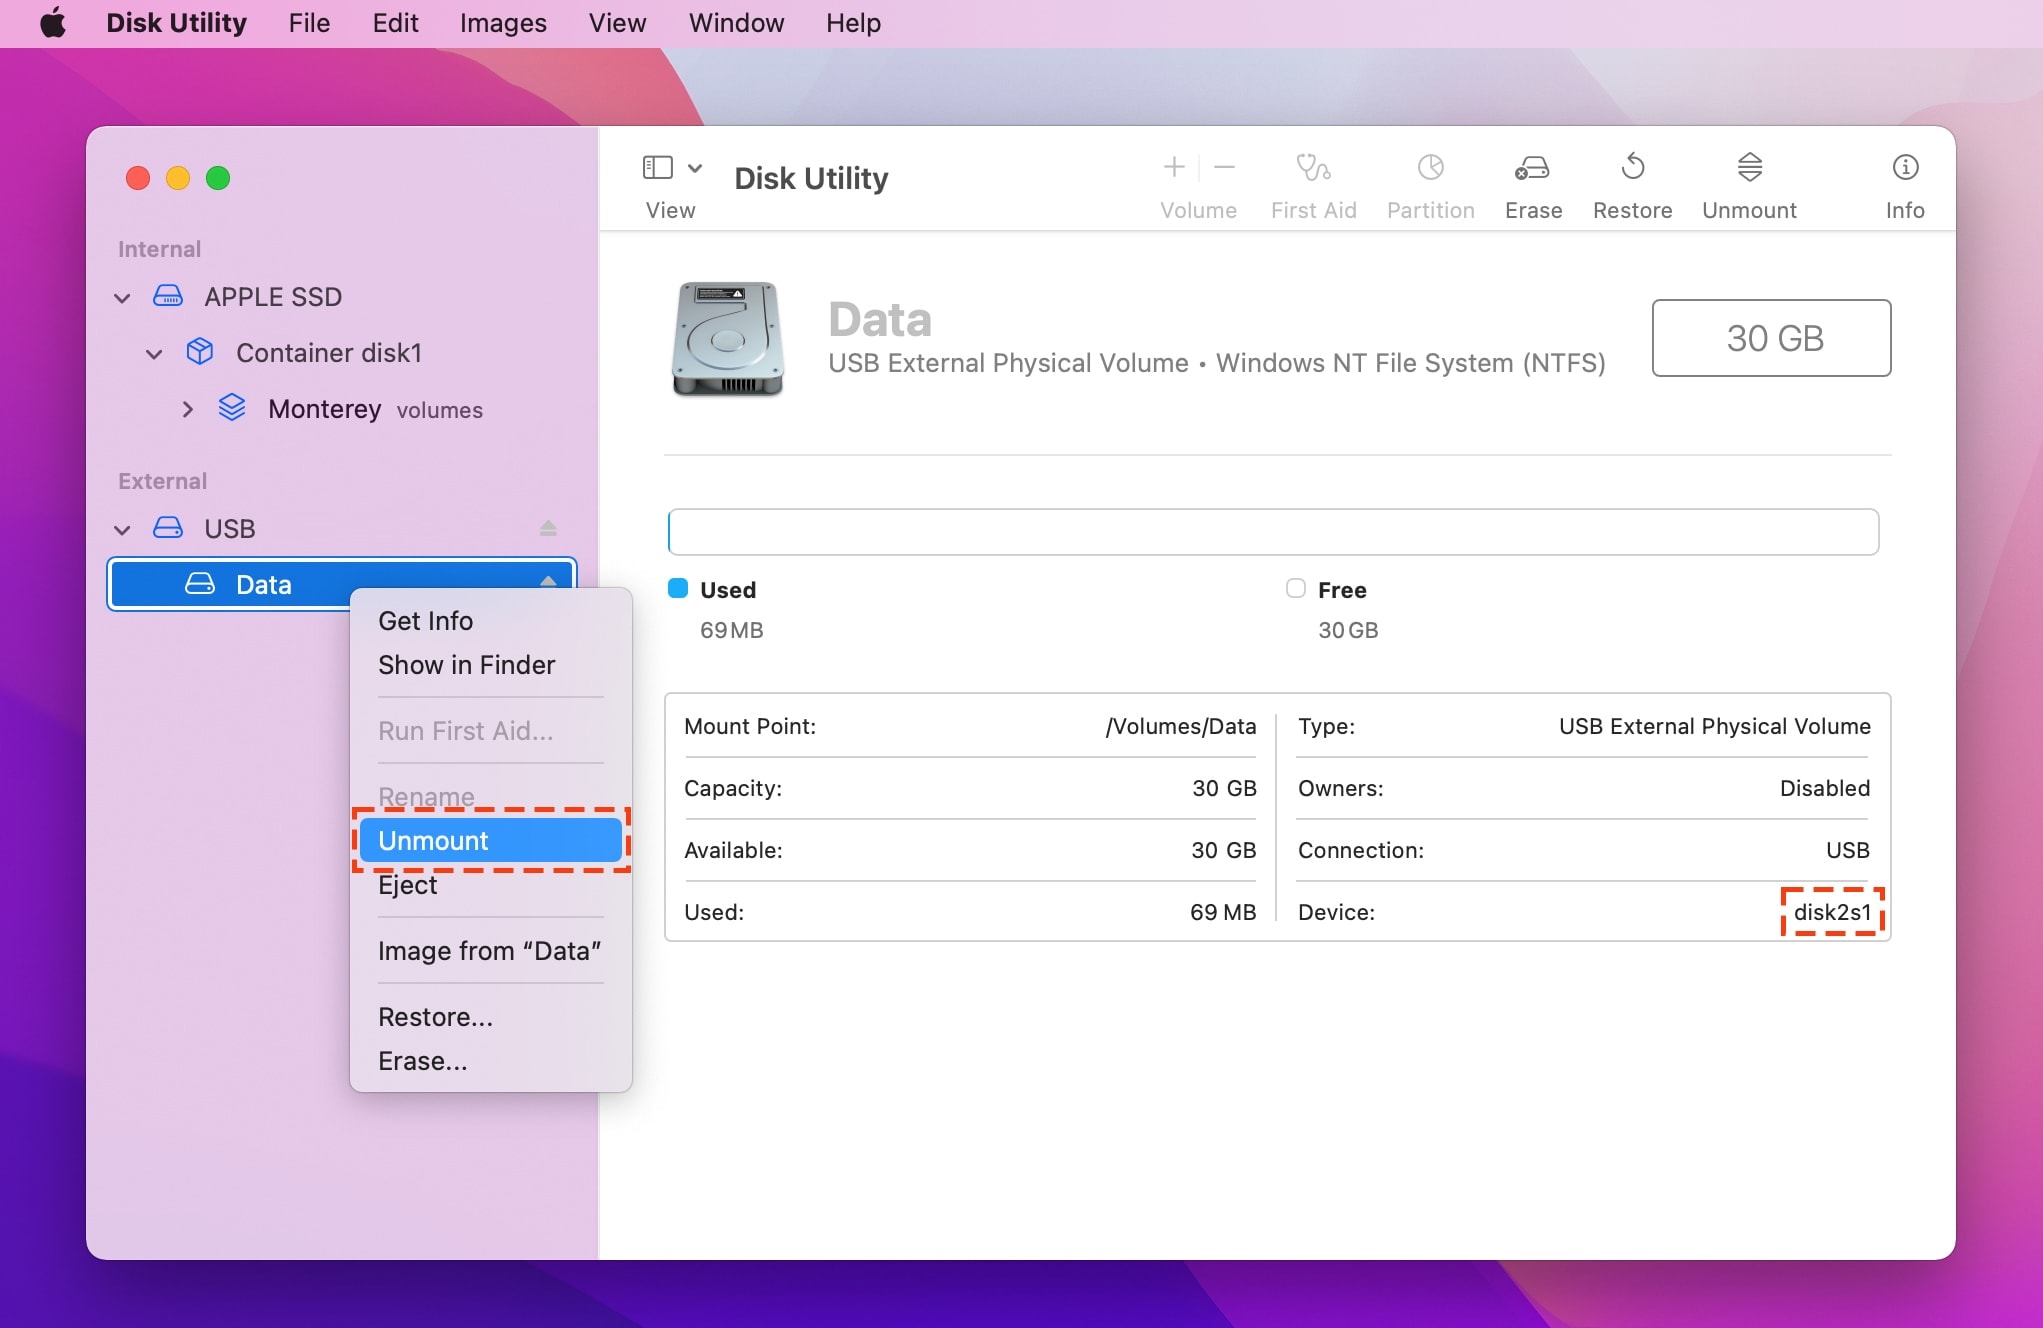 Select Unmount
 Step 3. Next, launch the Terminal. Then once the Terminal is open after that follow the code according to the picture down below.
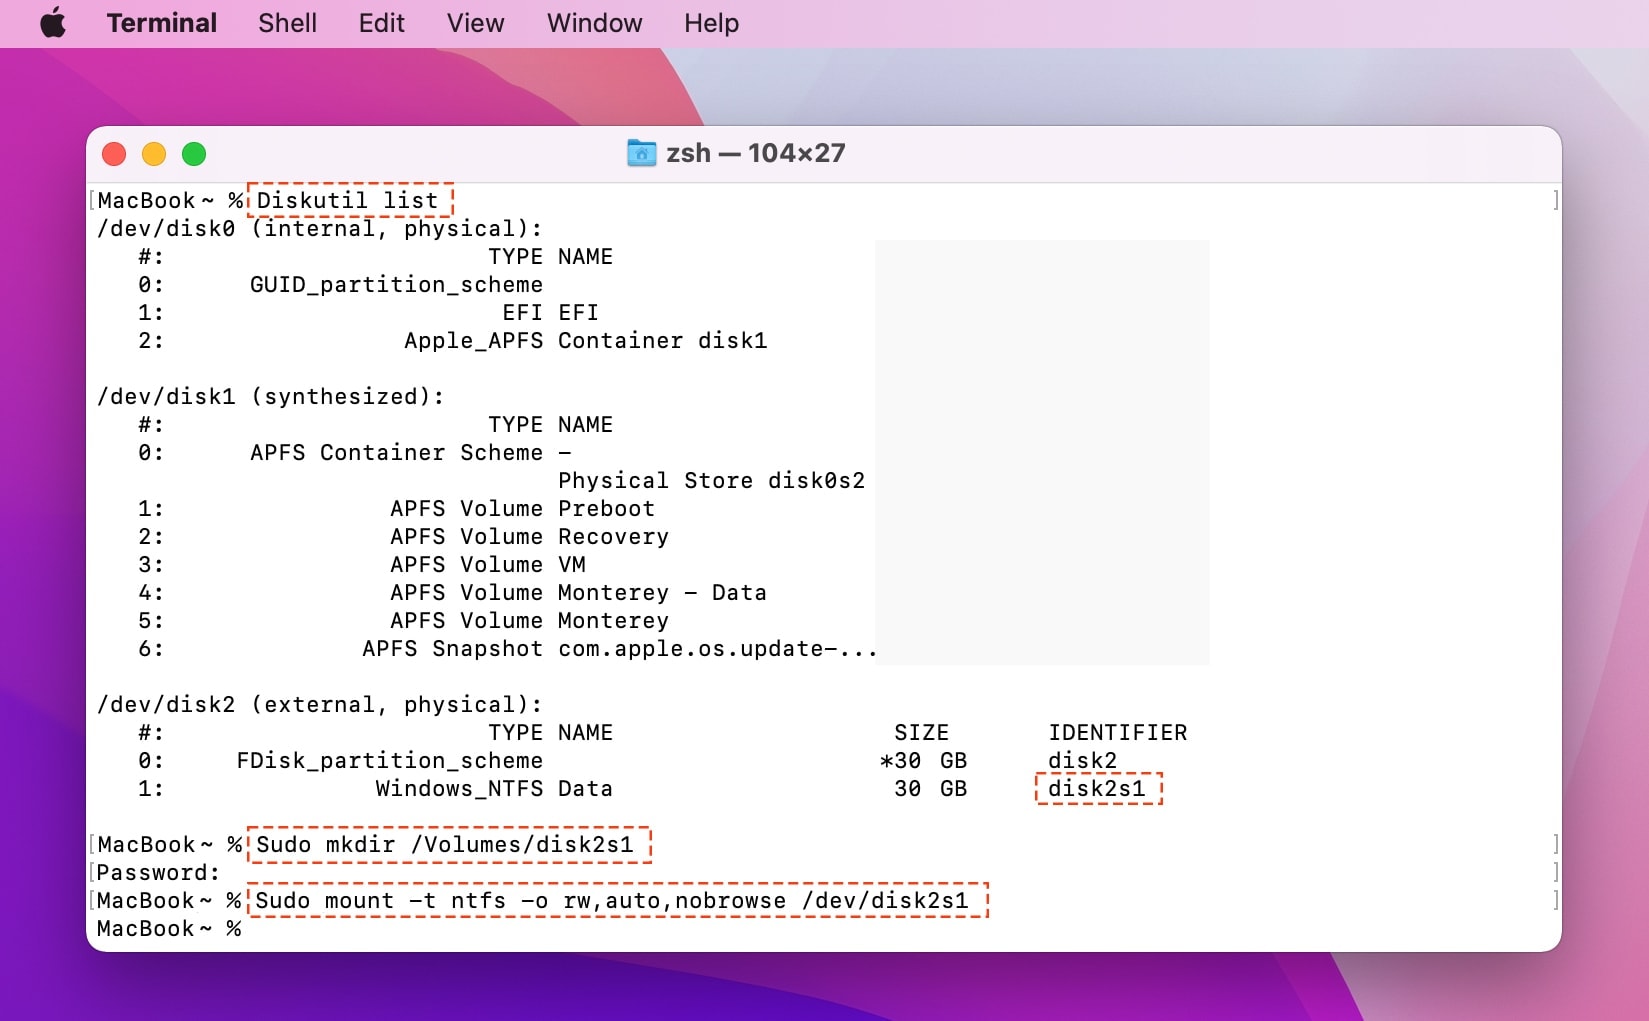 Code is Down Below
 Diskutil list
Sudo mkdir /Volumes/disk2s1
Sudo mount -t ntfs -o rw,auto,nobrowse /dev/disk2s1 /Volumes/disk2s1
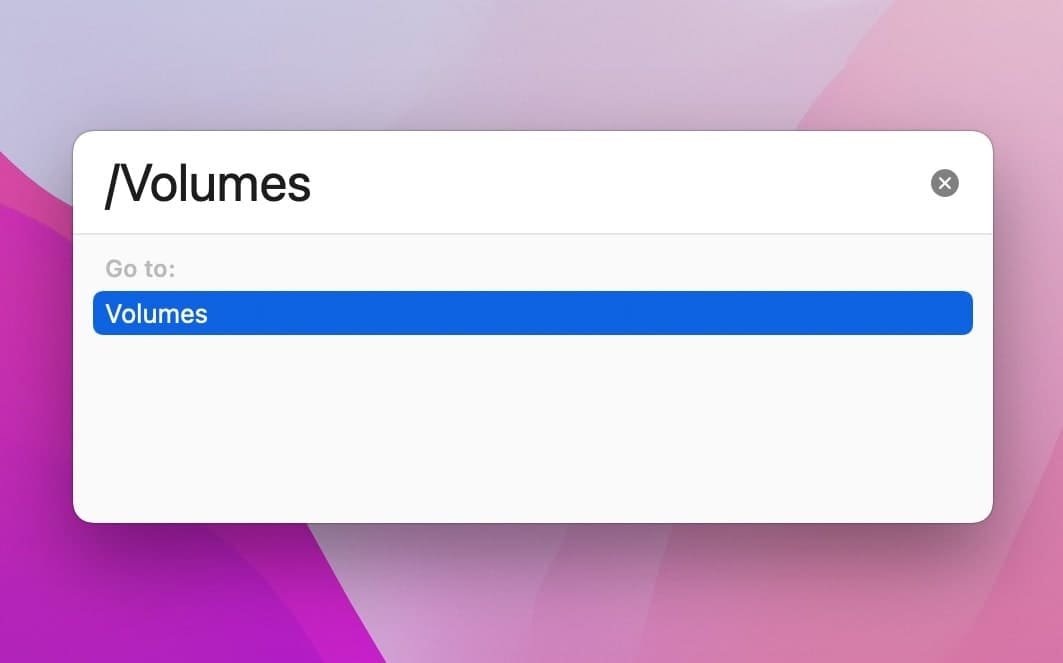
Step 4. At last, you need to click on the Go after that tap on the Go to Folder next in the search bar type /Volumes. Now, you can use the NTFS.
How to Write NTFS Drives Using Third-Party Software
If the above method did not work then simply follow this method to write NTFS drives. It will take some easy steps to write NTFS drives. Here is the step to write NTFS drives down below.
Step 1. At first, download the NTFS for mac you need to download and install the Paragon software from their website.
Step 2. Then head towards the System Preferences after that enable the Full Disk Access.
Related Post: How to Uninstall Windows Media Player on Windows 11
Bottom Line
It was all about How to Write NTFS Drives on macOS Monterey. I hope this article is very helpful for you to write NTFS drives. From this article, you will get something good. This is the right place where you can easily solve your problem. After following these steps I hope you will not face any kind of problem. If you faced any kind of problem and if you have any type of suggestions then do comment.
Tagged
Share This Article
From this article, you will learn How to Write NTFS Drives on macOS Monterey. macOS Monterey is one of the newest operating systems for Mac computers. Apple is always trying to make a better and more advanced operating system every year. In the meantime, Monterey comes from Monterey Bay. You will find many awesome and useful features in macOS Monterey.
Writing NTFS drives is a really common problem for Mac users because Mac doesn’t allow us to write NTFS drives on it. Also, the new macOS Monterey software update cannot write NTFS drives. Furthermore, NTFS has been used in Windows operating systems for decades. If you are a Mac user then we will go through 2 easy methods which will help you to write NTFS drives on macOS Monterey.
Related Post: How to Install VMware Workstation Pro on Windows 11
How to Write NTFS Drives With Terminal
Step 1. First of all, you need to launch the Application after that head towards the Disk Utility.
Step 2. Now, in the section of disk utility right-click on your USB after that select Unmount.
Select Unmount Step 3. Next, launch the Terminal. Then once the Terminal is open after that follow the code according to the picture down below.
Code is Down Below Diskutil list
Sudo mkdir /Volumes/disk2s1
Sudo mount -t ntfs -o rw,auto,nobrowse /dev/disk2s1 /Volumes/disk2s1
Step 4. At last, you need to click on the Go after that tap on the Go to Folder next in the search bar type /Volumes. Now, you can use the NTFS.
How to Write NTFS Drives Using Third-Party Software
If the above method did not work then simply follow this method to write NTFS drives. It will take some easy steps to write NTFS drives. Here is the step to write NTFS drives down below.
Step 1. At first, download the NTFS for mac you need to download and install the Paragon software from their website.
Step 2. Then head towards the System Preferences after that enable the Full Disk Access.
Related Post: How to Uninstall Windows Media Player on Windows 11
Bottom Line
It was all about How to Write NTFS Drives on macOS Monterey. I hope this article is very helpful for you to write NTFS drives. From this article, you will get something good. This is the right place where you can easily solve your problem. After following these steps I hope you will not face any kind of problem. If you faced any kind of problem and if you have any type of suggestions then do comment.