How To Install Or Uninstall WordPad in Windows 10 – Step by Step

WordPad is a great and handy text editor tool for Windows. In simple words, WordPad is alike of a notebook in which you take essential notes for something. In the oldest version of Windows, we have NotePad to use it. It came like apps, that means you can easily uninstall and install it on your Windows 10. It is more advanced but simpler than Microsoft Word. If you want to save or keep disk space on your Windows 10 then you have to uninstall WordPad in Windows 10. However, if the WordPad is not working well or gets stuck while using on your Windows 10 then you have permission to uninstall. Or there are might be more reasons to uninstall WordPad. Therefore, I will briefly guide you on How To Install Or Uninstall WordPad in Windows 10 – Step by Step.
How to Uninstall WordPad in Windows 10
Open the setting on your windows. To open the settings, you have to right-click on the Start Menu and click on the Settings.
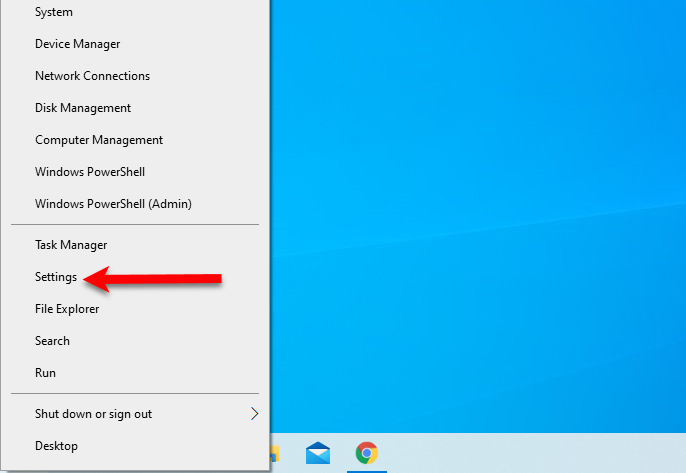 Settings
 In the Settings window, you will see several options. As you might know that WordPad comes in apps. You need to click on the Apps from them.
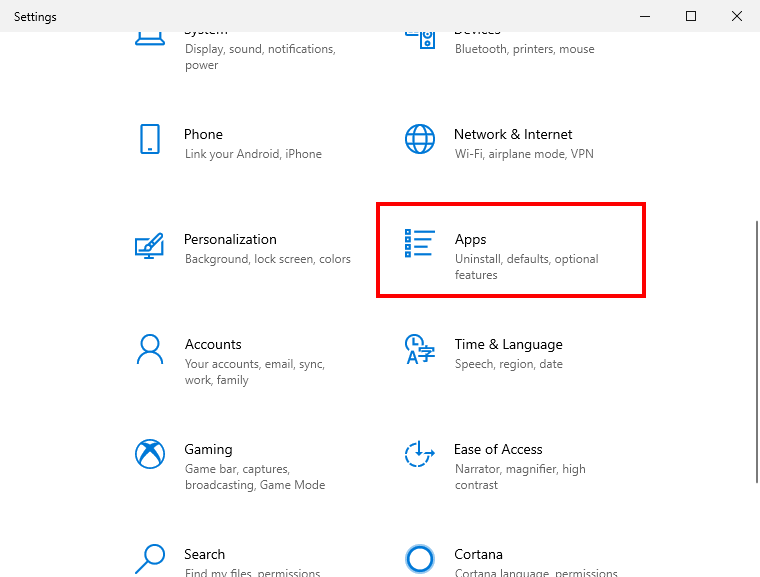 Apps
Apps From the left side, head over towards Apps & Features and choose Optional features option.
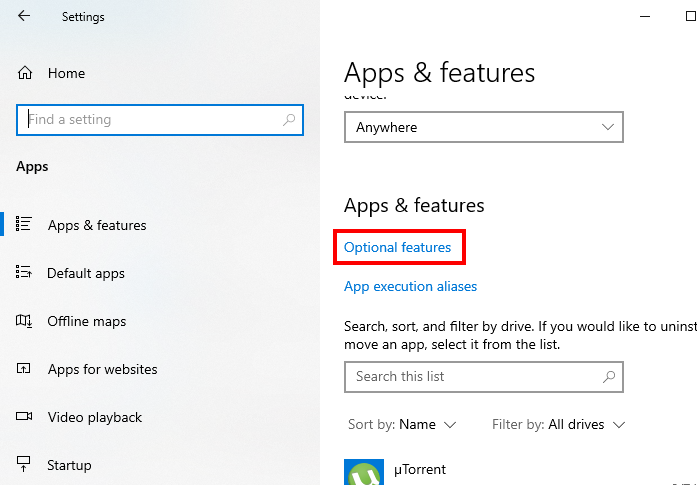 Optional Features
 There, you have to scroll down and find out the WordPad option, click on that and you have to click on the Uninstall.
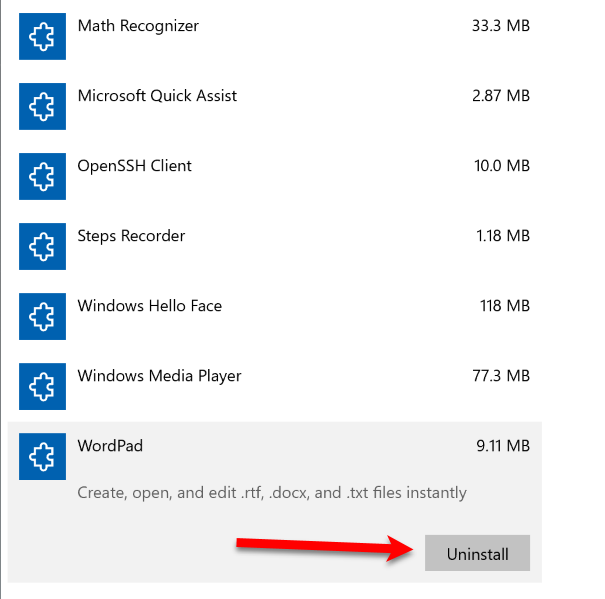 Uninstall WordPad
 You are done now. You have successfully uninstalled the WordPad app from your Windows 10.
How to Install WordPad in Windows 10
- Open the Settings in your Windows 10.
- Click on the Apps from the options.
- The same click on the Optional Features from the middle.
4. On the next window, you have to click on the Add a Feature button
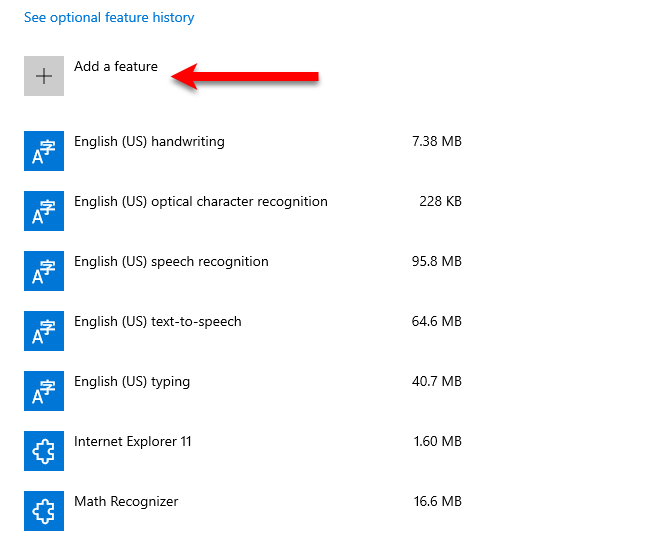 Add a Feature
 5. On the next page, you have several options, for the purpose of this article. However. you have to select the WordPad and make sure to click on the Install.
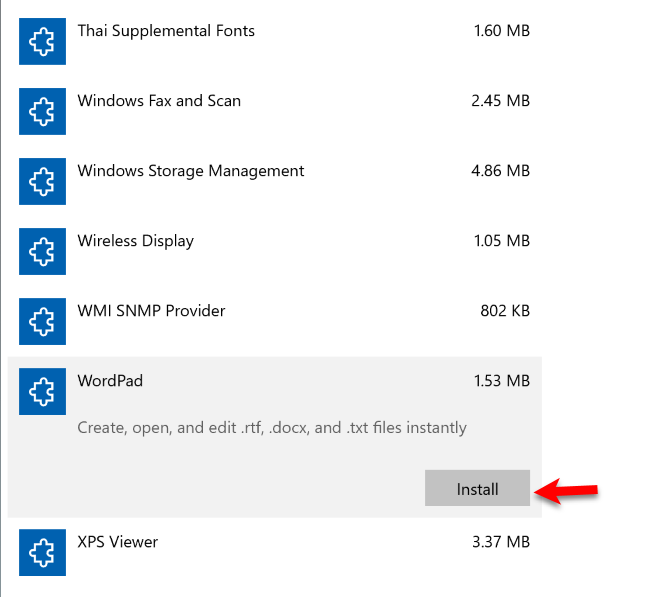 Install WordPad
 Related Posts:
- Change IP Address in Windows 10
- Turn Off Touchpad Windows 10
- 5 Ways To Password Protect a Folder in Windows 10
Final Thoughts:
The complete guidance was on How To Install Or Uninstall WordPad in Windows 10 – Step by Step. You can uninstall WordPad in Windows 10 whenever you want. If the WordPad is not working well on your Windows 10 then with the help of the above steps make sure to uninstall and again install it. However, I hope you have found this article or guide beneficial. So, if you have faced any kind of problem while following the steps then don’t hesitate to leave comments in the comment section below. I will give response ASAP.
Share This Article
WordPad is a great and handy text editor tool for Windows. In simple words, WordPad is alike of a notebook in which you take essential notes for something. In the oldest version of Windows, we have NotePad to use it. It came like apps, that means you can easily uninstall and install it on your Windows 10. It is more advanced but simpler than Microsoft Word. If you want to save or keep disk space on your Windows 10 then you have to uninstall WordPad in Windows 10. However, if the WordPad is not working well or gets stuck while using on your Windows 10 then you have permission to uninstall. Or there are might be more reasons to uninstall WordPad. Therefore, I will briefly guide you on How To Install Or Uninstall WordPad in Windows 10 – Step by Step.
How to Uninstall WordPad in Windows 10
Open the setting on your windows. To open the settings, you have to right-click on the Start Menu and click on the Settings.
 Settings
 In the Settings window, you will see several options. As you might know that WordPad comes in apps. You need to click on the Apps from them.
 Apps
Apps From the left side, head over towards Apps & Features and choose Optional features option.
 Optional Features
 There, you have to scroll down and find out the WordPad option, click on that and you have to click on the Uninstall.
 Uninstall WordPad
 You are done now. You have successfully uninstalled the WordPad app from your Windows 10.
How to Install WordPad in Windows 10
- Open the Settings in your Windows 10.
- Click on the Apps from the options.
- The same click on the Optional Features from the middle.
4. On the next window, you have to click on the Add a Feature button
 Add a Feature
 5. On the next page, you have several options, for the purpose of this article. However. you have to select the WordPad and make sure to click on the Install.
 Install WordPad
 Related Posts:
- Change IP Address in Windows 10
- Turn Off Touchpad Windows 10
- 5 Ways To Password Protect a Folder in Windows 10
Final Thoughts:
The complete guidance was on How To Install Or Uninstall WordPad in Windows 10 – Step by Step. You can uninstall WordPad in Windows 10 whenever you want. If the WordPad is not working well on your Windows 10 then with the help of the above steps make sure to uninstall and again install it. However, I hope you have found this article or guide beneficial. So, if you have faced any kind of problem while following the steps then don’t hesitate to leave comments in the comment section below. I will give response ASAP.


