How to Install macOS Ventura on VirtualBox on Windows PC?
 Azaz Shaikh
In this article, I am going to guide you on How to Install macOS Ventura on VirtualBox on Windows PC? macOS unveiled a new operating system that is MacOS 13 Ventura. Apple has announced many other operating systems like iPadOS 16, iOS 16, watchOS 9, and a new macOS by the name of macOS Ventura. Every year at WWDC (Worldwide Developer Conference) we will get a new operating system with a bunch of new and unique features. It is the successor of macOS 12 and macOS 11. However, everyone is curious to test and try the amazing features of macOS Ventura.
But how Windows users can install and test macOS Ventura. There is a good platform for Windows users to install macOS Ventura which is VirtualBox and VMware. Yes, you heard right that you can easily install macOS Ventura on VirtualBox and VMware and use its full features and functionalities. Anyhow, the installation procedure of macOS on virtual machines is a bit lengthy, and once you do that you won’t regret it because you will really enjoy using it.
We are showing you the step-by-step tutorial on How to Install macOS Ventura on VirtualBox on Windows PC. All you need to do is follow and read each step in order to avoid errors. We have also attached screenshots of the steps in order to understand the steps properly.
Get Required Files
- A working computer with 8GB RAM
- Download VirtualBox Latest Version
- Also Download VirtualBox Extension Pack
- Download macOS Ventura ISO Image
- VirtualBox codes to avoid errors
1. Install VirtualBox and Extension Pack
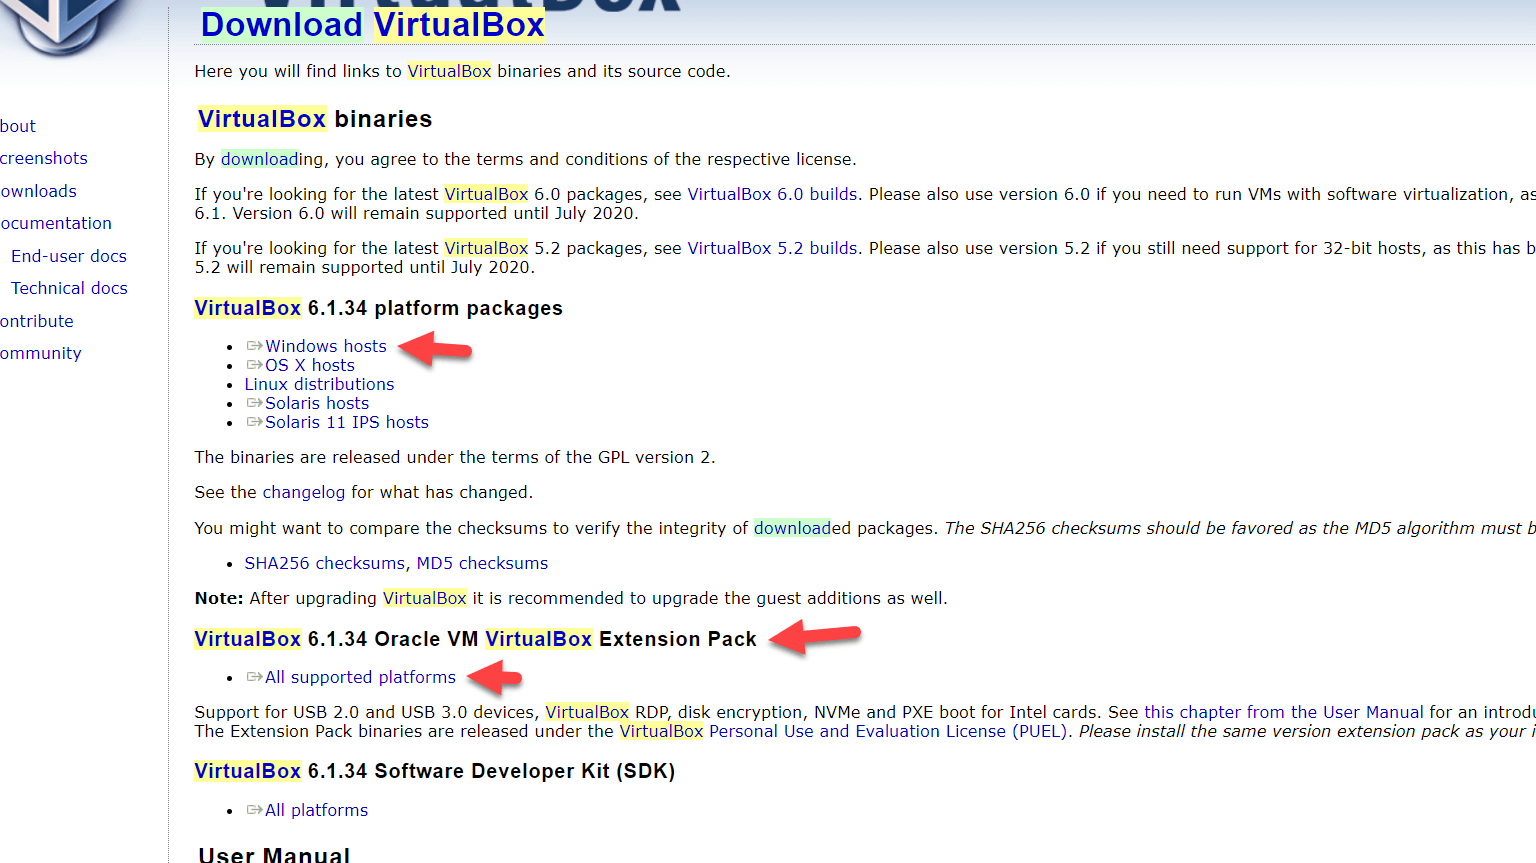
Download and Install VirtualBox latest version from the given above link. And also don’t forget to install its extension pack which is very important.
 VirtualBox
 2. Create a Virtual Machine for the macOS Ventura
Step 1. Turn on your computer and then open the Virtualbox and click on the Next.
 Click on the New
 Step 2. Name your virtual machine, you can Simply put macOS Ventura and click on the Next.
 Click on the Next
 Step 3. Now, increase the memory size and click on the Next.
 Click on the Next
 Step 4. Select the create a new virtual hard disk and click on the Create.
 Click on the Next
 Step 5. Select any hard disk type that you wish and then click on the Next.
 Click on the Next
 Step 6. Select the dynamically allocated and click on the Next.
 Click on the Next
 Step 7. Increase the amount of storage for the virtual machine that you need Click on the Create.
 Click on the Create
 3. Set up Settings for macOS Ventura Virtual Machine
Step 1. When it is created then click on the Setting.
 Click on the Setting
 Step 2. Go to the Display tab and then increase the video memory to 128 MB.
 increase the video memory to 128 MB
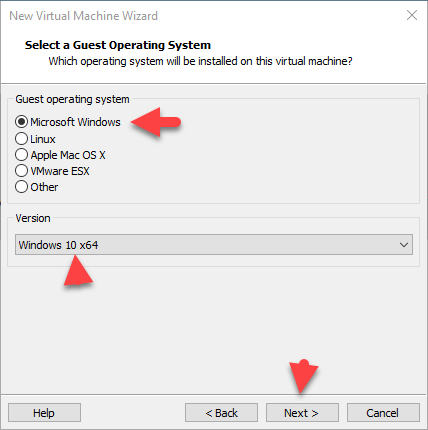
 Step 3. Go to the processor tab and increase the number of processors to 2.
 increase the number of processors to 2
 Step 4. Go to the storage tab and then click on the Empty and Click on the CD icon.
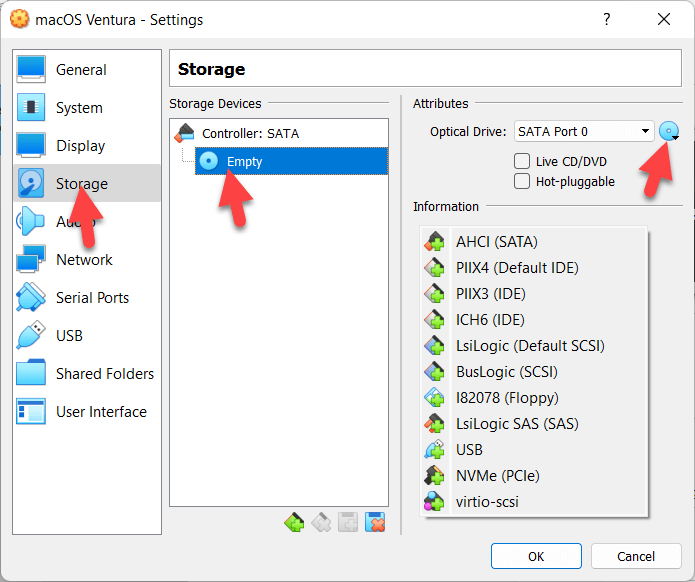 Click on the CD icon
 Step 5. Now, select the ISO file and click on the open.
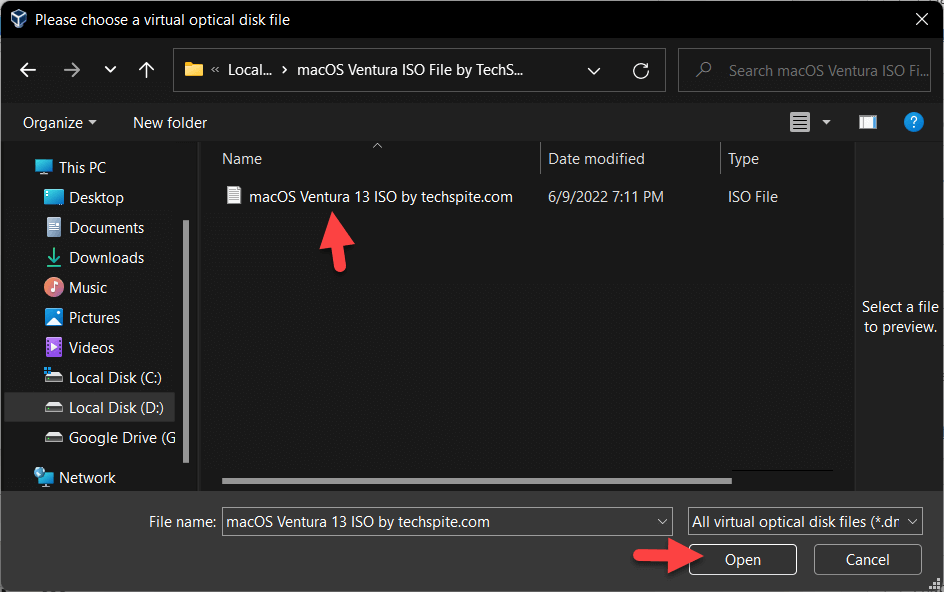 Click on the Open
 Step 6. Go to the USB Tab, and enable USB 3.0.
4. VirtualBox commands
Now, open the code file that you download from up and then press Press + H type the VM Name, and on the next box, type macOS Ventura and then click on the Replace All.
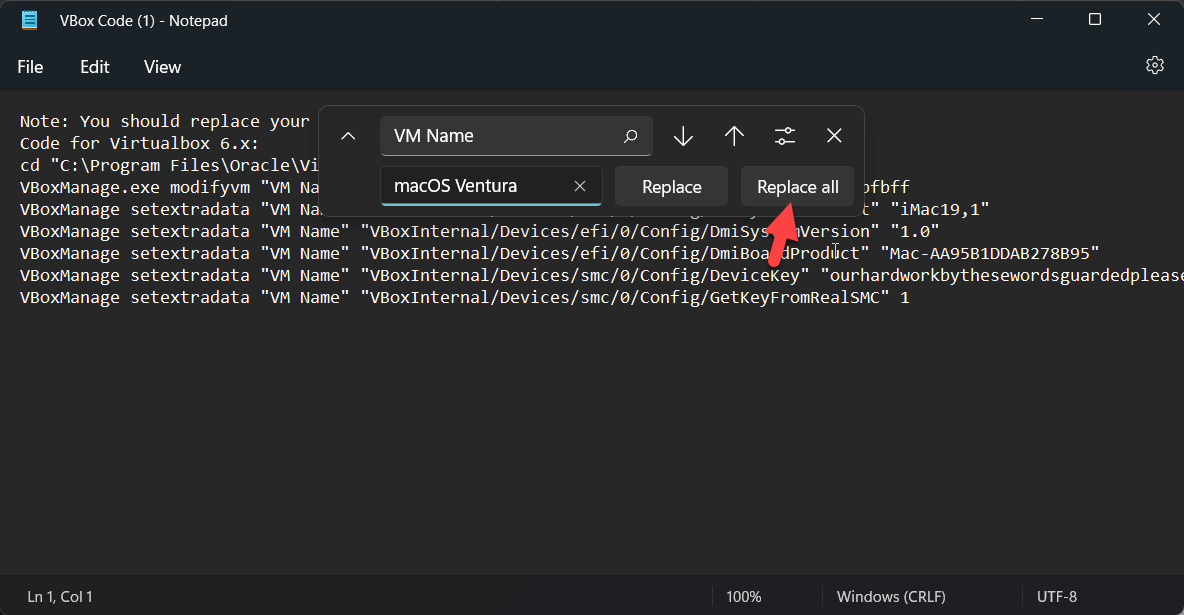 Click on the Replace All
 Open CMD and then run it as administrator and then type all code one by one on CMD.
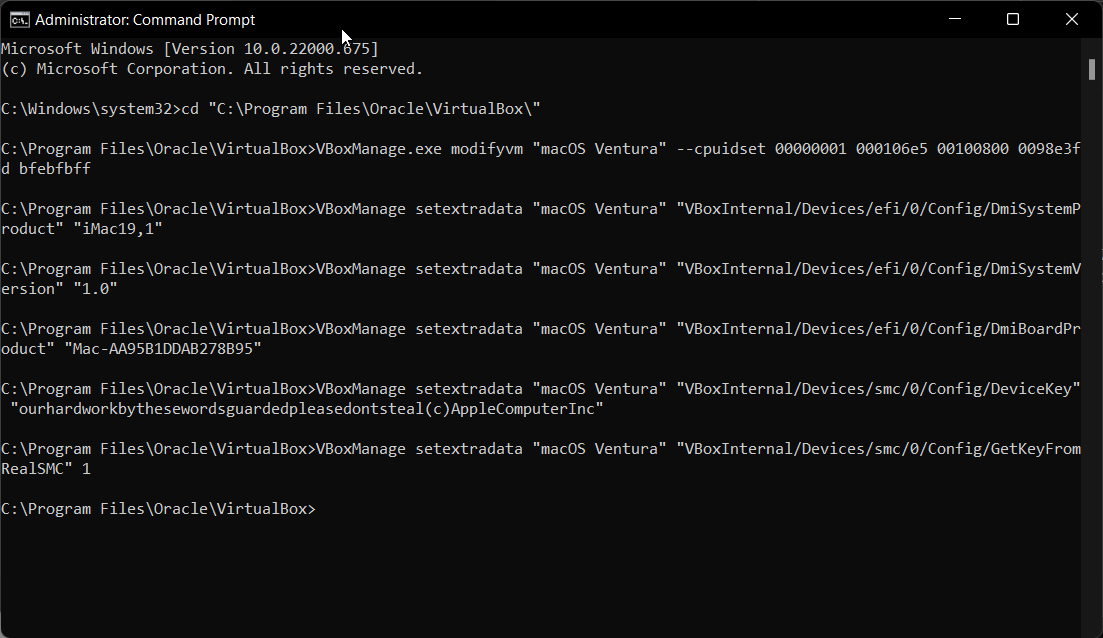 type all code one by one on CMD
 5. Install macOS Ventura on VirtualBox
Step 1. Now, Open VirtualBox and right-click on the virtual machine that you created, and click on the start.
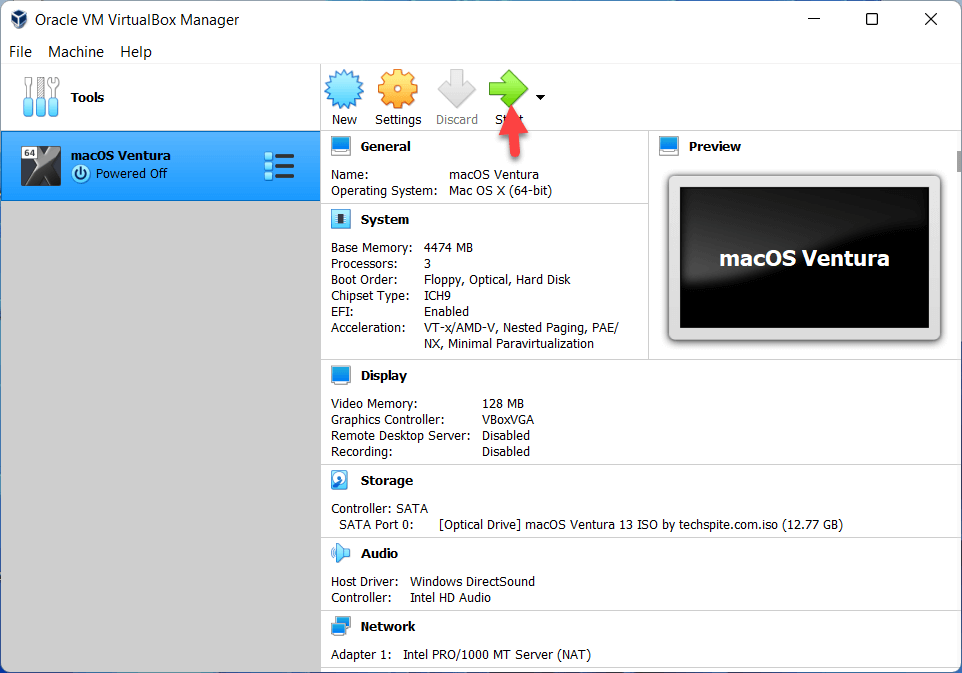 Click on the Start
 Step 2. Wait for a few minutes until the codes come and then the apple logo is gone and then select a language that you want.
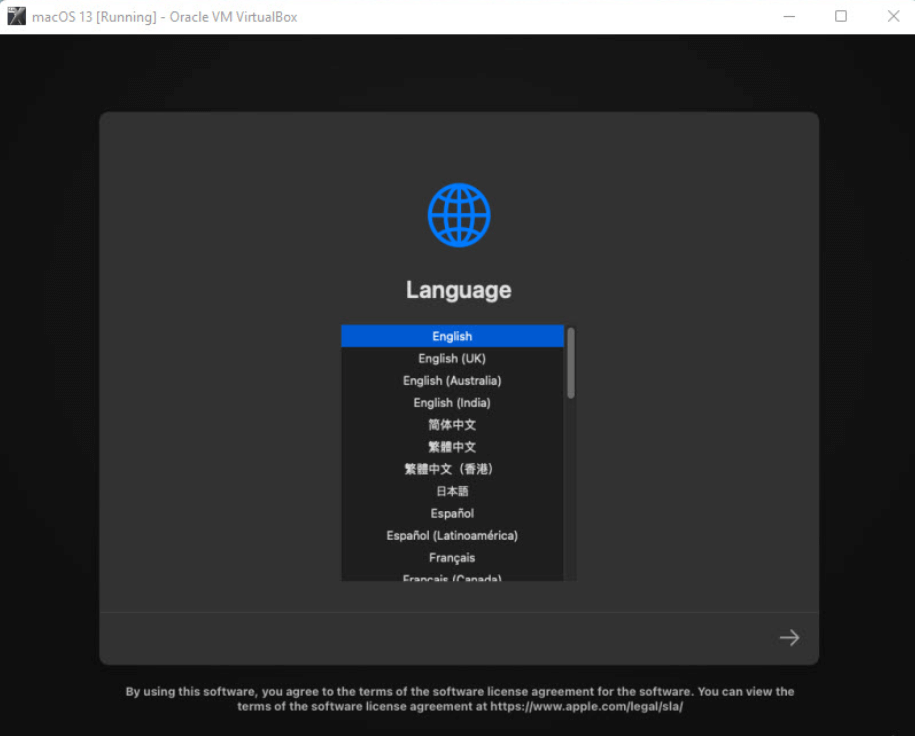 Select your Language
 Step 3. Now, On the macOS Ventura utility, click on the disk utility.
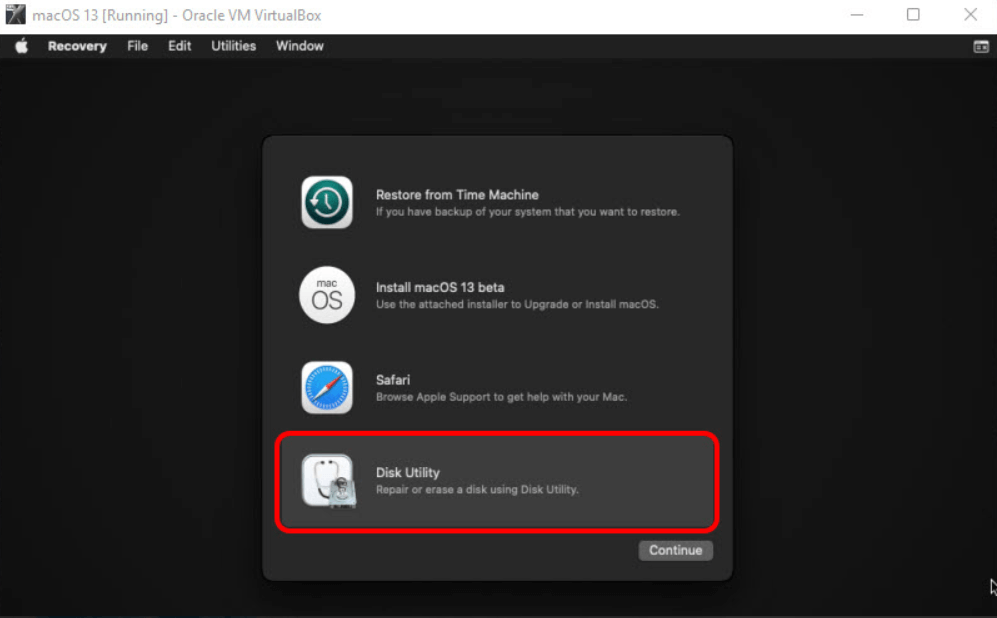 Click on the disk utility
 Step 4. Now, select the hard drive and then click on Erase, and a new dialog box will open where you can configure the settings such as name, format, and scheme.
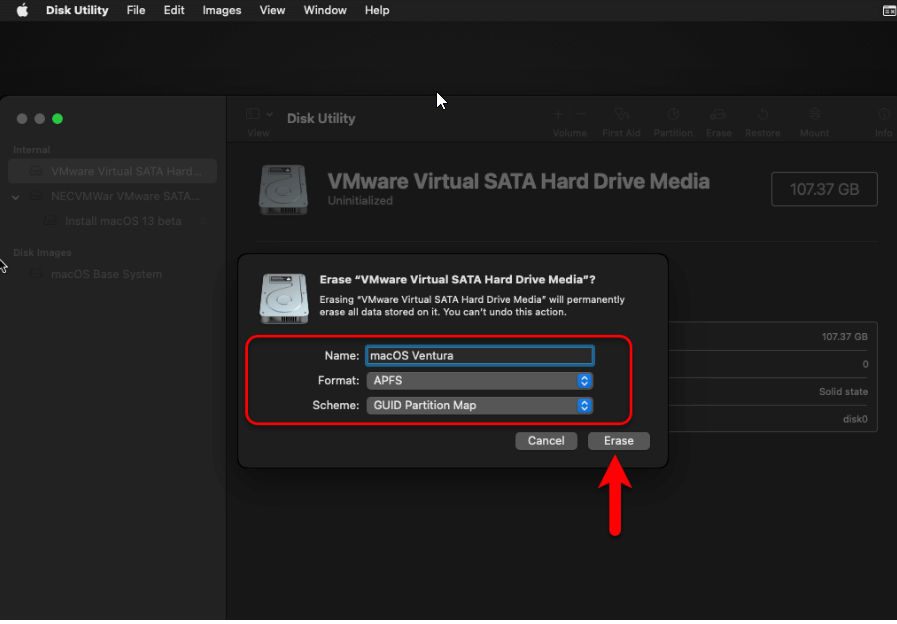 Click on the Erase
 Step 5. Close the disk utility and then you are again in the MacOS recovery Window and then select the install macOS Ventura.
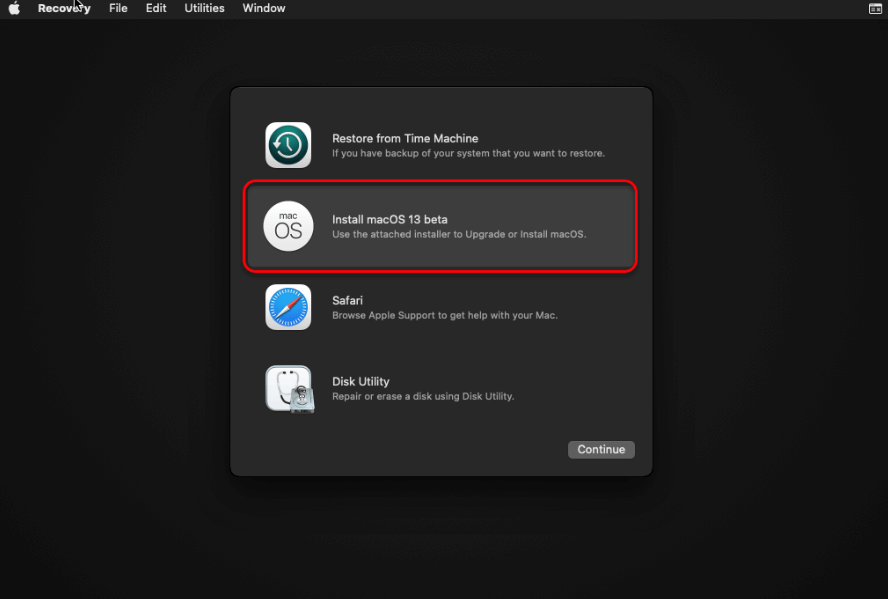 Click on the install macOS Ventura
 Step 6. Click on the Agree.
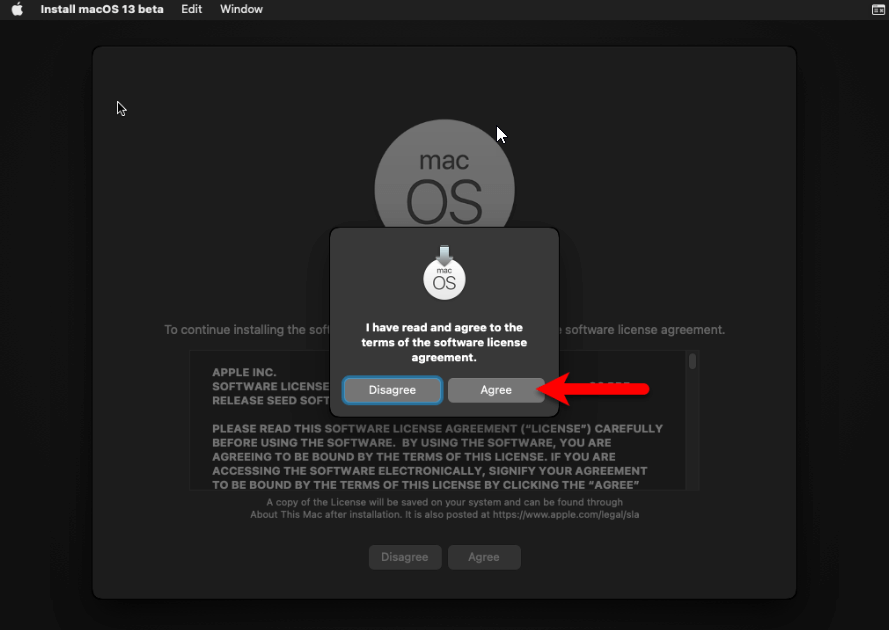 Click on the Agree
 Step 7. Select the drive that your partition and click on the Continue.
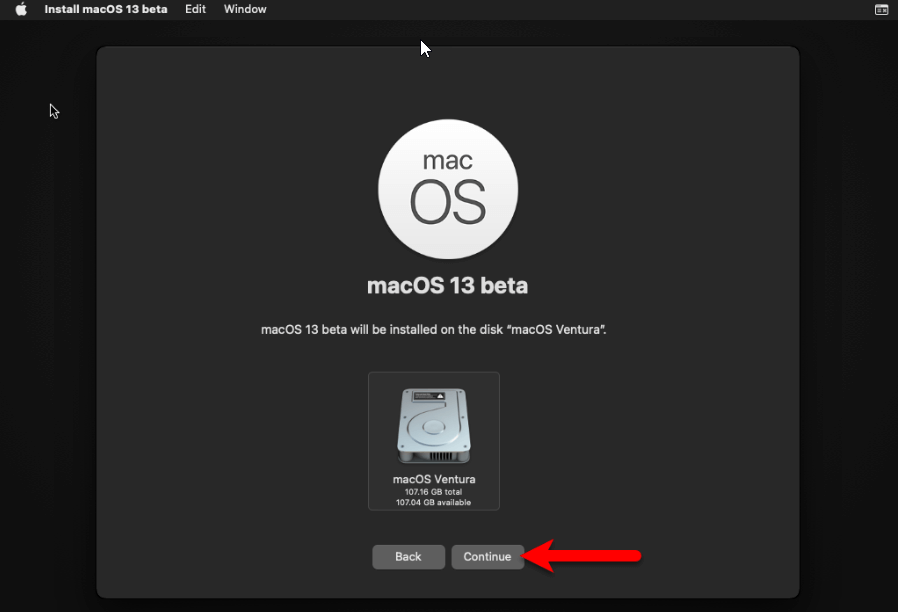 Click on the Continue
 Step 8. Once it is done then MacOS will restart again then you have to choose a language, and keyboard layout alongside your country.
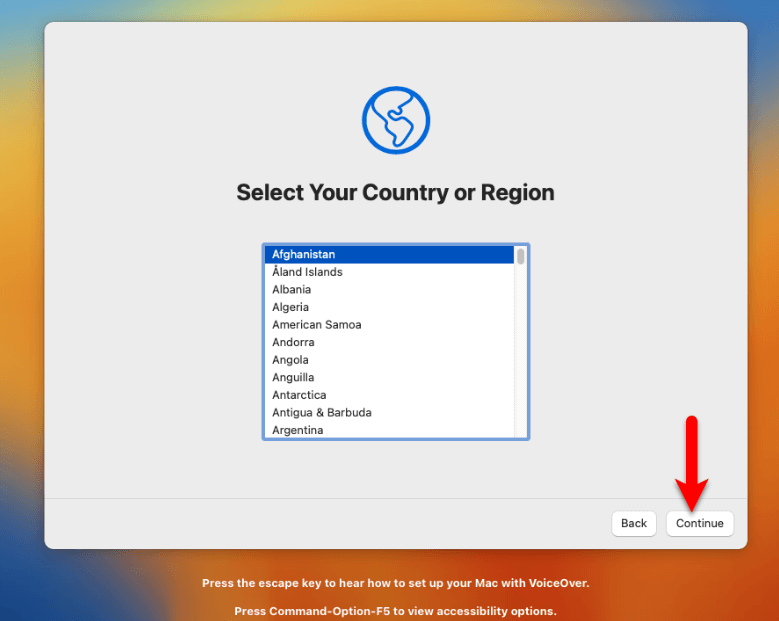 Click on the Continue
 Step 9. Now, In the accessibility, window click on the Not now.
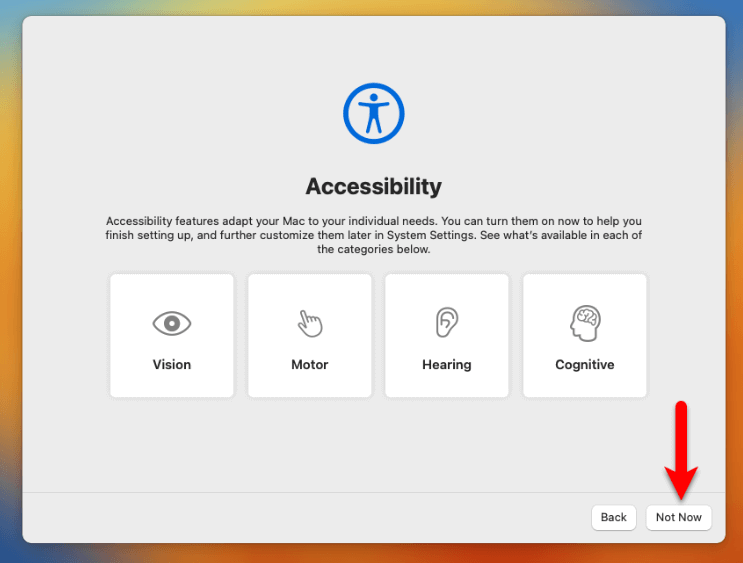 Click on the Not Now
 Step 10. On the Data and privacy click on the Continue.
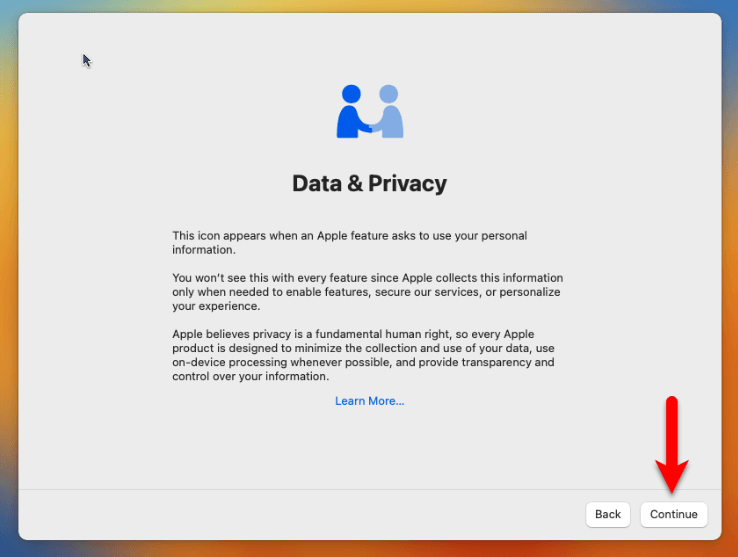 Click on the Continue
 Step 11. On the migration, the window clicks on the Not now.
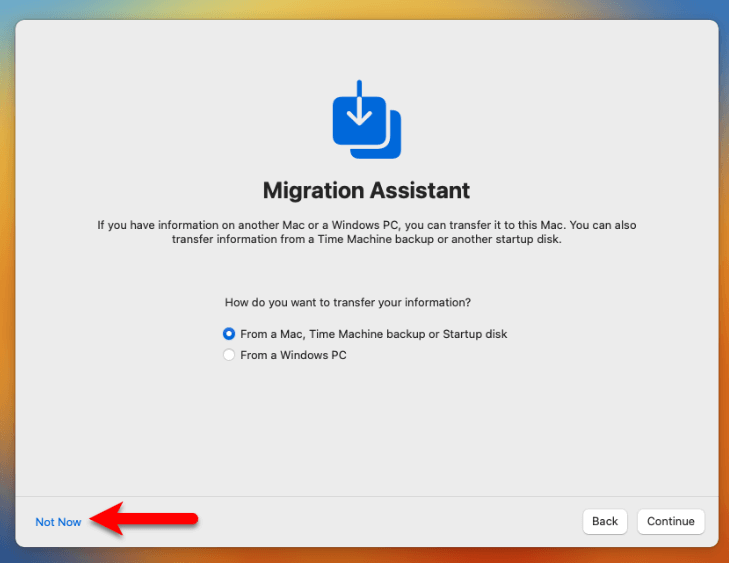 Click on the Not Now
 Step 12. Now, agree to terms and conditions.
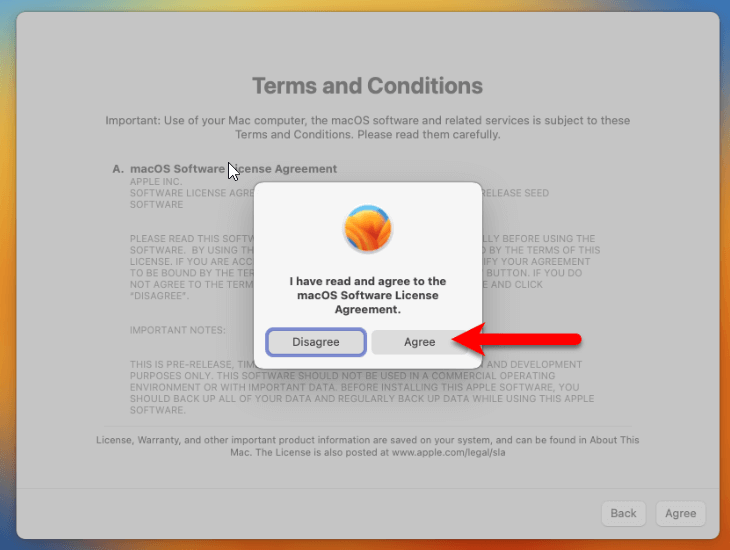 Click on the Agree
 Step 13. Create a password and a password hint.
Step 14. Click on the Continue.
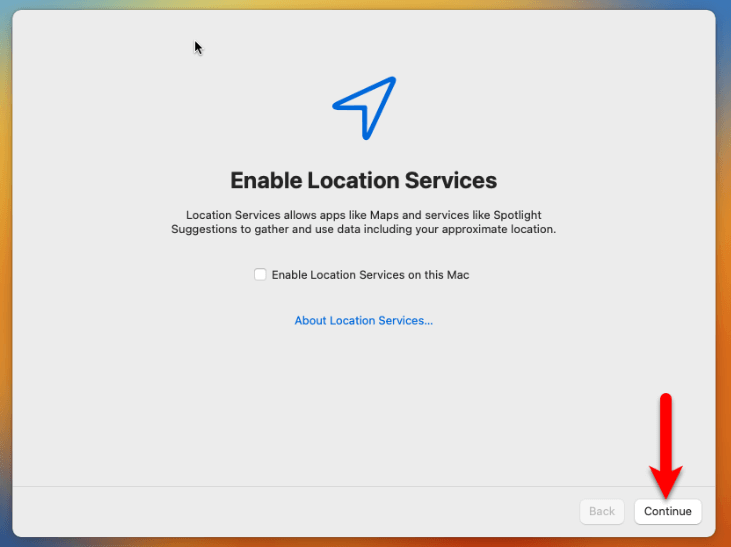 Click on the Continue
 Step 15. Do you want to use Siri on your mac if yes click on the continue and if you don’t want then uncheck the box of Siri and click on the continue?
Step 16. Choose a theme for your Mac and move on.
Step 17. Wait for the first appearance of the macOS Ventura.
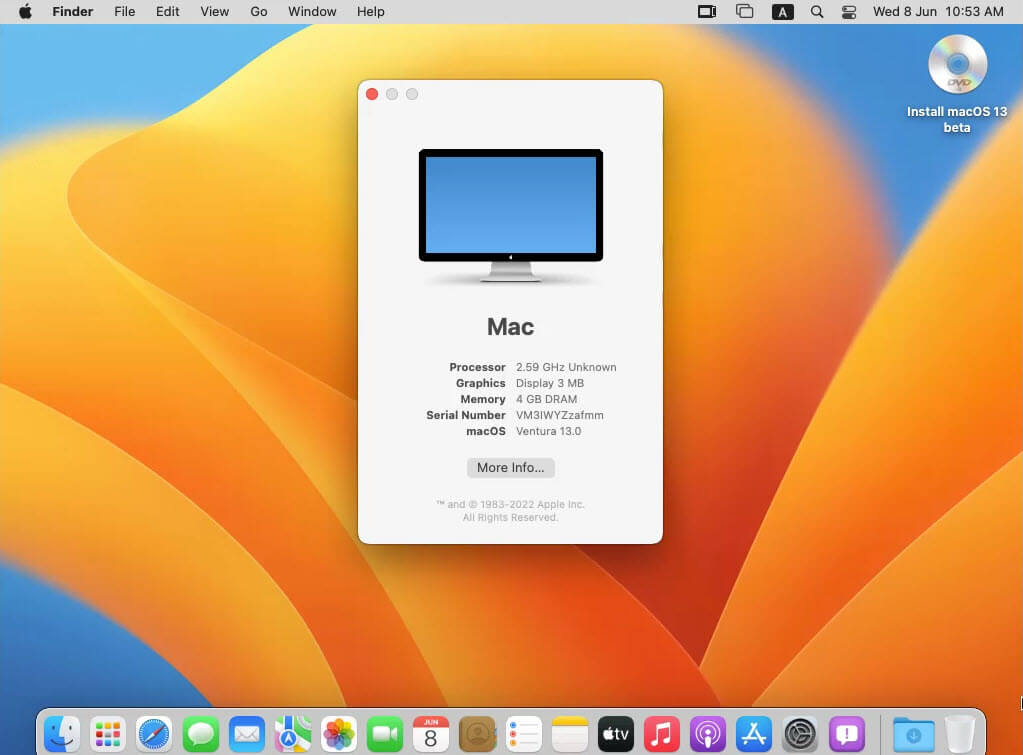 macOS Ventura on VirtualBox
 Final Words
It was all about How to Install macOS Ventura on VirtualBox on Windows PC. I am pretty sure that after installing and using macOS Ventura on VirtualBox, you will learn something new and know more about macOS Ventura. So, once you have used it then you might consider switching to macOS Ventura forever. At last, I hope you haven’t faced any problems while installation if faced then let us know in the comment section down below.
Tagged
Share This Article
In this article, I am going to guide you on How to Install macOS Ventura on VirtualBox on Windows PC? macOS unveiled a new operating system that is MacOS 13 Ventura. Apple has announced many other operating systems like iPadOS 16, iOS 16, watchOS 9, and a new macOS by the name of macOS Ventura. Every year at WWDC (Worldwide Developer Conference) we will get a new operating system with a bunch of new and unique features. It is the successor of macOS 12 and macOS 11. However, everyone is curious to test and try the amazing features of macOS Ventura.
But how Windows users can install and test macOS Ventura. There is a good platform for Windows users to install macOS Ventura which is VirtualBox and VMware. Yes, you heard right that you can easily install macOS Ventura on VirtualBox and VMware and use its full features and functionalities. Anyhow, the installation procedure of macOS on virtual machines is a bit lengthy, and once you do that you won’t regret it because you will really enjoy using it.
We are showing you the step-by-step tutorial on How to Install macOS Ventura on VirtualBox on Windows PC. All you need to do is follow and read each step in order to avoid errors. We have also attached screenshots of the steps in order to understand the steps properly.
Get Required Files
- A working computer with 8GB RAM
- Download VirtualBox Latest Version
- Also Download VirtualBox Extension Pack
- Download macOS Ventura ISO Image
- VirtualBox codes to avoid errors
1. Install VirtualBox and Extension Pack
Download and Install VirtualBox latest version from the given above link. And also don’t forget to install its extension pack which is very important.
VirtualBox 2. Create a Virtual Machine for the macOS Ventura
Step 1. Turn on your computer and then open the Virtualbox and click on the Next.
Click on the New Step 2. Name your virtual machine, you can Simply put macOS Ventura and click on the Next.
Click on the Next Step 3. Now, increase the memory size and click on the Next.
Click on the Next Step 4. Select the create a new virtual hard disk and click on the Create.
Click on the Next Step 5. Select any hard disk type that you wish and then click on the Next.
Click on the Next Step 6. Select the dynamically allocated and click on the Next.
Click on the Next Step 7. Increase the amount of storage for the virtual machine that you need Click on the Create.
Click on the Create 3. Set up Settings for macOS Ventura Virtual Machine
Step 1. When it is created then click on the Setting.
Click on the Setting Step 2. Go to the Display tab and then increase the video memory to 128 MB.
increase the video memory to 128 MB Step 3. Go to the processor tab and increase the number of processors to 2.
increase the number of processors to 2 Step 4. Go to the storage tab and then click on the Empty and Click on the CD icon.
Click on the CD icon Step 5. Now, select the ISO file and click on the open.
Click on the Open Step 6. Go to the USB Tab, and enable USB 3.0.
4. VirtualBox commands
Now, open the code file that you download from up and then press Press + H type the VM Name, and on the next box, type macOS Ventura and then click on the Replace All.
Click on the Replace All Open CMD and then run it as administrator and then type all code one by one on CMD.
type all code one by one on CMD 5. Install macOS Ventura on VirtualBox
Step 1. Now, Open VirtualBox and right-click on the virtual machine that you created, and click on the start.
Click on the Start Step 2. Wait for a few minutes until the codes come and then the apple logo is gone and then select a language that you want.
Select your Language Step 3. Now, On the macOS Ventura utility, click on the disk utility.
Click on the disk utility Step 4. Now, select the hard drive and then click on Erase, and a new dialog box will open where you can configure the settings such as name, format, and scheme.
Click on the Erase Step 5. Close the disk utility and then you are again in the MacOS recovery Window and then select the install macOS Ventura.
Click on the install macOS Ventura Step 6. Click on the Agree.
Click on the Agree Step 7. Select the drive that your partition and click on the Continue.
Click on the Continue Step 8. Once it is done then MacOS will restart again then you have to choose a language, and keyboard layout alongside your country.
Click on the Continue Step 9. Now, In the accessibility, window click on the Not now.
Click on the Not Now Step 10. On the Data and privacy click on the Continue.
Click on the Continue Step 11. On the migration, the window clicks on the Not now.
Click on the Not Now Step 12. Now, agree to terms and conditions.
Click on the Agree Step 13. Create a password and a password hint.
Step 14. Click on the Continue.
Click on the Continue Step 15. Do you want to use Siri on your mac if yes click on the continue and if you don’t want then uncheck the box of Siri and click on the continue?
Step 16. Choose a theme for your Mac and move on.
Step 17. Wait for the first appearance of the macOS Ventura.
macOS Ventura on VirtualBox Final Words
It was all about How to Install macOS Ventura on VirtualBox on Windows PC. I am pretty sure that after installing and using macOS Ventura on VirtualBox, you will learn something new and know more about macOS Ventura. So, once you have used it then you might consider switching to macOS Ventura forever. At last, I hope you haven’t faced any problems while installation if faced then let us know in the comment section down below.