How to Enable & Create A Restore Point in Windows 11?

In this article, you will learn How to Enable & Create A Restore Point in Windows 11? Do you want to enable & create a restore point? If absolutely yes then follow the method down below. However, Windows 11 have many advanced features but one of the best features is Restore Point. Moreover, Restore point is helpful everywhere like if your PC is having any kind of problem then Restore Points will help you to solve the issue or get rid of the issue. One of the best things in Restore Point is that if you restore your PC then if the restore point is enabled then your personal files will not delete. Further, if you want to enable & create a Restore Point then you need to read this article.
How to Enable A Restore Point
Step 1. First of all, you need to press Win Key + R to open the run dialog.
Step 2. When the Run is launched then type sysdm.cpl after that hit the Enter.
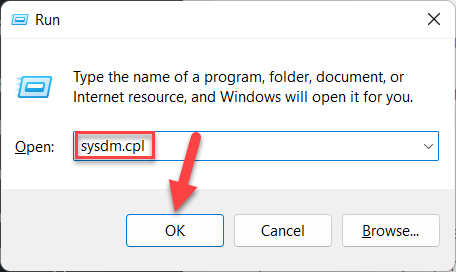 sysdm.cpl
 Step 3. Now, go to the System Protection tab.
Step 4. Next, select any of the drivers that you want to enable in the section of Protection settings then click on the Configure.
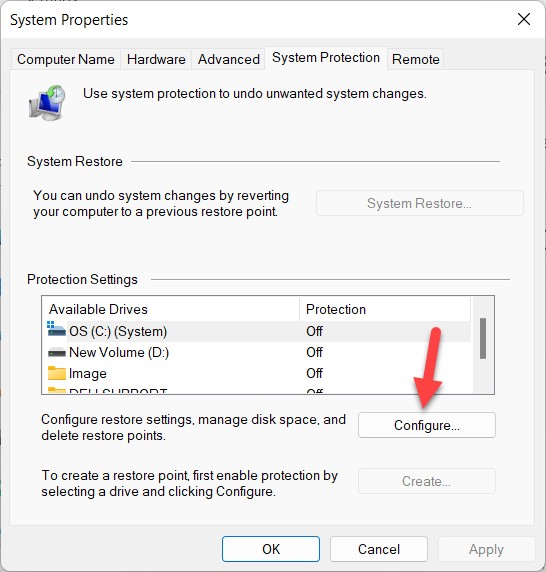 Click on the Configure
 Step 5. However, check the box of Turn on System Protection then click on the Apply and you can also adjust the max usage by moving the slider.
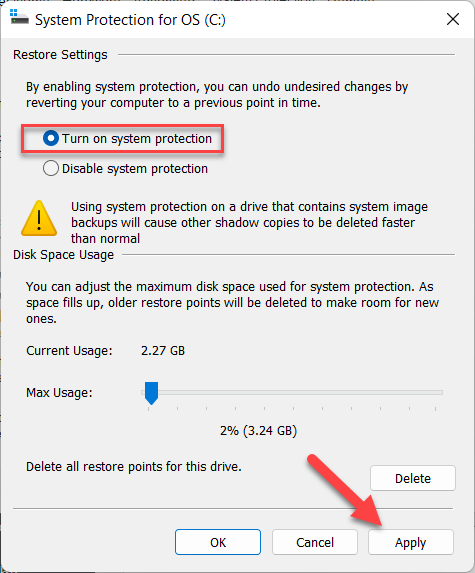 Click on the Apply
 How to Create A Restore Point
Step 1. At first, open the system properties from the run dialog.
Step 2. When the system properties are open the head towards the System Protection tab.
Step 3. Choose the driver to create a system point then click on the Create. Don’t forget if the driver is disabled then you can’t create a restore point.
 Click on the Create
 Step 4. After that give a name to your restore point then click on the Create.
 Click on the Create
 Step 5. Now, it will start creating store points you need to wait for a while.

Step 6. Finally, you successfully create a restore point.
Bottom Line
It was all about How to Enable & Create A Restore Point in Windows 11? I hope this article is very helpful for you to create a Restore Point. From this article, you will get something good. This is the right place where you can easily solve your problem. After following these steps I hope you will not face any kind of problem. If you faced any kind of problem and if you have any type of suggestions then do comment.
Related Posts:
Tagged
Share This Article
In this article, you will learn How to Enable & Create A Restore Point in Windows 11? Do you want to enable & create a restore point? If absolutely yes then follow the method down below. However, Windows 11 have many advanced features but one of the best features is Restore Point. Moreover, Restore point is helpful everywhere like if your PC is having any kind of problem then Restore Points will help you to solve the issue or get rid of the issue. One of the best things in Restore Point is that if you restore your PC then if the restore point is enabled then your personal files will not delete. Further, if you want to enable & create a Restore Point then you need to read this article.
How to Enable A Restore Point
Step 1. First of all, you need to press Win Key + R to open the run dialog.
Step 2. When the Run is launched then type sysdm.cpl after that hit the Enter.
sysdm.cpl Step 3. Now, go to the System Protection tab.
Step 4. Next, select any of the drivers that you want to enable in the section of Protection settings then click on the Configure.
Click on the Configure Step 5. However, check the box of Turn on System Protection then click on the Apply and you can also adjust the max usage by moving the slider.
Click on the Apply How to Create A Restore Point
Step 1. At first, open the system properties from the run dialog.
Step 2. When the system properties are open the head towards the System Protection tab.
Step 3. Choose the driver to create a system point then click on the Create. Don’t forget if the driver is disabled then you can’t create a restore point.
Click on the Create Step 4. After that give a name to your restore point then click on the Create.
Click on the Create Step 5. Now, it will start creating store points you need to wait for a while.
Step 6. Finally, you successfully create a restore point.
Bottom Line
It was all about How to Enable & Create A Restore Point in Windows 11? I hope this article is very helpful for you to create a Restore Point. From this article, you will get something good. This is the right place where you can easily solve your problem. After following these steps I hope you will not face any kind of problem. If you faced any kind of problem and if you have any type of suggestions then do comment.
Related Posts: